

You're sitting at a kitchen table or a bedroom desk, a fresh sheet taped down, a still life in front of you and two pencils in your hand. Graphite feels safe. Charcoal feels risky, messy and harder to control. That hesitation is exactly why charcoal pencils drawing deserves serious practice, because assessors can see within seconds whether you understand tone, edge and decision making, and charcoal doesn't let you hide behind faint, polished lines.
Table of Contents
- Why Charcoal Pencils Deserve a Place in a UK Art Portfolio
- Choosing Your Charcoal Pencil, Paper and Basic Kit
- A Reliable Workflow From First Mark to Five-Value Study
- Mark-Making, Blending and Erasing With Intention
- Building Portfolio Evidence for Level 2 and Level 3 Art
- Safe Studio Habits, Dust Control and Fixative the Right Way
- Quick Reference and Common Questions
Why Charcoal Pencils Deserve a Place in a UK Art Portfolio
A student I marked last year submitted a graphite mug study that was neat, accurate and completely flat. Next to it was a second version in charcoal pencil, rougher at the edges but with a real cast shadow, a lifted highlight and a dark accent under the rim. The second drawing carried the portfolio conversation. It showed looking, not just copying.
That's not a modern classroom preference. The National Portrait Gallery guidance on drawing techniques and materials explains that charcoal or chalk may be used to draw an image before painting or as the medium for completed portraits. In other words, charcoal counts as both preparatory drawing and finished work in UK museum practice, which matters when you're deciding whether a study belongs in a portfolio or in the recycling.
What the Material Actually Is
Traditional charcoal is generally made from burnt, blackened willow twigs. Tate describes it as a carbon-based, black, crumbly material traditionally produced by heating thin, peeled willow twigs without oxygen. Particles lodge in paper or textile fibres, creating dense marks where pressure is greatest and softer, powderier edges around them.
That particle behaviour explains everything students find frustrating and useful. Charcoal is less precise than graphite, it smudges readily, and it's particularly suited to rapid studies, tonal modelling, under-drawing and expressive mark-making. If you want a forensic contour, pick graphite. If you want to prove you can model form in light, pick charcoal.
Where the Pencil Form Comes From
Processed or compressed charcoal was developed during the twentieth century, when manufacturers added a binder to powdered charcoal to make a more durable form than ordinary willow or vine charcoal. Charcoal pencils belong to that development. They put bound charcoal in a familiar wood-cased format, so you get pencil-like handling without losing strong blacks.
A charcoal pencil isn't a compromise tool for beginners. It's loose charcoal made governable, and governable doesn't mean tame.
For UK learners, the medium's technical identity rests on carbon composition, oxygen-free production and particle-based tonal variation. Understand those three properties and you stop blaming the tool when a highlight goes grey. You start managing pressure, paper tooth and lift-out, which is the skill portfolio reviewers are testing.
Choosing Your Charcoal Pencil, Paper and Basic Kit
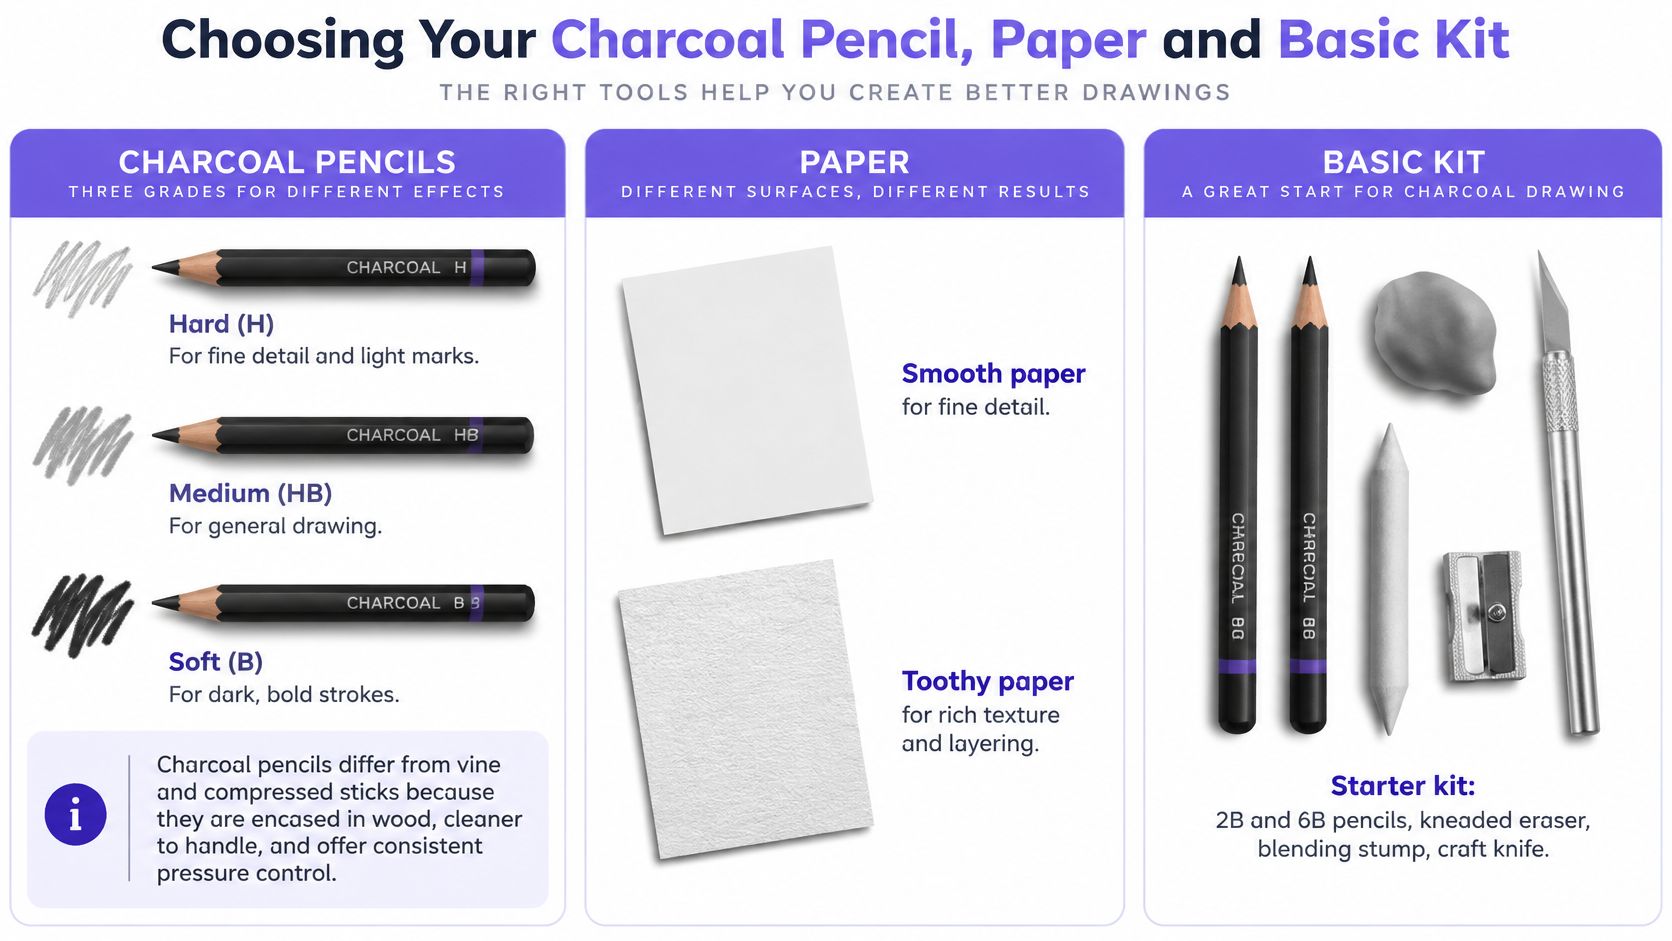
Buy in the order you'll use things, not in the order shops display them. Start with paper, because the wrong paper defeats a good pencil every time. Charcoal particles need tooth, a slight texture that catches and holds them. Very smooth paper gives you slippery, pale marks and highlights you can't clean. A textured, conservation-quality drawing paper holds layers and lets a kneaded eraser lift tone back.
Pencil, Stick or Vine
Vine charcoal is soft, light and easy to dust away, so it's forgiving for first gestures. Compressed sticks lay down intense darks fast but they're messy in a small home studio. A charcoal pencil wraps powdered charcoal with a binder inside wood, giving you cleaner hands, a point you can sharpen, and consistent pressure control.
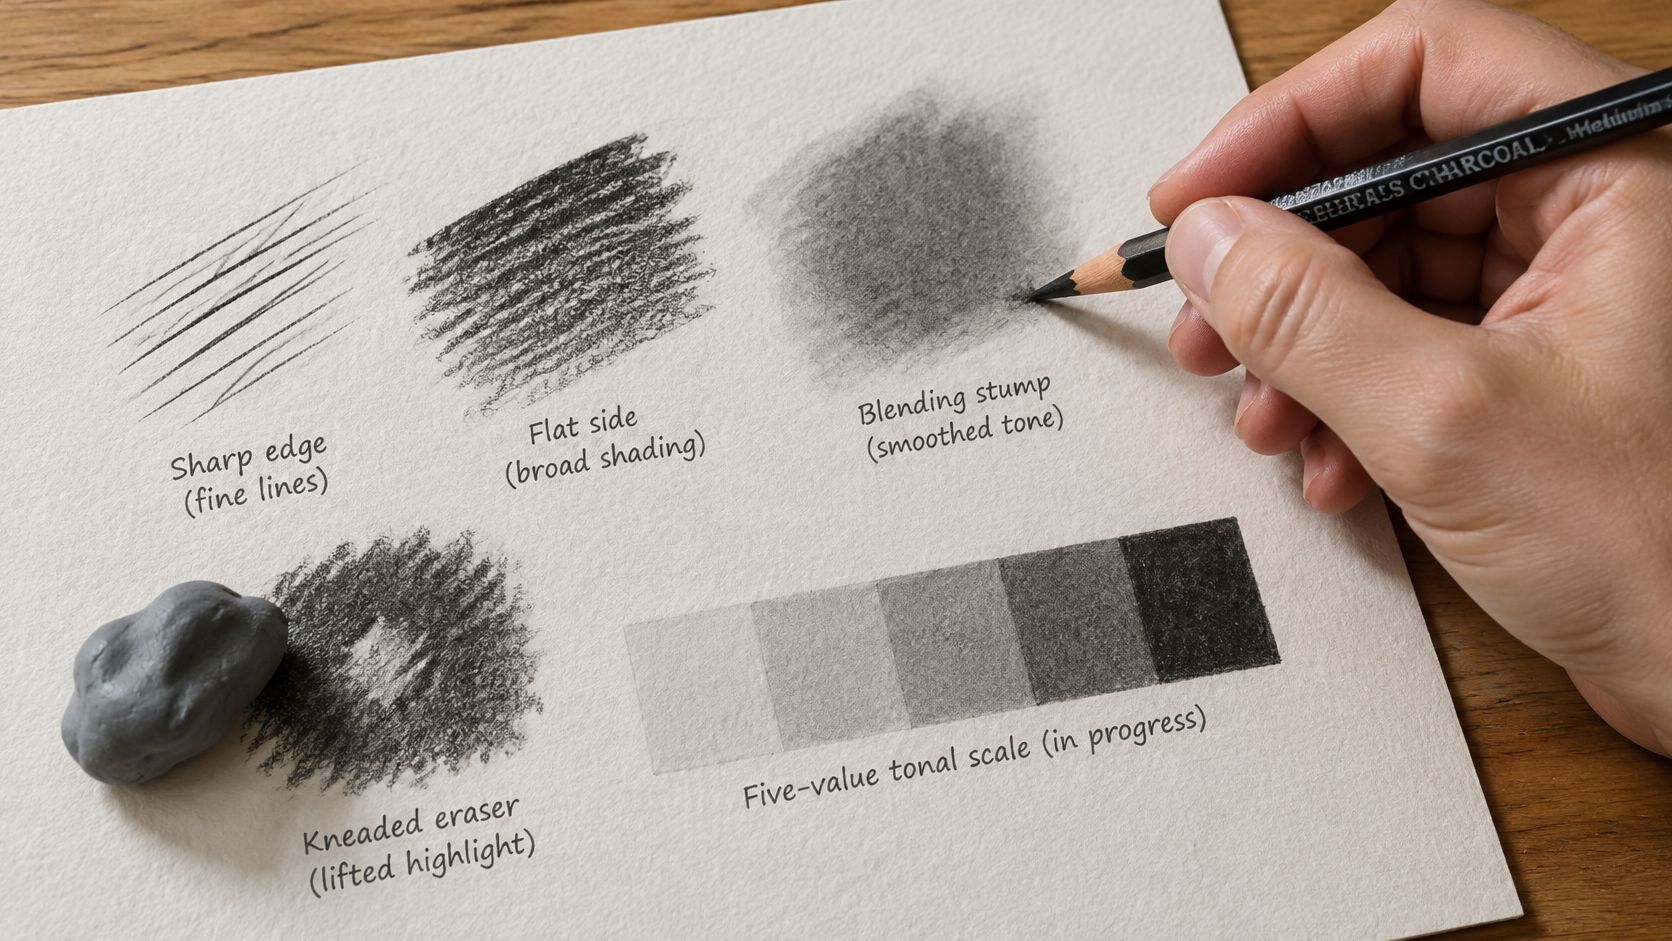
Britannica notes, in material summarised for learners, that a pointed charcoal pencil can produce hair-thin lines while its broad side creates even planes. That's your practical test in the shop. If you can't get both a fine line and a flat tone from one pencil on a test pad, try a different grade.
- Hard grades: Better for light construction lines, measured edges and detail that mustn't bloom.
- Medium grades: Your general workhorse for blocking and building mid tones.
- Soft grades: Darkest accents and bold shadows, but they blunt quickly and smudge if you're heavy-handed.
A Minimum Viable Kit
You don't need a boxed set to start. A workable starter kit is one graphite pencil for initial measurement, one medium charcoal pencil, a kneaded eraser, suitable paper and a basic blending tool such as a stump or a folded tissue. Add a craft knife or sharpener that doesn't chew the core. Upgrades only matter when they solve a visible problem, better paper for layering, a softer pencil when your darks cap out at grey.
Storage sounds trivial until a soft core snaps in a bag. If you're carrying pencils to school, college or a life class, the practical advice in Grainmark Leather recommendations on protecting tools in transit is worth applying to charcoal, which breaks more readily than graphite.
There's a local lineage here too. Museum history associated with Keswick records that the Cumberland Pencil Company was established in Keswick in 1832, following the Borrowdale graphite discovery in Cumbria, as documented in Derwent Pencil Museum history and photographs. Graphite and charcoal are different materials, but Britain's portable, wood-cased drawing tool tradition is the reason the pencil format feels so natural.
Charcoal Drawing Tools at a Glance
| Tool | Best for | Watch out for |
|---|---|---|
| Vine charcoal | Light gesture and correction | Fades if overworked |
| Charcoal pencil | Controlled tone and detail | Core snaps under pressure |
| Compressed stick | Fast, dense darks | Messy, harder to lift |
| Kneaded eraser | Lifted highlights | Goes dirty and smears |
A Reliable Workflow From First Mark to Five-Value Study
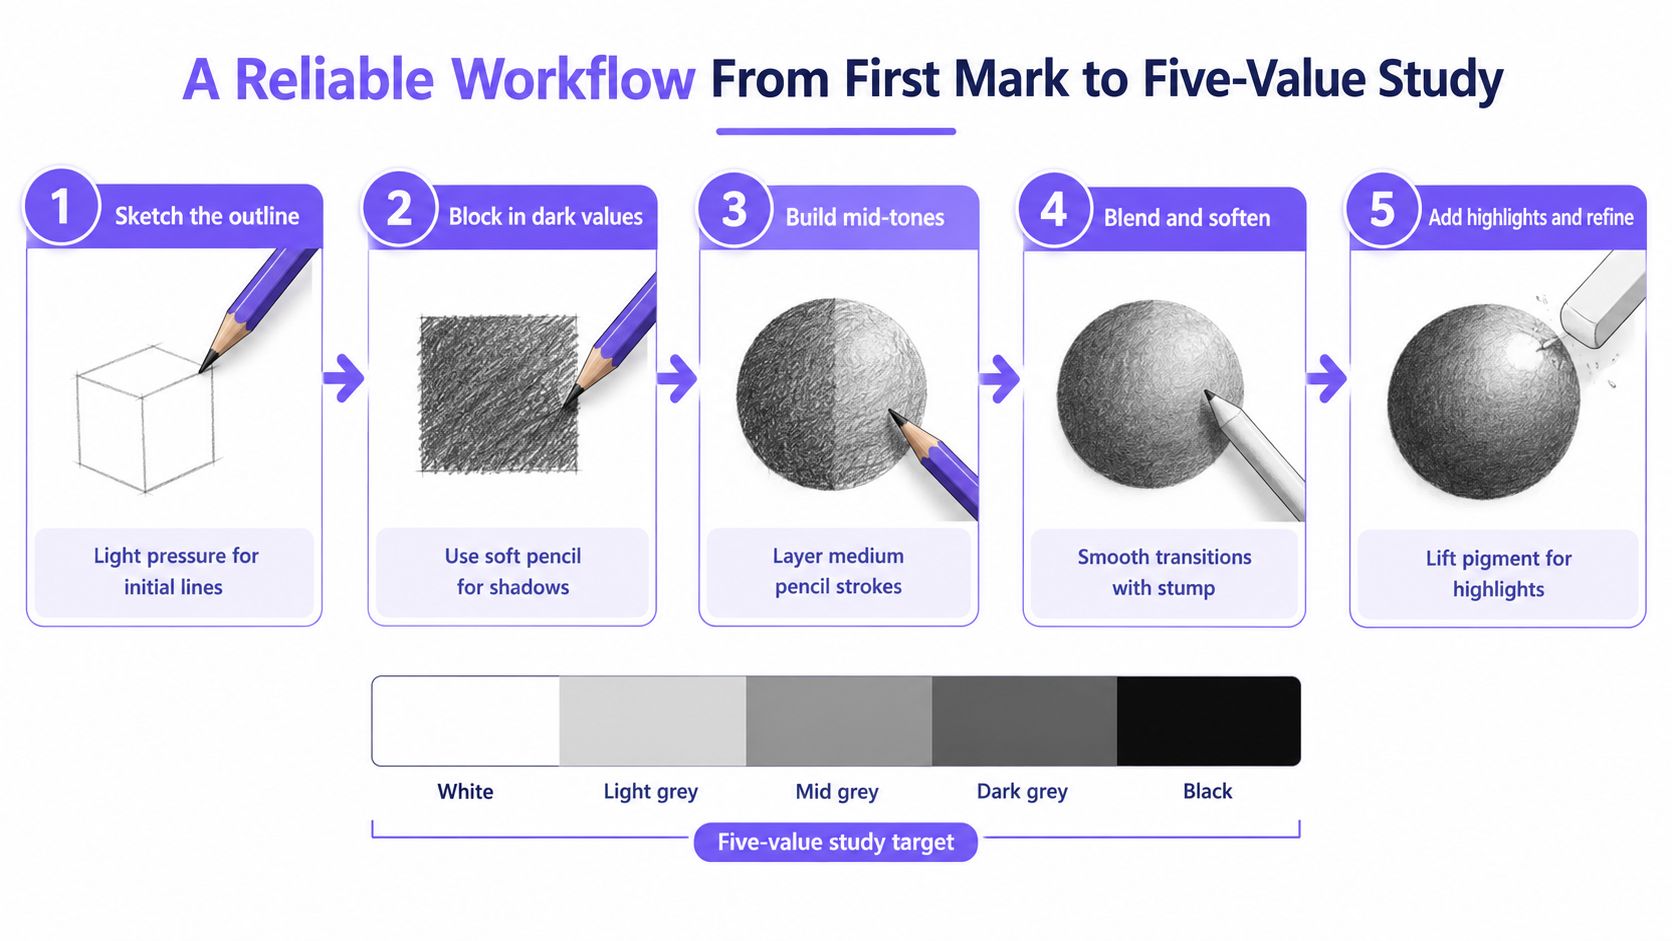
Most failed charcoal drawings don't fail at the detail stage. They fail in the first ten minutes, when a student presses hard on a contour, commits to an outline and leaves nowhere for tone to go. Work in a fixed sequence and you avoid that trap.
The Six Stage Sequence
University College London's material guidance, available through the UCL Methods Room material museum exhibitions, records that vine charcoal comes in soft, medium and hard grades, powdered charcoal can tone a whole surface, and compressed charcoal combines charcoal powder with gum binder, with binder quantity controlling hardness. Build your workflow around that behaviour.
- Choose textured paper first: Tape it down so it can't shift when you work side-on.
- Establish proportion lightly: Use vine charcoal or a hard charcoal pencil for gesture and placement, with lines you can dust back.
- Block broad values side-on: Hold the pencil at a low angle and map shadow families before any detail.
- Deepen darks progressively: Switch to the point, layer rather than grind, and rotate the pencil to preserve a clean point.
- Lift highlights: Shape a kneaded eraser to a point or edge and pull light back where it belongs.
- Reserve focal accents: Save your sharpest edges and maximum darks for the focal area only.
A sphere is the classic training subject for a reason, and working through drawing a sphere step by step in charcoal pencil forces you to separate halftone, core shadow and reflected light without hiding behind texture.
The Five-Value Gate
Don't add detail until you can point to five clearly separated value groups on the page. Those are paper white, light halftone, middle tone, dark tone and maximum dark. If two groups merge when you squint, the drawing isn't ready for eyelashes, wood grain or lettering.
Practical rule: If the five values don't read from across the room, close detail won't rescue the drawing up close.
The main pitfall is overworking early contours. Excessive pressure compresses paper texture, reduces its capacity to accept later layers and makes highlights difficult to recover. Test pressure and grade on a scrap strip of the same paper before you start. It takes thirty seconds and it saves the sheet.
Rubbing or pulverising marks produces softer intermediate tones, which is useful for halftones, but don't rub everything. A drawing where every transition is blurred reads as indecisive. Keep some transitions crisp, especially where a form turns sharply or an object meets its cast shadow.
Mark-Making, Blending and Erasing With Intention
Smudging isn't blending. Students conflate the two, rub an entire cheek with a fingertip, then wonder why the form has collapsed into fog. Blending is a controlled transition between value groups. Smudging, used deliberately, lightens and softens a halftone. Used everywhere, it just redistributes dirt.
Matching Tool to Mark
A blending stump gives a tight, controlled transition and works well around eyes, lips and small still life edges, but it can polish charcoal into the paper and kill later lift-out. A tortillon is softer and less precise, better for broader halftones. Fingers are fast and responsive, but skin oils can fix tone unevenly and you'll transfer charcoal to every white area you touch afterwards. A chamois cloth lays a very even, pale tone across a large area, useful for backgrounds, useless for edges.
The pencil itself does more than students expect. Rotate it and you refresh the point. Drop to the side of the lead and you get a broad plane. Increase pressure in stages and you darken without changing tools. For portrait work, that contrast between a hair-thin line at an eyelid and a flat plane across a shadowed jaw is the whole game, and working through step-by-step pencil portrait tips alongside charcoal practice helps you see where graphite habits help and where they hold you back.
Erasing is drawing, not correction. A kneaded eraser pinched to a wedge lifts a sharp highlight on a bottle. Dabbed flat, it lowers a tone that's gone too dark without disturbing the paper as much as a plastic eraser would. Clean it by stretching and folding, or you'll stamp grey marks back on.
Troubleshooting the Usual Failures
- Smudgy highlights: You're lifting with a dirty eraser or your hand is resting in the darks. Work from the lightest area outward and use a bridge or spare sheet under your hand.
- Dead blacks: You've ground one layer flat instead of layering. Build darks in passes and leave a trace of paper texture alive.
- Disappearing contours: You blended across an edge that needed to stay separate. Restate it with the point, only at the focal area.
Charcoal sits close to other powdery media in how it behaves on tooth, so if you enjoy this lift-and-layer way of working, exploring soft pastel drawing techniques later will feel familiar rather than foreign.
Building Portfolio Evidence for Level 2 and Level 3 Art
A single good charcoal study is not portfolio evidence yet. It becomes evidence when you can show observation, development, decision making and reflection around it. That's the gap between a pleasant sketchbook page and work an assessor can mark, and it's where Level 2 and Level 3 students aiming for university most often undersell themselves.
What the Levels Actually Mean
In England, Wales and Northern Ireland, GCSE grades 9 to 4 are classified as Level 2, while A levels, Access to Higher Education Diplomas and Level 3 National Diplomas are classified as Level 3, according to the UK government guide to qualification levels. A Level 2 art qualification sits broadly at GCSE standard. A Level 3 qualification aligns with advanced study and can support degree applications, though you must still check each university's published entry requirements for subjects, grades and portfolios.
The Office for National Statistics similarly describes Level 2 as five or more GCSE passes at grade 4 and above or equivalent, and Level 3 as two or more A levels or equivalent, in its ONS workforce qualification levels technical annex for Census 2021. Verify whether your programme is a full Level 2 or full Level 3 award, not just an introductory unit, and how your target university treats it.
Government data recorded 814,335 A-level results in summer 2025 across 137 qualifications from four awarding organisations, as set out in the qualification results in England summer 2025 publication. That scale underlines the point. A regulated Level 3 qualification is formal evidence of advanced study. Your portfolio must separately demonstrate experimentation and critical decisions.
Turning One Study Into Evidence
Photograph the subject and your setup. Keep the failed first blocking. Annotate where you changed a proportion, why you lifted a highlight, and what you'd do differently. Then produce a second, resolved version. That sequence, observed study, tonal analysis, annotation, reflection, revised outcome, is what tutors can feed back on and what universities recognise as development. Structured guidance on building your artistic portfolio for progression will help you curate rather than accumulate pages.
Cost is a real constraint, not an excuse assessors expect you to hide. UK government participation data reports that 84% of people aged 16 and over engaged with the arts in 2025/26, while physical engagement fell from 90% to 83% year-on-year, in the Community and Engagement Survey 2025/26 summary report. Reporting on that evidence identifies cost as the second-most recorded barrier to arts engagement. A staged buying plan, minimum kit first, upgrades when a material limit is visible in the work, is a stronger answer than buying a large set upfront.
The Online College of Art & Design (OCAD) is one UK route that structures this progression, offering tutor-led study from Level 2 certificates and iGCSE through A Level and Level 3 foundation diplomas, with portfolio coursework built around iterative feedback. Whichever route you choose, judge it by whether it makes you annotate, revise and curate, not just produce.
Safe Studio Habits, Dust Control and Fixative the Right Way
Most tutorials treat safety as a footnote. If you're drawing in a bedroom, a shared classroom or with SEND learners at home, dust control is part of the method. Get it wrong and you'll avoid the medium altogether, which is a loss, because bound charcoal in pencil form produces far less loose material than powder or sticks handled carelessly.
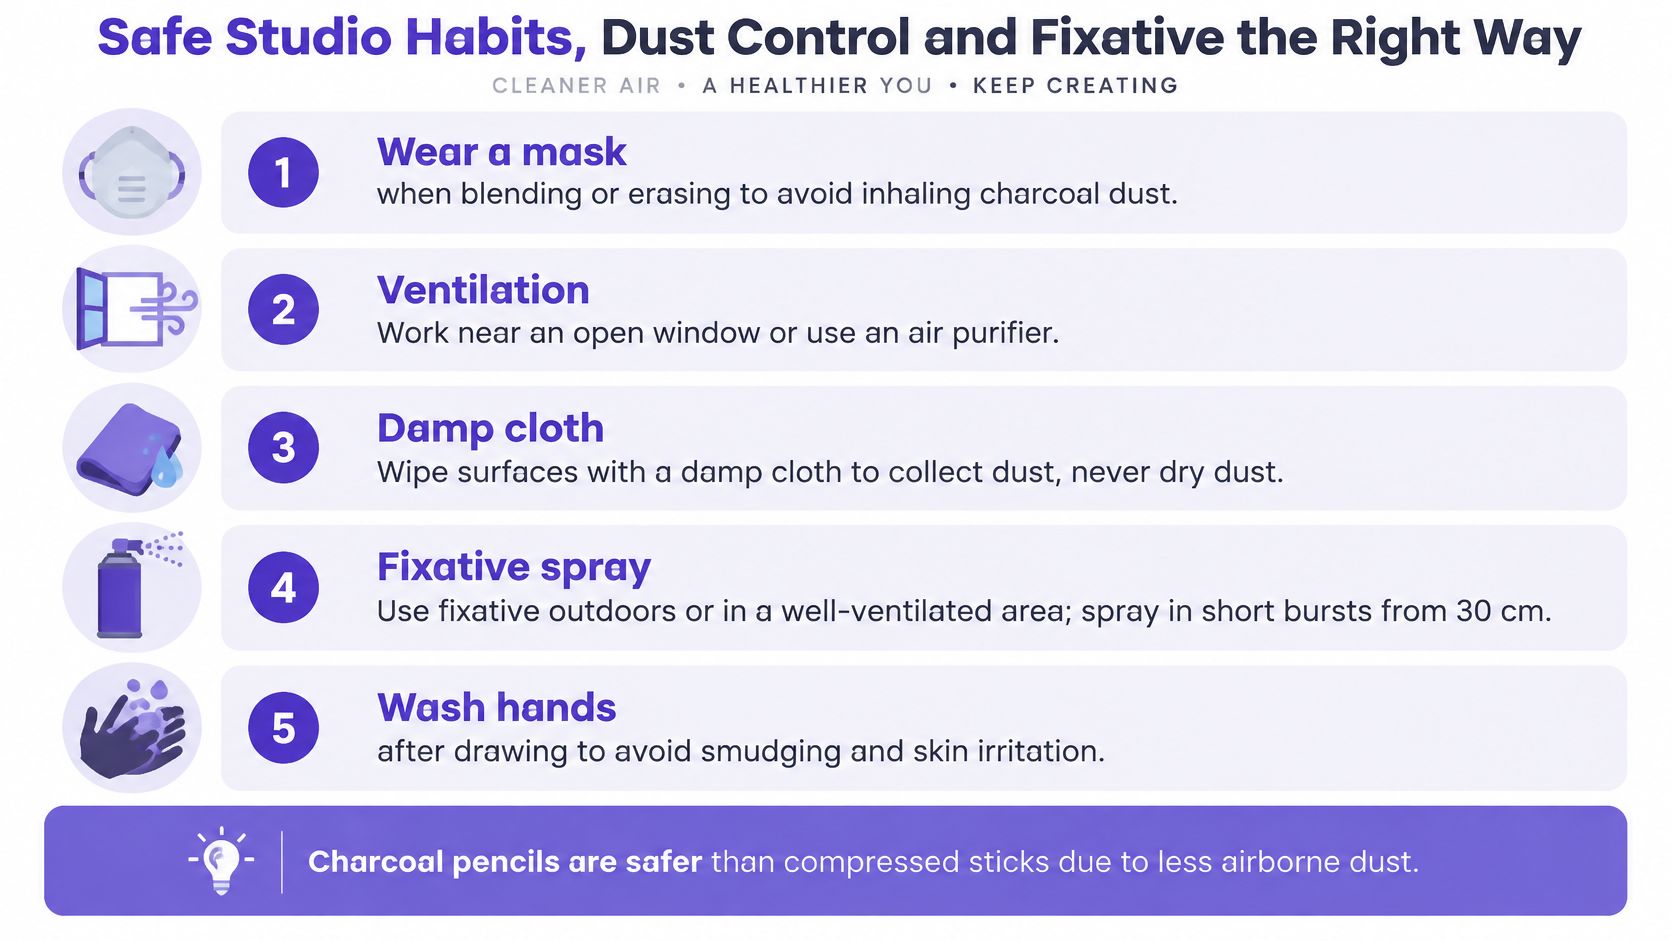
UK safety documentation, including a charcoal safety sheet hosted by Hospital Rooms, states that charcoal dust may irritate the respiratory system and recommends avoiding inhalation, preventing dust spread, washing hands and working in well-ventilated conditions. A separate UK safety data sheet says charcoal powder is not classified as hazardous but still advises ventilation, warns against inhaling loose powder, and states charcoal products are unsuitable for children under 36 months.
Non-toxic doesn't mean risk-free. With charcoal, the issue is exposure and mess, not acute poisoning, and exposure is manageable.
A Low-Dust Routine That Works at Home
Choose pencils instead of loose powder as your default. Open a window or work with ventilation running. Don't blow across the sheet, which sends particles exactly where you breathe. Tilt and tap the sheet gently to shed loose material onto a tray or paper you can fold and bin. Clean surfaces with a damp cloth so you collect dust rather than redistributing it, and wash hands before you touch door handles, keyboards or your face. If you're blending heavily or you have a respiratory sensitivity, a simple dust mask during that stage is sensible.
Fixative Without Regret
Charcoal remains vulnerable after the drawing looks finished. The UK National Archives warns that charcoal images can offset or smudge with even slight pressure, and recommends conservation-quality mounts or acid-free folders and a rebated mount for display, in its guidance on caring for prints and drawings.
Follow a strict finishing protocol. Remove loose particles by tilting, not brushing. Apply an artist-tested fixative in several light passes from the manufacturer's recommended distance, letting each pass dry. Inspect tonal change under neutral light. Store or frame behind a spacer so glazing can't touch the surface.
Don't saturate. British Museum conservation research found fixative on a historical charcoal drawing produced uneven ageing, with treated areas ageing differently from untreated areas. Test on a spare sheet with the same paper and charcoal first, note any darkening or sheen, and use the minimum consistent with handling. Avoid aerosol fixative indoors, especially around children or anyone sensitive to airborne irritants. Photograph or scan coursework before fixing, so you hold a record if contrast shifts.
Quick Reference and Common Questions
Pin this above your desk. If you can't defend each step in a tutorial conversation, that's your next practice target.
Your Progression Checklist
- Paper choice: Textured enough to hold layers and lift cleanly.
- Gesture: Light, correctable placement before any commitment.
- Value blocking: Broad shadow families mapped side-on.
- Deepening: Darks built in passes with the point.
- Lift-out: Highlights pulled back with a clean kneaded eraser.
- Focal accents: Sharpest edge and darkest dark reserved for one area.
- Documented reflection: Photographs, annotation and a stated next step.
Questions Level 2 and Level 3 Students Ask
How long should a charcoal pencil study take? Long enough to complete the five values and one revision, short enough that you don't polish a weak structure. A timed observational study followed by a slower, resolved version gives you both fluency and finish for a portfolio, which is more persuasive at Level 3 than one overworked sheet.
Is a charcoal pencil worth buying if I already own graphite? Yes, if your graphite work caps out at mid grey and your shadows lack weight. Graphite gives precision and a slight sheen. Charcoal gives matte, dense darks and liftable tone. Universities don't require charcoal specifically, but they do look for range and material understanding, and using both tools knowingly demonstrates it.
Do I need a Level 3 qualification and a portfolio for a creative degree? Usually both matter. The qualification evidences advanced study at A level standard, while the portfolio shows your development, experimentation and decision making. Check each university's entry requirements early, because specified subjects, grades and portfolio formats vary.
How do I clean a shared workspace without spreading dust? Don't dry dust or blow. Fold loose particles into scrap paper, wipe with a damp cloth, wash hands, and store drawings interleaved or mounted so surfaces don't offset onto the next person's work.
If you want your charcoal studies to count toward a recognised qualification and a university-ready portfolio, The Online College of Art & Design (OCAD) offers flexible, tutor-led online routes from Level 2 and iGCSE through A Level and Level 3 foundation diplomas, including dedicated SEND pathways. Visit the site to compare courses, see how portfolio coursework and one-to-one feedback are structured, and choose the level that matches your next step.