

You've redrawn the same Level 3 fashion figure for the third time. The pose feels promising, the jacket has a convincing collar, and you've added seams, pockets and a careful hem. Yet the garment still looks painted onto the body rather than supported by it. If you're asking how to draw clothes so they look believable, the answer starts before the first fold.
Clothing is a construction problem. Fabric responds to the body beneath it, to gravity, to movement and to the points where it's held in place. Once you draw those forces, your studies become more than attractive fashion sketches. They become evidence of observation, material understanding and design thinking, the qualities that university admissions tutors need to see in a portfolio.
Table of Contents
- Why Your Clothes Look Flat and What Tutors Actually See
- Blocking the Figure and Finding the Anchor Points
- How Different Fabrics Behave on the Body
- Building Sketchbook Studies That Read as Portfolio Work
- From Observation to Stylised Fashion Sketches
- Meeting Real UK University Portfolio Standards
- Putting It All Together Into a Study Plan
Why Your Clothes Look Flat and What Tutors Actually See
Flat clothing usually begins with decorative drawing. A student sees a reference image, notices a crease, then copies a line. Another crease appears nearby, so they copy that too. The drawing gathers detail, but none of the marks explains why the fabric bends, stretches or hangs.
A tutor looking through work from a Level 3 applicant will notice that difference quickly. They're not only checking whether the hem is neat. They're looking for structural thinking, such as whether the artist understands the figure beneath the garment, identifies contact points and shows how fabric reacts around joints. The strongest clothing studies make the body and garment feel connected.
Every garment has a hidden framework
Think of a jacket as a soft structure built around a harder one. The neck opening rests around the neck, the shoulder seam crosses a changing plane, the sleeve turns around the arm, and the cuff is held by the wrist. A loose shirt behaves differently from a fitted bodice because the garment has different points of support and different amounts of available fabric.
Folds appear where fabric is pulled, compressed or supported. They can radiate from an elbow, gather under an arm, collapse at the waist or drop vertically from a shoulder. They aren't random lines waiting to be copied. They're visual records of force.
Portfolio test: If you can explain why a fold exists, you're making a stronger study than if you've simply drawn more folds.
This mechanics-first approach connects with the long history of British fashion illustration. Fashion illustration in Britain can be traced at least to the late eighteenth century, and it was established as a distinctive visual field by the 1930s. Earlier printed dress collections appeared between 1520 and 1610, while regular journals spread in England from the 1670s onward, creating a publishing tradition that documented clothing and taste across more than three centuries. The history of fashion illustration in Britain shows that clothing drawing has long communicated construction, style and social change, not merely decoration.
A university portfolio should therefore show the decisions behind the final image. Include the rough figure, the tension map, fabric tests and edited fashion drawings. A clean final sketch matters, but the thinking around it often tells the tutor more.
Blocking the Figure and Finding the Anchor Points
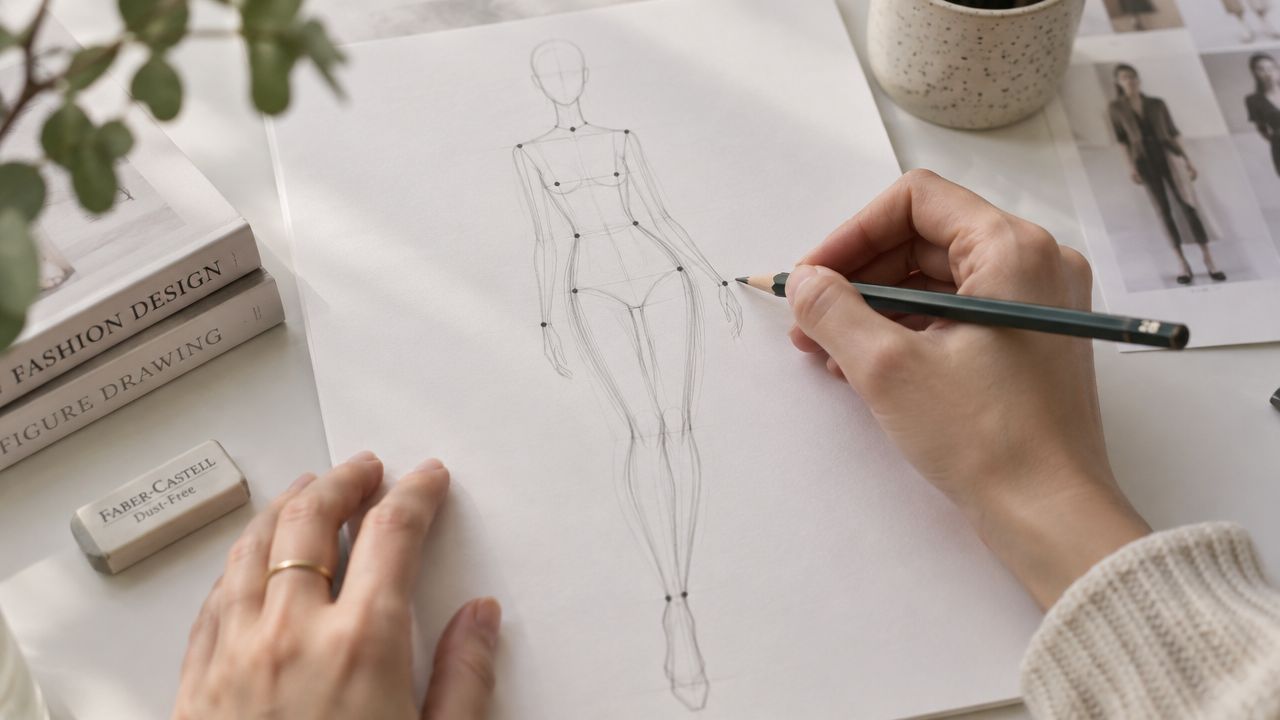
Start with the figure, not the outfit. Use a light pencil line to establish the gesture, the tilt of the shoulders, the direction of the spine and the balance of the hips. Keep this stage loose. You're building a body that the clothing can occupy, not rendering anatomy for its own sake.
Mark the contact structure
Place seven clothing anchor points:
- Neck, where collars, straps and necklines are supported.
- Shoulders, where jackets, shirts and dresses often begin to pull.
- Bust, where fabric crosses a forward curve.
- Waist, where fitted clothing compresses or changes direction.
- Hips, where a garment meets another strong body form.
- Wrists, where sleeves finish or gather.
- Ankles, where trousers, skirts and long garments end or fold around the leg.
These points form a practical scaffold. They don't need to appear heavily in the finished drawing, but they should guide the placement of seams, hems and major folds.
Map tension before wrinkles
Look for convex and concave forms. Fabric tends to stretch across a convex area, such as the elbow when the arm bends outward. It often bunches into a concave area, such as the inner elbow, where spare material is compressed. The same relationship appears at the inner knee, beneath an arm and behind the waist.
Draw a small arrow from the place where the fabric is being pulled. Then let the fold travel away from that point. This gives the mark a direction and a reason.
Folds follow force, not decoration.
A sleeve at a straight arm may show long hanging lines. The same sleeve on a bent arm may form compressed, broken shapes near the elbow and longer tension lines on the outer arm. Your drawing changes because the body changes, not because you've added random surface detail.
For further practice connecting figure structure to clothing, use this guide to drawing in construction. Build the same scaffolding beneath every study, whether you're drawing pinned muslin, a hanging textile or a complete fashion design. The anchor points will support the fabric behaviour you investigate next.
How Different Fabrics Behave on the Body
Fabric names aren't enough to guide a drawing. You need to observe how each material holds its shape, stretches between supports, breaks at pressure points and recovers after movement. The table below works as a reference card for your sketchbook.
Fabric families and how to draw each one
| Fabric | Weight & fold shape | Drawing cue |
|---|---|---|
| Denim | Firm and substantial, with angular breaks around knees, elbows, seams and pockets | Use broken, decisive creases. Keep the main folds broad and avoid covering the surface with fine lines. |
| Jersey knit | Flexible and responsive, often collapsing into compressed folds where the body bends | Use nested zig-zags and soft changes of direction. Show stretching across the body with longer, closer marks. |
| Silk charmeuse | Light, fluid and highly draped, with long folds that change direction as the body moves | Use long, calligraphic lines and controlled tonal transitions. Let a few sweeping folds carry the form. |
| Wool coating | Dense and stable, holding a designed silhouette while forming heavy folds at openings and joints | Use larger planes with restrained creasing. Strengthen the outer contour and show weight at the hem. |
| Quilting | Layered and padded, with repeated channels or sections that sit over a fuller volume | Draw the underlying inflated shape first. Then place the stitched divisions so they bend around the form. |
Denim needs a different mark from silk because it resists movement differently. Jersey often records the body closely, while wool coating can preserve a coat's outer shape away from the body. Quilting adds a further problem, because the internal pattern must follow the padded volume rather than sit flat across it.
Reference choice affects the quality of your observations. A virtual fitting reference such as virtual models for clothes can help you compare silhouettes, garment positions and outfit variations before committing to a portfolio study. Treat it as a way to generate and inspect clothing references, not as a substitute for analysing the physical behaviour of fabric.
Keep one fabric family as the subject of a focused study. Write its name beside the drawing, then note where the cloth is held, where it hangs freely and where it compresses. Admissions tutors can see material understanding when your marks change with the textile rather than repeating one generic wrinkle symbol.
Building Sketchbook Studies That Read as Portfolio Work
A sketchbook page becomes portfolio evidence when it records a question and shows how you investigated it. “How does this cloth hang from one point?” is more useful than “practise folds”. The first question leads to observation, comparison and reflection, all of which give an admissions tutor a clear route through your decisions.
Use three observation exercises
Begin with a draped muslin study. Pin or secure the fabric over a dress form, chair or other stable support, then draw the major planes before the small wrinkles. Add arrows showing tension, and label the areas that hang freely. Use a strong single light source so highlights, midtones and core shadows remain easy to separate. UK art guidance recommends studying cloth on a live model or draped form under a single strong light for this reason, because the lighting pattern helps you distinguish compression, tension and hanging volume. Aim to complete at least one focused drapery study per session, using each drawing to test a specific observation. See these ideas developed in why every artist should keep a sketchbook.
Next, make a fabric weight study. Hang different textiles from a single clip and draw them at the same scale. Compare the distance from the support to the lowest point, the width of the hanging mass and the shape of the folds. Don't turn this into a catalogue of pretty samples. Identify the physical behaviour that changes from one material to another.
Finish with timed live-model poses. Use quick drawings to capture the direction of movement, then place clothing over the gesture. The purpose isn't detail. It's learning how a sleeve, trouser leg or skirt responds when the figure shifts weight.
Design the page as a readable investigation
A strong spread can place the initial observation on the left, material tests in the centre and an edited conclusion on the right. Add short notes such as “pulls from shoulder seam”, “heavy fold at lower edge” or “light comes from upper left”. These annotations show that you're analysing causes, not filling empty space.
For A2 and A3 work, protect enough negative space around the drawings for each study to remain legible. Vary scale deliberately. A large central drape can sit beside smaller detail crops, fabric swatches and one written reflection. Caption the page with what changed in your understanding and connect that reflection to interests you might discuss in a personal statement.
A tutor should be able to answer three questions from the spread:
- What did you observe?
- What decision did you make?
- What did the decision lead to?
That sequence turns ordinary practice into a visible process. It also prevents a sketchbook from becoming a repetition of similar full-figure drawings with no development.
From Observation to Stylised Fashion Sketches
Observation gives you information, but design requires selection. A stylised fashion sketch shouldn't carry every fold visible in the reference. It should keep the marks that explain the silhouette, movement, fabric and design intention.
Start by making an accurate observation beside a second drawing. In the second version, choose one fabric for the figure and remove folds that don't contribute to the design. This edit is not a shortcut. It shows that you can distinguish essential structure from surface noise.
Four editing decisions
Remove unnecessary folds. Erase marks that clutter the contour or compete with the garment's main feature. If a jacket's oversized sleeve is the design idea, don't allow minor wrist creases to become the visual focus.
Exaggerate key drape. Strengthen the folds that describe movement. A long curve from shoulder to hem may communicate a sweeping dress more effectively than many short lines.
Simplify to silhouette. Check the outline at a distance. If the garment still reads clearly without internal detail, your construction is doing its job. Add only the seams, openings and folds needed to explain how it's made or worn.
Balance accuracy and style. You can lengthen the legs, widen a sleeve or sharpen a shoulder, but keep the garment's gravity believable. The body may become fashionably elongated, yet the hem still needs to fall, the sleeve must turn around the arm and the fabric needs a clear support.
Use three to five repeated marks to describe a fold rhythm rather than inventing a new line for every crease. Gesture lines can replace heavy shading when they follow the direction of the fabric. Keep one light source in mind, even if the reference contains mixed lighting, so your design page remains visually coherent.
Separate your sketchbook into observation pages and design pages. Observation pages should retain measurement, uncertainty, annotations and material tests. Design pages can be cleaner, more selective and more expressive. Label the shift clearly, because an admissions tutor should see both your ability to look carefully and your ability to transform what you see.
Meeting Real UK University Portfolio Standards
A good clothing drawing still needs to arrive in the right submission format. UK providers don't all ask for identical evidence, so check each course page before you export your work. The requirements below give you practical benchmarks for organising a university-ready portfolio.
The University of Edinburgh's portfolio guidance asks for a digital portfolio of up to 20 pages and a maximum file size of 50MB, with initial research, investigative work, development, finished pieces and short reflective text included in the submission. Its portfolio preparation and requirements guide makes the sequence of evidence especially useful for clothing studies. A second UK creative-course example asks for 15–20 slides or up to 20 images, including preparatory drawings and studies alongside finished work.
UK Art School Portfolio Requirements Compared
| University or provider example | Typical page count | Format | Key selection criteria |
|---|---|---|---|
| University of Edinburgh guidance | Up to 20 pages | Digital portfolio, maximum 50MB | Research, investigation, development, finished work and reflection |
| Another UK creative-course example | 15–20 slides or up to 20 images | Digital slide or image submission | Preparatory drawings, studies and finished pieces |
| UCA entry guidance | Portfolio may be requested depending on prior qualification | Provider-specific admissions process | Evidence of creative ability where required |
The UCA gives a concrete admissions benchmark for applicants. Students with at least 32 UCAS points from an art- or design-related subject may be considered without a portfolio, while applicants below that threshold may still be asked to submit one, according to UCA's entry requirements. Don't treat that threshold as a reason to neglect your work. A portfolio remains valuable evidence of how you think and make.
Level 2 and Level 3 progression has its own mechanics. One UK college example asks for four GCSEs at grade 4 or above, including English and maths, plus creative work in a portfolio. Another progression route asks for Level 2 or GCSE-level evidence, a sketchbook portfolio and a successful interview, as shown in this Level 3 art and design programme information.
Place your strongest clothing investigation early, but don't open with only a polished fashion figure. A more persuasive sequence might begin with a finished garment drawing, follow with the observational studies that support it, then show fabric experiments, figure work and a reflective closing page. Use a self-audit before uploading:
- Technical range: Have you shown line, tone, proportion and construction?
- Material understanding: Do denim, jersey, silk, wool and quilting receive different treatment?
- Development: Can a tutor follow an idea from reference to edited design?
- Personal voice: Do your selections reveal a genuine interest in clothing, textiles or the body?
- Presentation: Are pages sharp, consistently framed and easy to read?
For broader advice on ordering and presenting evidence, use these tips for building your artistic portfolio.
Putting It All Together Into a Study Plan
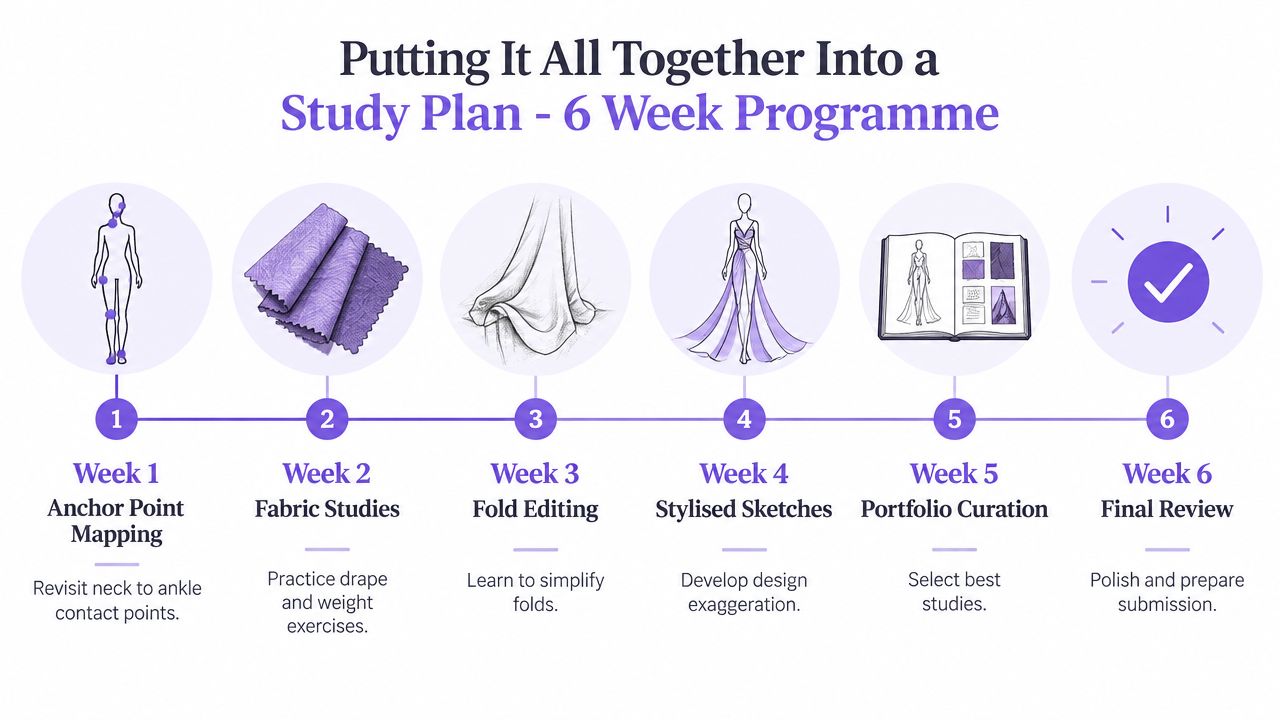
Treat the final six weeks as a sequence of decisions, not a burst of last-minute drawing. Each week should produce evidence that can either enter the portfolio or explain how a stronger piece developed.
A six-week programme
Week one, anchor point mapping. Revisit figure blocking and mark the neck, shoulders, bust, waist, hips, wrists and ankles on several poses. Keep the drawings light and concentrate on how the garment attaches to the body.
Week two, fabric studies. Compare drape and weight using separate textile exercises. Make the differences visible through line direction, fold size and tonal control.
Week three, observational drape sessions. Work from pinned muslin and a hanging cloth under one strong light. Add arrows, weight notes and brief reflections rather than leaving the pages unexplained.
Week four, stylised sketch development. Edit folds, strengthen the main drape and test proportion changes. Create alternatives, but keep the underlying garment behaviour consistent.
Week five, portfolio curation and writing. Select the strongest studies, arrange them into a readable sequence and write short reflections that explain what you discovered. Remove repetition, not evidence of process.
Week six, final review. Photograph or scan the work carefully, check file dimensions and inspect every page at submission size. Ask whether the images still show construction and material decisions after compression.
At this stage, students often overwork pages until the marks lose energy. They also ignore negative space, submit inconsistent scales and photograph sketchbook spreads under uneven or coloured light. Keep a neutral background and lighting setup so the work, rather than the room around it, receives attention.
Use Friday for a short self-critique. Print the criteria sheet, place it beside your studies and judge the work against structural thinking, material understanding, development and personal voice, not against whether you personally like every mark. Set a hard stop on redrawing a finished piece. Two weeks before the deadline, ask a tutor for one final portfolio review, then make only purposeful changes.
The Online College of Art & Design (OCAD) offers flexible, tutor-led art and design study, including a Level 3 Foundation Diploma in Art & Design with a Fashion Design specialism and a Foundation Diploma in Fashion Design. Visit The Online College of Art & Design (OCAD) to explore how its portfolio-centred coursework and tutor feedback could support your clothing drawing and university progression.