

The familiar advice to draw a fluffy outline, shade the bottom and smudge everything soft is a shaky starting point. It can produce a recognisable cloud symbol, but it doesn't teach you how to draw clouds that belong to a particular sky. A more useful approach begins with observation: identify the cloud's structure, work out the lighting, then choose marks that describe what you see.
Table of Contents
- Why Most Cloud Drawings Look Flat
- Learning to Read the Sky Like a Visual Map
- Building Form With a Three-Value Plan
- Matching Marks to Medium Across Pencil, Ink, and Digital
- Quick Studies and Class Exercises That Build Skill
- Turning Cloud Studies Into Portfolio-Ready Evidence
Why Most Cloud Drawings Look Flat
Clouds aren't all cotton-like heaps. The Met Office guide to measuring cloud distinguishes cumulus, with its detached heaps, often flattened bases and darker undersides, from the comparatively featureless blanket of stratus. If you give both the same scalloped outline, you've lost their defining differences before shading begins.
That's why I encourage beginners to postpone texture. A cloud can contain beautifully blended pencil marks and still look flat if its overall shape doesn't make sense.
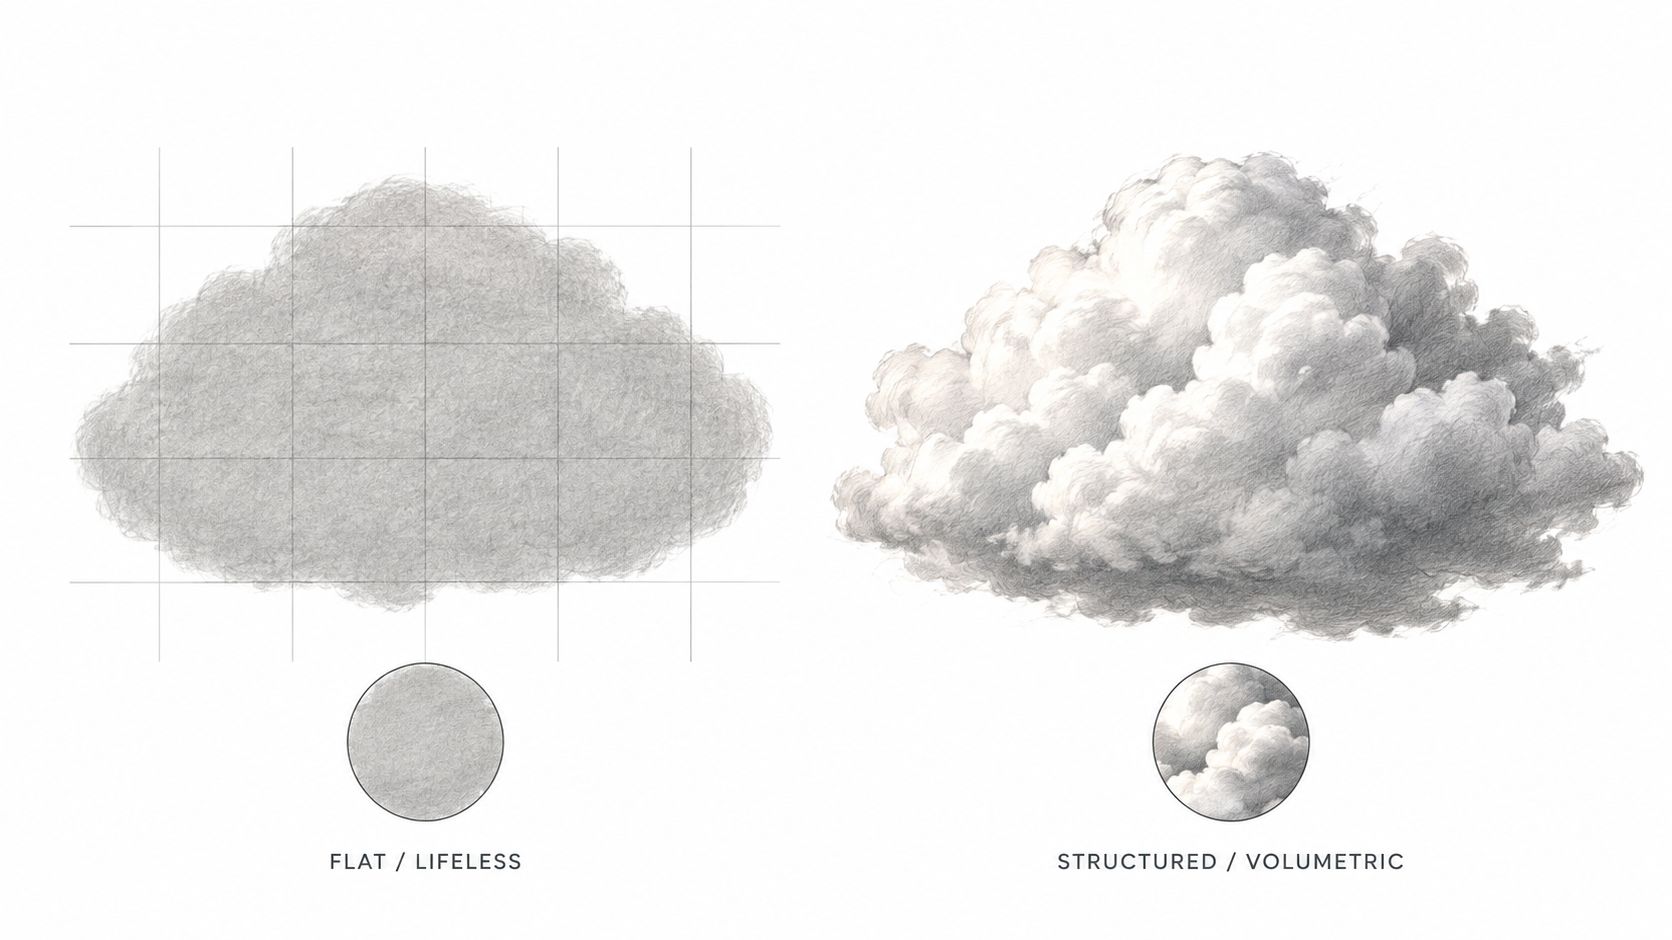
Compare a symbol with a volume
Consider a simple drawing made from equally sized bumps, surrounded by a continuous dark line. Add an even grey strip underneath and you have a decorative puff. The viewer recognises the subject, but there's little indication of which parts project forward or turn away from the light.
A more convincing version has an uneven silhouette, grouped rather than isolated bulges, and shadows that belong to particular masses. Some boundaries remain distinct; others disappear into neighbouring tones. You're describing relationships, not decorating an outline.
This comparison makes the difference between surface detail and organised form easier to notice.
Look at the spaces around clouds
Before drawing individual clouds, assess the whole sky. The Met Office observation framework measures coverage in oktas, where 0 means clear sky, 4 approximately half cover and 8 complete cover, as explained in the measurement guide above.
For drawing, this encourages you to compare cloud masses with negative space, the visible sky between them. A narrow opening may tell you more about the composition than another carefully rendered bump.
Use these checks before adding detail:
- Silhouette: Does the outer shape resemble the cloud you're observing, rather than a familiar cartoon?
- Light direction: Can you explain why a particular surface is lighter or darker?
- Edge variation: Have you made every boundary equally sharp, or distinguished defined areas from dissolving ones?
- Sky coverage: Have you preserved the balance between cloud and open sky?
Practical rule: If the drawing only becomes recognisable after you add little curls and smudges, revisit the large shapes.
Don't treat softness as a universal solution. Your first decisions should concern structure, lighting and boundaries. Texture is useful only when it supports those decisions.
Learning to Read the Sky Like a Visual Map
Cloud names can sound like vocabulary for a science examination, but they're useful drawing prompts. In 1802, British meteorologist Luke Howard introduced terms describing visible cloud structure; Tate's account of Turner's “Skies” sketchbook connects that vocabulary with the period's growing interest in atmospheric observation.
The root terms are cirrus, meaning curled or wispy forms; cumulus, heap-like forms; stratus, layered forms; and nimbus, rain-bearing clouds. They help you ask what kind of shape you're looking at before deciding how to render it.
Use this visual map to connect the terminology with recognisable structures.
Translate names into drawing decisions
Cirrus invites elongated, directional marks. Look for tapering streaks and feathered endings rather than a solid underside. Don't borrow the flat base you might use for a cumulus study.
With cumulus, identify the grouped rounded tops and the base beneath them. Treat neighbouring bulges as parts of a larger mass, not separate circles joined together. Let the observed shadow shapes determine which groups feel substantial.
Stratus calls for broad horizontal organisation. Its layered appearance is the important feature, so avoid filling a quiet sheet with cauliflower-like lobes.
Nimbus tells you to consider rain-bearing structure, but it isn't a licence to turn any cloud black. Combined names, such as nimbostratus and cumulonimbus, distinguish different forms.
Use altitude as context, not a drawing formula
The Met Office cloud classification guide recognises 10 main genera and places cloud bases over the British Isles into broad bands: low cloud generally below 6,500 ft, middle cloud between 6,500 and 20,000 ft, and high cloud at roughly 20,000 ft or above.
Use low-level cumulus and stratus, high-level cirrus, and vertically developing cumulonimbus as visual starting points. Combined names such as cirrocumulus, altostratus and stratocumulus refine the description. Nimbus alone doesn't specify an altitude band.
For your sketchbook, make a short identification checklist:
- Overall arrangement: Detached masses, streaks, a blanket or a rising tower?
- Boundary character: Feathered, rounded, broken or largely continuous?
- Base: A visible underside, an indistinct layer or no substantial base?
- Weather cues: A quiet sheet or a dense rain-bearing formation?
Don't infer colour or sharpness from altitude alone. Compare the actual light, overlap and distance you can see.
Observation works better as repeated practice than a single glance. Turner's 1818 “Skies” sketchbook contains 65 watercolour sky studies and 14 unrelated pencil sketches, according to Tate's account above. His varied lines, wave-like strokes, scribbles and hatching offer a useful lesson: change your marks when the structure changes.
Building Form With a Three-Value Plan
Before committing to a detailed drawing, make a thumbnail using three values: a sky tone, a cloud-body tone and a deepest-shadow tone. This is a planning exercise, not a promise that every finished cloud will contain only those tones.
Give the thumbnail 5–10 minutes. Keep it small enough that you can judge the arrangement without getting absorbed in individual lobes. You should be able to point to the principal cloud mass, its illuminated side and its darkest area.
Establish the light before modelling
Mark a sun direction beside the thumbnail rather than automatically placing a sun inside the composition. If the light comes from the upper left, use that decision consistently when constructing your chosen cumulus.
Follow this sequence:
- Place the underside first: Sketch its width, angle and relationship to the rest of the cloud. Keep the construction line light enough to change.
- Group the body: Build larger rounded masses above the base. Avoid tracing every small projection.
- Reserve the crown: Leave the brightest paper for observed sunlit areas, breaking the light shape into irregular groups.
- Connect the middle values: Add restrained tone where the form turns away from the light, rather than placing identical shadows beneath every bump.
The darkest underside is a starting assumption for this exercise, not a rule to impose on every reference. If your observed sky contradicts it, adjust the plan.
You may also need to distinguish form shadow, where a surface turns away from illumination, from shadow cast by another mass. Use this explanation of how an object casts a shadow to clarify the difference before inventing dark patches.
Storm Cloud Composition Choices
Storm skies need identification as well as dramatic shading. The Met Office guide to mid-level clouds describes nimbostratus as a dark, thick, featureless layer associated with persistent precipitation, contrasting with vertically developing cumulonimbus that can bring heavy rain, hail or thunderstorms.
Translate that distinction into composition rather than applying the same dark treatment to both.
| Feature | Nimbostratus | Cumulonimbus |
|---|---|---|
| Overall arrangement | Wide, layered mass | Strong vertical rise |
| Main structure | Comparatively featureless sheet | Grouped, cauliflower-like development |
| Base treatment | Broad, subdued tonal area | Dense base beneath a substantial tower |
| Drawing emphasis | Low-contrast horizontal passages | Height, overlap and internal volume |
| Detail to avoid | Invented rounded lumps everywhere | Repeated, equally sized lobes |
A dark subject doesn't require the darkest possible material. In graphite, build your base gradually rather than pressing immediately to maximum darkness. In colour, try cool complementary greys, balancing a cool mixture with a restrained complementary colour until it becomes suitably neutral.
Leave room to darken selectively. A cloud base drawn at maximum darkness too early gives you fewer ways to describe its internal differences.
Finally, inspect the thumbnail from a little distance. If the principal masses merge into an unreadable patch, simplify them. If every lobe has an outline, remove unnecessary boundaries before enlarging the drawing.
Matching Marks to Medium Across Pencil, Ink, and Digital
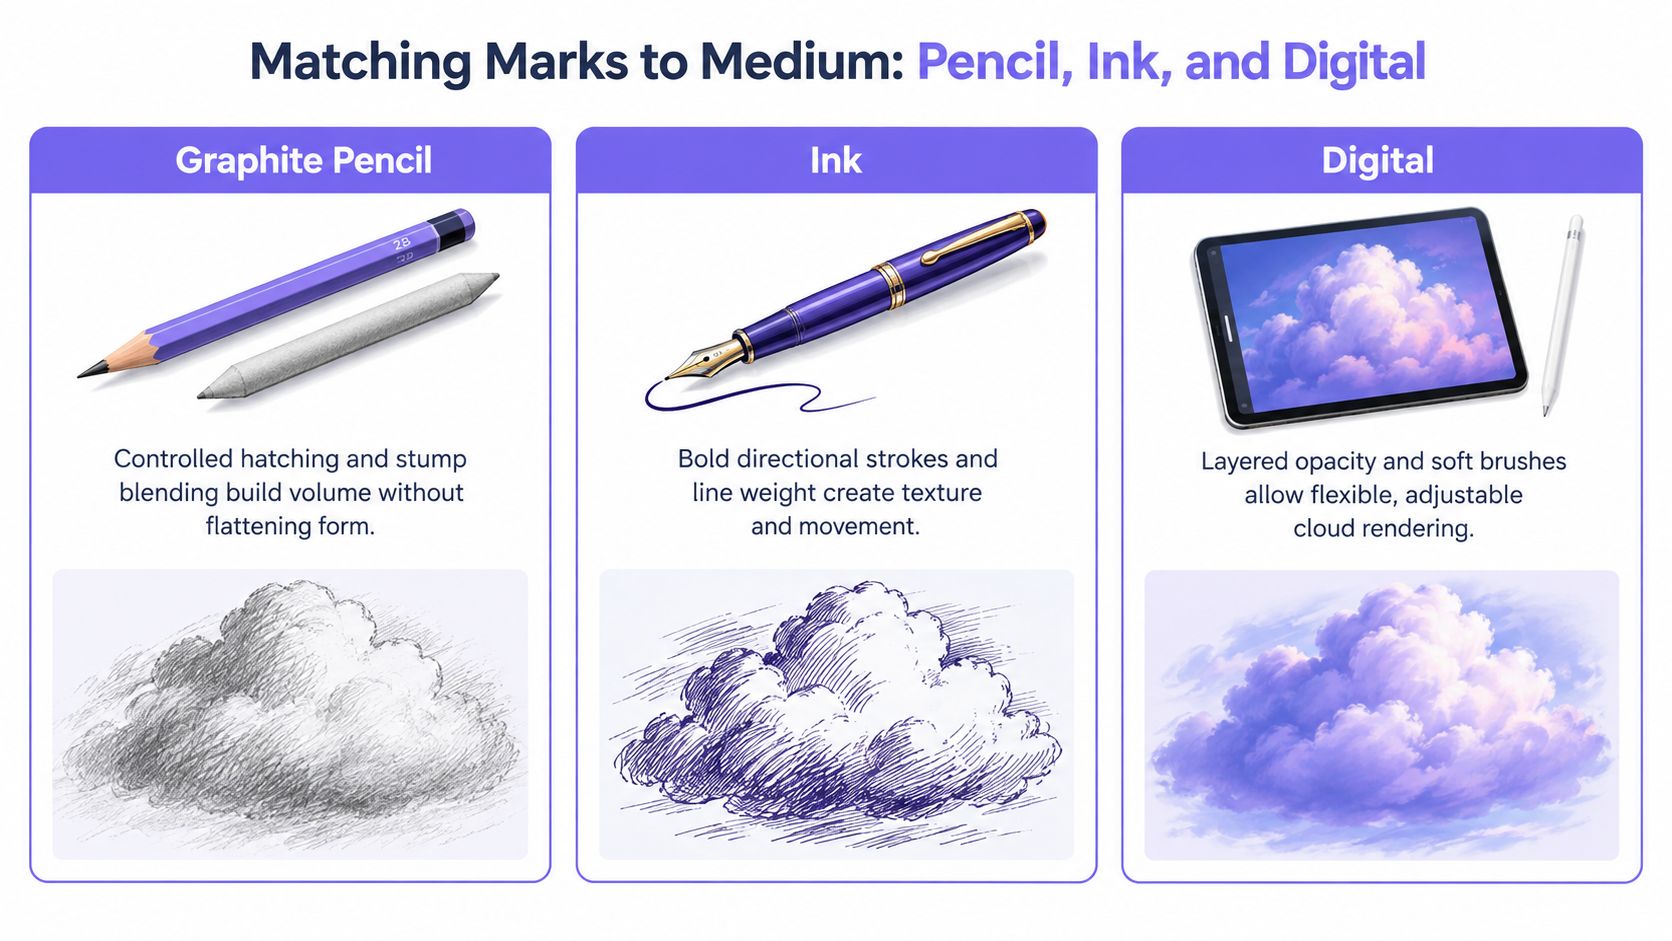
The same reference will need different treatment in graphite, ink and digital painting. Don't expect a pen to behave like a blending stump, or assume a soft digital brush will make the important decisions for you.
Choose a medium according to the marks you can control comfortably. The comparison below shows different ways to develop a cloud without relying on identical techniques.
Graphite and ink need different kinds of restraint
With graphite pencil, begin with light hatching and build overlapping strokes where you need more tone. Follow the turning form rather than covering every area with the same mechanical pattern. A blending stump is optional: use it on selected passages, leaving enough visible structure to avoid a uniformly polished surface.
If you're choosing materials, Mr. Pen sketch pencil advice is a useful resource to consult before buying a larger set. Start by testing what your existing pencil can achieve through pressure and layering.
Ink requires you to plan the white paper more deliberately. Place denser hatching in shadow groups, leave illuminated passages open, and use broken marks around dissolving boundaries. Crosshatching can deepen selected areas, but wrapping every cloud in a heavy contour will work against an atmospheric result.
Try these medium-specific adjustments:
- Graphite without smudging: Layer light strokes and lift selected marks with a kneaded eraser.
- Ink without a solid outline: Describe fragments of the boundary and let neighbouring sky marks imply the rest.
- Limited equipment: Practise light, middle and dark swatches using the tool you already own before adding materials.
Digital flexibility still needs judgement
For digital work, try a sky layer beneath a cloud layer, with a separate layer for shadow adjustments. This arrangement makes revision easier: you can alter the cloud silhouette without repainting the entire background.
Block the principal shapes with a firmer brush before selectively introducing a soft round brush. Avoid airbrushing the whole cloud into an indistinct patch. Where your reference shows a clear light-to-shadow transition, preserve it; where it shows a gradual transition, don't force a crisp boundary.
For learners who find subtle values difficult, enlarge the reference and temporarily simplify it into distinct tonal areas. For learners with SEND needs or sensory preferences, offer alternatives to rubbing graphite, repeated tiny marks or complex layer controls.
Comfort first: Choose the method you can repeat without unnecessary strain. Blending is an option, not an entrance requirement.
Short sessions are easier to resume when you leave a note stating the next action, such as adjusting the base or reducing background contrast. Pick a clear stopping point rather than trying to finish every passage in one sitting.
Quick Studies and Class Exercises That Build Skill
A sky journal turns cloud drawing into a record of decisions rather than a collection of unrelated pictures. Keep the drawing beside brief notes about the date, viewing direction, wind, light and dominant cloud genus. Record observed conditions rather than guessing what you can't establish.
John Constable provides a useful historical model. During 1821–1822, he observed clouds from Hampstead Heath, producing around 50 surviving sky paintings and reportedly more than 100 studies overall, as documented in the National Gallery of Australia's account of Constable's sky studies.
His practice, often called “skying”, included atmospheric notes rather than treating the sky as interchangeable scenery. A study dated 11 September 1821 records an autumn morning, silvery-grey clouds, warm ground, a light south-westerly wind, fine weather during the day and overnight rain, in that same account.
Give each exercise a different purpose
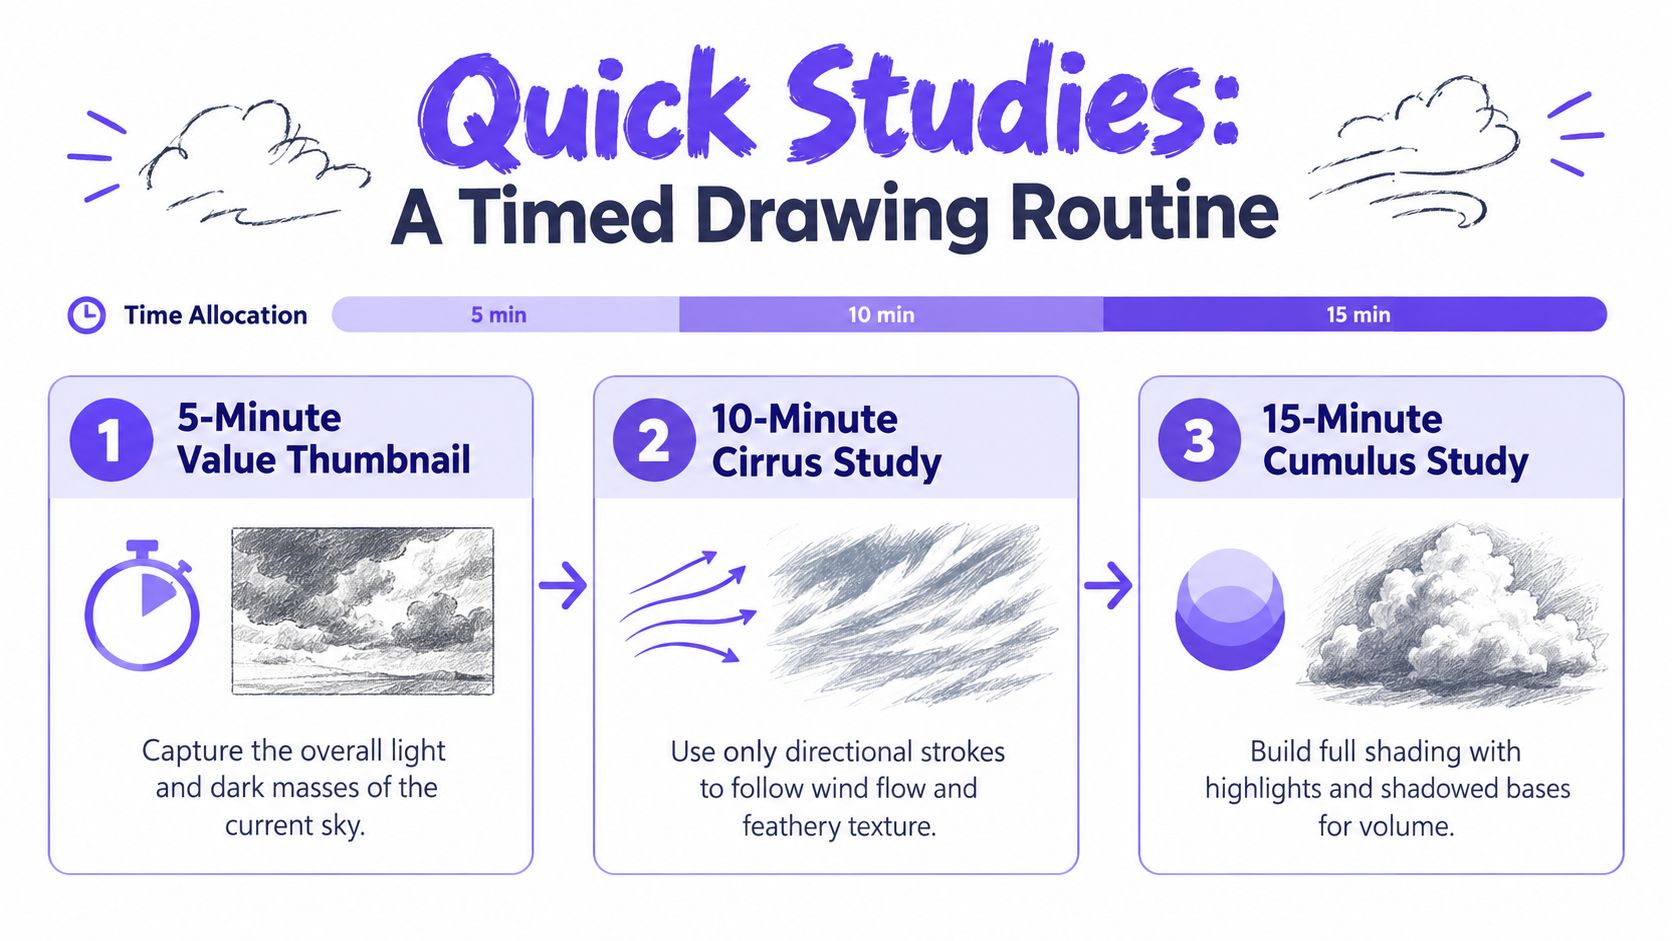
Use the following timings as suggested classroom limits, not performance targets:
- Five-minute value thumbnail: Capture the current sky's largest light and dark areas. Stop before adding texture.
- Ten-minute cirrus study: Use directional strokes only, concentrating on taper, spacing and movement.
- Twenty-minute stratus study: Organise a sheet through broad horizontals and restrained tonal changes.
- Thirty-minute cumulonimbus study: Construct the rising mass and dense base before refining internal groups.
For a shorter session, the illustrated routine offers a compact alternative.
Review decisions rather than counting detail
Keep a dated reference folder alongside the journal. Include a horizon or treetop when it helps you judge scale and placement, following Constable's connection between sky and nature.
When reviewing a study, write what you noticed, what you changed and what you would test next. A useful reflection might explain that you replaced repeated rounded contours with a flatter observed base. That tells a tutor more than labelling the drawing successful.
For further practice planning, use these ways to get better at drawing alongside your journal. The exercises can support GCSE, iGCSE and Level 3 coursework when they relate to your project and assessment requirements.
Use the video as another observation exercise: pause to compare a demonstrated decision with your own reference, rather than copying automatically.
Turning Cloud Studies Into Portfolio-Ready Evidence
Cloud studies can become more than outdoor practice. A sequence of references, experiments and revisions lets you demonstrate how you investigate a subject and make material decisions. The important evidence is the relationship between those stages, not merely a polished final sky.
For Level 2 and Level 3 creative students considering university, curate the work around a clear enquiry. You might investigate how different media describe an overcast sky, or how repeated observation changes your handling of a particular cloud formation.
Show development alongside resolved work
Manchester Metropolitan University's UAL Foundation Diploma application guidance asks for 15 to 20 images or presentation slides, including visual or contextual research, developmental work, experiments and resolved projects. That's a reason to retain useful trials rather than discarding everything except the final drawing.
Loughborough University's design and creative arts portfolio guidance recommends around three projects in detail, including process evidence, experimentation and final evaluation; shortlisted Fine Art applicants must also submit a portfolio and attend an online interview. Prepare to explain why you changed something, not just name the medium.
Organise a cloud project with these components:
- Research: Dated observations and references relevant to your enquiry.
- Experiments: Selected trials that reveal a meaningful difference in approach.
- Development: Annotations explaining revisions and material choices.
- Resolution: A finished outcome connected to the investigation.
These tips for building your artistic portfolio can help you select and sequence that evidence.
FAQs for Level 2 and Level 3 students
Can I use cloud drawings in a university portfolio?
Yes, if they're relevant to the course and demonstrate your thinking. Include observation and development rather than presenting disconnected exercises.
Should I progress directly to university or take an Art Foundation?
A one-year Diploma in Foundation Studies (Art and Design) is a recognised UK progression route that can help you explore specialisms and develop your portfolio, but it doesn't guarantee admission. Check qualifications and course requirements through UCAS guidance on choosing a course, particularly when planning your next step from Level 2 or Level 3.
Will the same portfolio file suit every university?
Don't assume so. Birmingham City University's art and design portfolio guidance requires invited applicants to submit within 28 days, with a file no larger than 10MB, and permits links to moving-image work.
What should I bring to a tutor review?
Start a one-week sky journal and bring at least three dated studies, your references and brief reflections. Ask which examples communicate development most clearly and what evidence is still missing.
Flexible, tutor-led online art study is one option for developing these skills alongside formal qualifications. The Online College of Art & Design (OCAD) offers GCSE/iGCSE, A Level and foundation pathways with portfolio-centred coursework and tutor feedback. Visit to explore a suitable course, and use your dated cloud studies as a starting point for discussing your observational skills and university portfolio goals.