

A home educator is planning a term with limited time, while a Head of Department is balancing mixed ability groups, uneven confidence and a cupboard that never contains quite the right materials. The pressure is familiar: choose projects that are enjoyable now, but still teach pupils how to observe, research, experiment, explain decisions and improve outcomes.
The strongest Key Stage 3 art projects do more than produce attractive final pieces. They create evidence that carries forward into GCSE, Level 2 and Level 3 portfolios, including sketchbook development, contextual studies, material tests, feedback and documented reflection. That matters in a subject where participation has faced long-term pressure. The House of Lords Library reported a 37% decline in arts GCSE entries between 2010 and 2020 in its review of arts education in secondary schools. More recent figures recorded 206,598 UK GCSE art and design completions in 2025, equal to 3.4% of all GCSE entries, according to the National Society for Education in Art and Design's reported figures. A carefully sequenced KS3 experience can help pupils understand that art is both expressive and purposeful.
Each project below includes practical objectives, materials, teaching steps, differentiation, assessment points and a direct link to the questions Level 2 and Level 3 creative students ask about university portfolios. For planning the wider sequence, use this unit plan in teaching explained alongside the project notes.
Table of Contents
- 1. Observational Sketchbook Journal Developing Visual Research Habits
- 2. Artist Study and Creative Response Pop Art Remix
- 3. Land Art Sculpture with Natural Materials
- 4. Relief Printmaking Lino and Monoprint Editions
- 5. Mixed Media Collage Layered Narratives
- 6. Cyanotype Photography Photograms and Botanical Records
- 7. Textile Stitch and Surface Design Embroidered Storytelling
- 8. Hand-Built Ceramics Coil and Pinch Sculpture
- 9. Graphic Design Typographic Poster Campaign
- 10. Identity and Self-Portrait Series Exploring Who I Am
- KS3 Art Projects: 10-Project Comparison
- Turning Projects into a Portfolio Habit
1. Observational Sketchbook Journal Developing Visual Research Habits
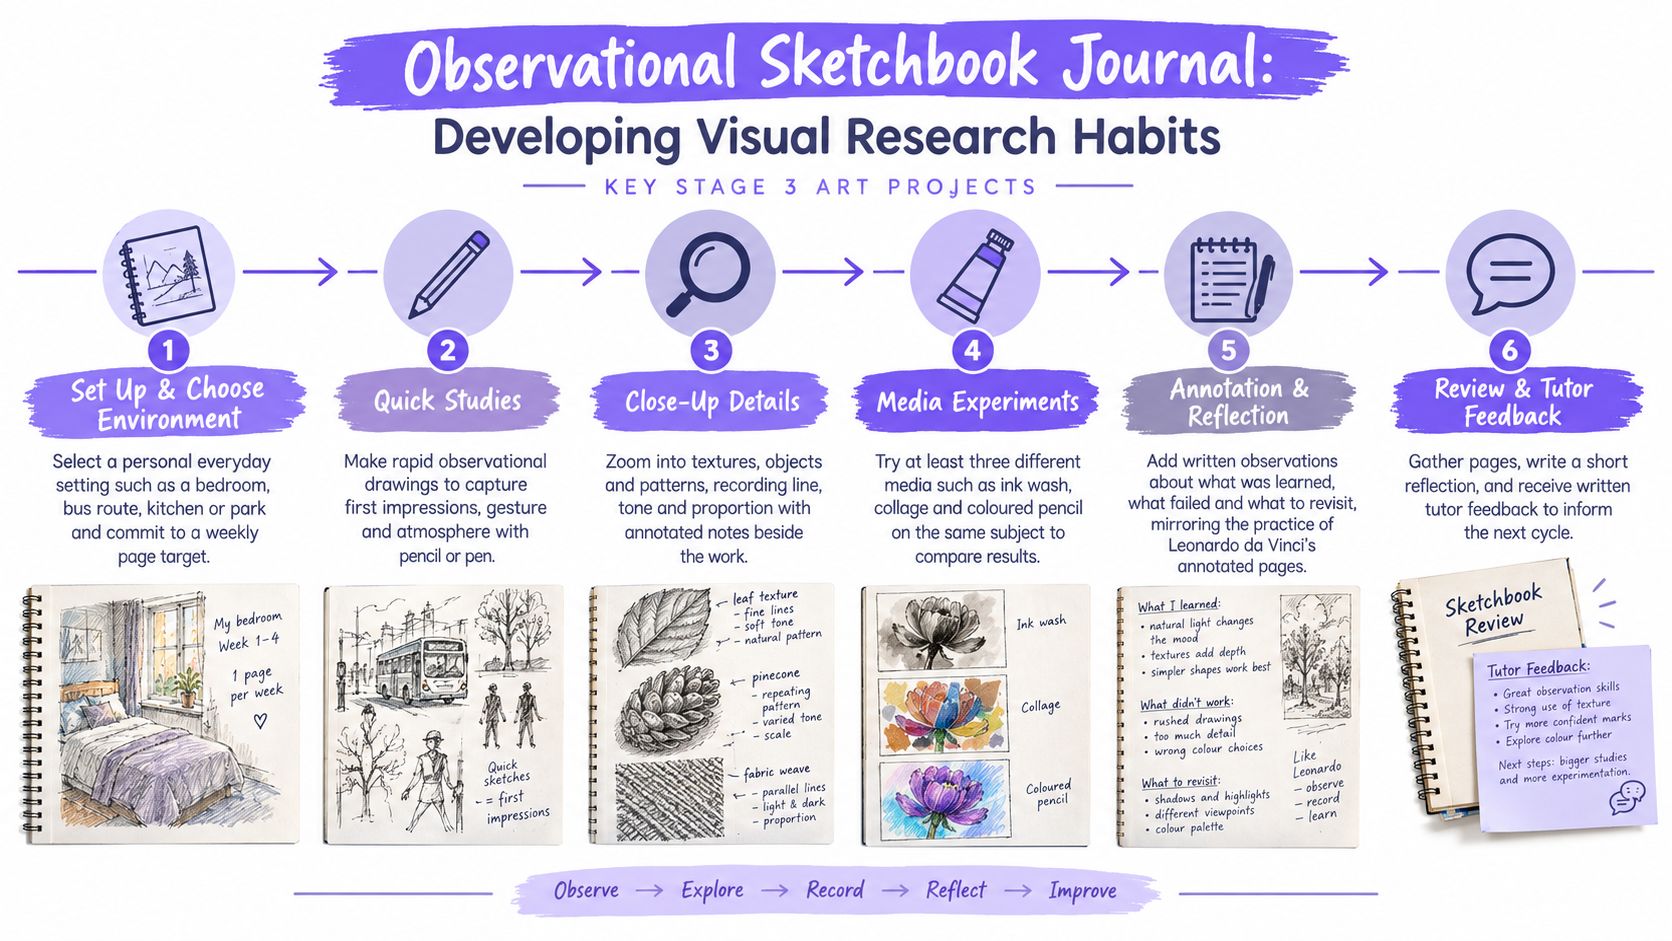
A sketchbook journal is one of the most useful Key Stage 3 art projects because it teaches the habit behind almost every successful portfolio: looking closely, recording evidence and returning to an idea. Pupils choose an everyday environment, such as a bedroom, bus route, kitchen or park, then revisit it through quick studies, close-up details, written notes and material experiments.
Use graphite, coloured pencil, ink, watercolour, collage and photography. Set a fixed weekly expectation, such as three pages, but keep the subject personal enough for pupils to sustain interest. Each page should include an annotation explaining what was noticed, tested or learned. Leonardo da Vinci's notebooks provide a strong historical example because observation, mechanical study and written notes share the same page. David Hockney's sketchbook and iPad drawing practice also show how daily observation can become an extended visual record.
What to assess and adapt
Review work at planned points rather than waiting for the end. Look for direct observation, purposeful media choices, useful annotations and evidence of change, not polished drawings on every page. A pupil who records a failed ink wash and explains the next adjustment is demonstrating portfolio thinking.
Home educators can photograph pages and discuss them during feedback. For SEND learners, offer visual prompts, a choice of locations, pre-printed page structures, audio annotations or short recorded reflections. A useful reference on why every artist should keep a sketchbook reinforces the value of keeping development visible.
Portfolio rule: Assessors want to see how an idea develops, not only the image that survived the process.
2. Artist Study and Creative Response Pop Art Remix
Begin with an artist before introducing materials. Pupils research Roy Lichtenstein and Andy Warhol, identifying what they can see, how the work was made, why the imagery suited its cultural context and what the work might communicate now. Lichtenstein's comic-strip paintings can lead to discussions of cropping, bold outlines and Ben-Day dot effects. Warhol's repeated Campbell's Soup imagery provides a practical route into serial composition, consumer culture and variation.
The final response should not be a copy. Ask pupils to choose their own subject, perhaps a school object, gaming symbol, snack package or local landmark, then borrow selected strategies while changing the meaning. A one-page artist summary should come before making begins. The most useful framework is what, how, why and so what. Pupils should state exactly what they have taken from an artist and what they've changed.
Materials can include acrylic paint, marker, collage paper, printed references and digital layout tools. Pupils with limited drawing confidence can work from photographs or simplified shapes. More experienced learners can compare two artists and combine their methods without producing a confused imitation.
Portfolio evidence that matters
Assess the research page, source selection, experiments and final response separately. A strong sketchbook will show failed colour combinations, tests of scale, decisions about repetition and a short evaluation of whether the chosen Pop Art method still communicates the new subject.
Level 2 and Level 3 students often ask whether university assessors expect artist research. They do, but not as decorative biography. Contextual study should explain how another artist affected the student's decisions. That distinction turns a copied style into an informed creative response.
3. Land Art Sculpture with Natural Materials
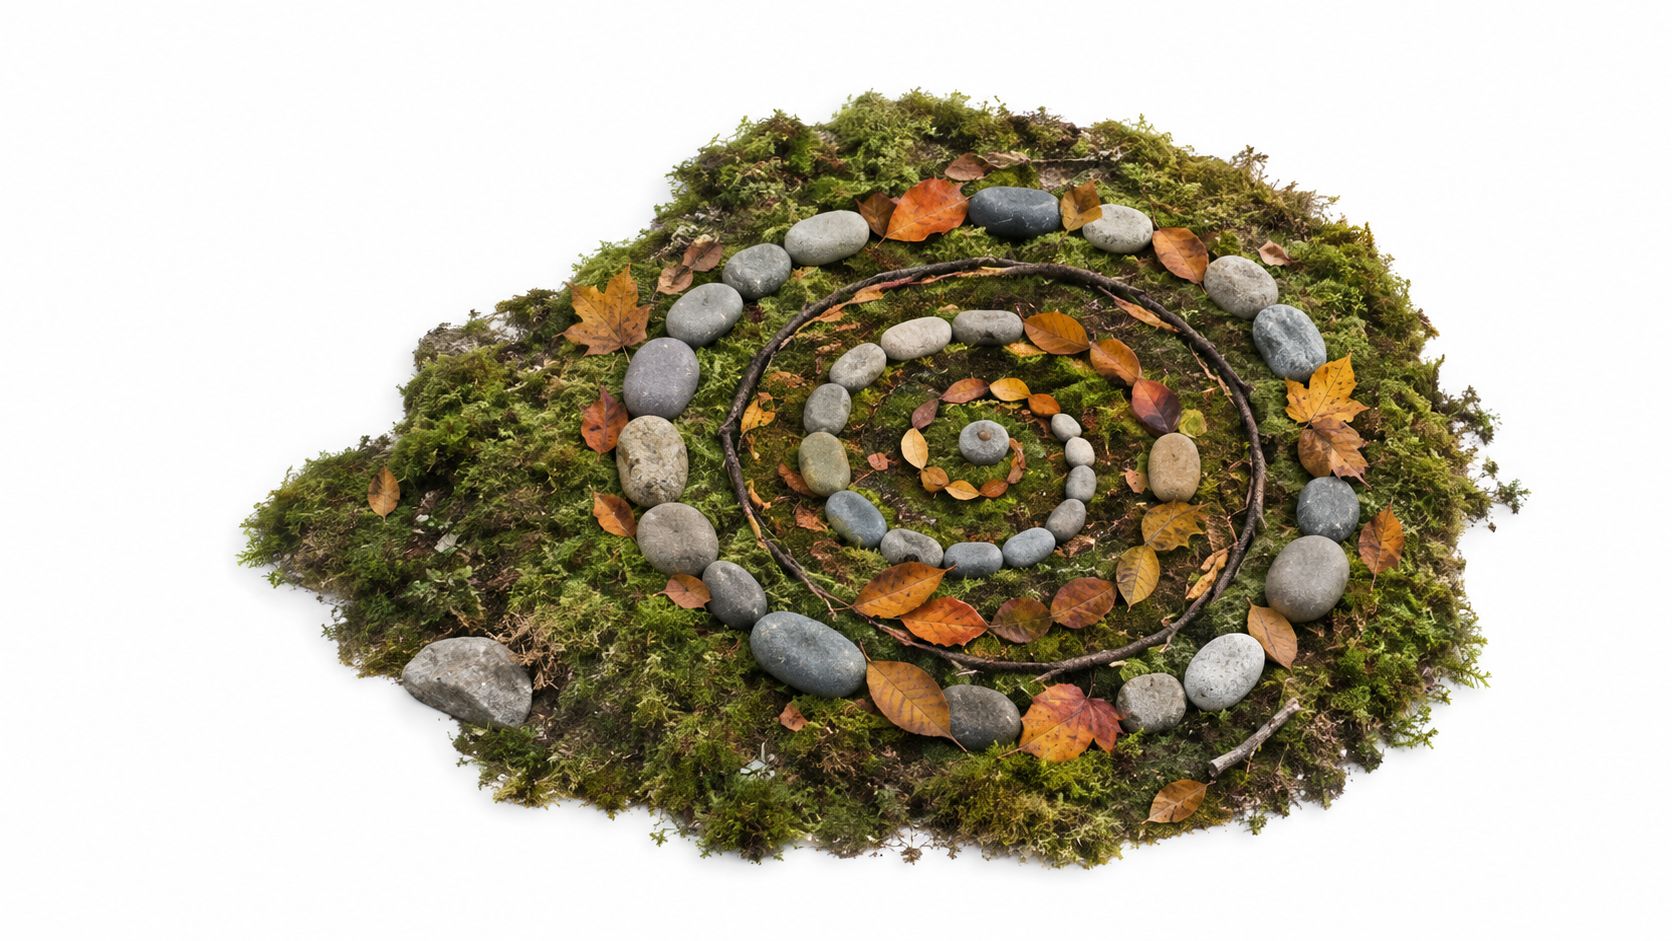
Land art gives pupils a demanding design problem without requiring expensive specialist equipment. In a defined outdoor area, they collect leaves, stones, sticks and soil, then create a temporary sculpture or installation that responds to its site. The work may change through wind, rain, movement or decay, so photography becomes part of the artwork rather than an afterthought.
Andy Goldsworthy's ice, leaf and stone works offer a clear example of how material, weather and place can shape a decision. Richard Long's A Line Made by Walking from 1967 shows how a simple intervention can become a statement about movement and place. Pupils should study the examples, then produce a work that belongs to their own location rather than copying a recognisable spiral.
Set boundaries before pupils go outside. Complete a risk assessment, establish rules for collecting materials and make clear that living plants, habitats and private property are not available resources. Photograph each work from at least three angles and, where possible, at different times.
Making temporary work assessable
The sketchbook should include a site map, material tests, small planning drawings and a short statement explaining how the environment shaped the result. Assessors will look for a relationship between the work and its location, not merely neat arrangement.
For remote learners, a garden, balcony, pavement edge or indoor arrangement can provide an equivalent site. SEND adaptations might include a pre-selected material tray, a smaller working area, gloves for sensory needs, a partner photographer and voice-recorded reflection. A pupil who cannot safely collect outdoors can design the arrangement from found household materials and explain the changed relationship between natural and manufactured matter.
4. Relief Printmaking Lino and Monoprint Editions
Printmaking teaches pupils that one design can produce a family of related outcomes. Start with a bold image that will survive reduction into a lino or polystyrene block. Pupils learn about reversed imagery, inking, pressure, layering and the difference between an accidental mark and a controlled mark.
Edvard Munch's woodcuts, including The Kiss, demonstrate how an image can be reworked across multiple prints. Käthe Kollwitz provides a route into relief printmaking as a means of addressing social and political subjects. Those references help pupils understand that printmaking isn't only a craft exercise. It can carry mood, narrative and argument.
The process needs careful sequencing:
- Reverse the design: Draw the image backwards before transferring it to the block, especially if it includes words.
- Test the surface: Make several test prints on scrap paper and record changes to ink, pressure and paper.
- Compare variations: Try a limited palette, uneven inking, layered colour or a monoprint alongside the edition.
- Use conventions: Number and sign the strongest prints so pupils understand professional print language.
Differentiation and assessment
Use polystyrene sheets and blunt tools for pupils who need a less physically demanding process. Provide simplified templates, larger shapes and adapted grips where necessary. More confident pupils can register two colours or deliberately alter each print to explore variation.
Assessors will look beyond the cleanest print. Include the original drawing, reversed transfer, test prints, notes about problems and the selected edition. Level 3 portfolio readers want to understand the decisions behind an outcome. A blurry test print can be more valuable than a flawless final sheet if the pupil explains what the test changed.
5. Mixed Media Collage Layered Narratives
Collage becomes more meaningful when every layer carries information. Give pupils a personal or social theme, such as memory, migration, local identity, food or belonging, then ask them to combine magazine cuttings, painted papers, photographs, found text and drawn marks. The materials should not merely fill space. Their texture, scale, source and associations should contribute to the message.
Kurt Schwitters' Merz collages offer a useful study of found paper and printed scraps. Romare Bearden's collage and photomontage works can open discussion about African American life, memory and constructed images. Pupils should analyse how an artist controls fragments, rather than only naming materials.
Begin with a small series of thumbnail compositions. Limit the source palette so the final image doesn't become a random scrapbook. Pupils can paint their own papers, photograph objects or create text by hand. Discuss copyright and use self-created or royalty-free sources where possible.
What a portfolio viewer needs to see
The sketchbook should show at least two layout options, a limited palette, material tests and a note explaining why particular fragments were kept or removed. Photograph the work before final gluing if repositioning is part of the process.
A home educator can replace magazines with packaging, newspapers, receipts, fabric scraps or pupils' own photographs. For SEND learners, use pre-cut shapes, textured paper samples, digital collage or a verbal explanation instead of extended writing. The assessment remains valid when the learner can explain composition, material meaning and revision, even if cutting or handwriting is difficult.
Students preparing for university often ask whether a portfolio must contain only technically impressive work. This project gives a better answer. A coherent idea, supported by considered development, can be more persuasive than a decorative image with no explanation.
6. Cyanotype Photography Photograms and Botanical Records
Cyanotype introduces photography without requiring a camera. Pupils arrange leaves, feathers or lace on cyanotype-coated paper, expose the surface to sunlight or UV light and wash the print according to the manufacturer's instructions. The result records both the object and the process, with the final series revealing changes in exposure, placement and transparency.
Sir John Herschel developed the cyanotype process in 1842, and Anna Atkins used cyanotypes in Photographs of British Algae, published in 1843. These examples make the project useful for connecting science, photographic history and botanical observation. Pupils can create a visual catalogue of local plants, but the record should include the date, object, arrangement and exposure conditions.
Commercial cyanotype kits are the safest practical choice for most groups. Follow the supplied safety guidance, protect work surfaces and establish clear rules for handling prepared paper. A test strip log helps pupils compare results without pretending that every variable can be controlled.
Building a series rather than a single effect
Ask pupils to present a coherent series of at least six prints, showing consistency as well as purposeful variation. They can change scale, overlap, orientation or background, then annotate what each test reveals. Assessors will look for sequencing, technical observation and presentation.
For remote or low-resource learners, use pre-coated paper and sunlight where appropriate, or offer a digital photogram simulation as a parallel route. SEND adaptations include larger objects, a simplified layout choice, visual instructions, a partner for placement and recorded reflections. The portfolio should contain test strips, photographs of arrangements and the final prints, not only the blue results.
7. Textile Stitch and Surface Design Embroidered Storytelling
Textile work rewards patience and makes process easy to document. Pupils design a fabric panel that communicates a memory, story or pattern system, using hand embroidery, appliqué and simple stitches. Begin with a sampler that tests five or six stitches, such as running stitch, backstitch, blanket stitch, chain stitch and French knots. The sampler is not a warm-up to discard. It becomes evidence of material learning.
Faith Ringgold's story quilts demonstrate how painted panels, fabric and narrative text can work together. Sheila Hicks provides a contrasting study of colour, wrapping, weaving and scale. Pupils can then develop a repeat pattern on paper before choosing whether the final panel is representational, abstract or text-based.
Use fabric scraps, embroidery thread, blunt needles where appropriate, fabric pens and paper templates. Keep the initial panel manageable. A smaller, completed piece with well-recorded decisions is more useful than a large unfinished surface.
Inclusive making and portfolio presentation
Offer larger needles, needle threaders, pre-punched fabric, adhesive appliqué, fabric collage or digital pattern design. Learners with sensory sensitivities can choose paper, felt or a sealed sample rather than loose fibres. Allow audio or video reflection when writing is a barrier.
Photograph stitch samples at close range, then record the panel flat and in context. The guide to beginner appliqué techniques can support an accessible starting point. Assessors will look for control developing over time, a relationship between technique and meaning, and clear evidence that the pupil made choices rather than following a fixed template.
University-bound students often worry that a portfolio needs one narrow specialism. A textile project can show material curiosity and conceptual thinking, especially when the student explains why fabric, repetition or slow hand making suits the subject.
8. Hand-Built Ceramics Coil and Pinch Sculpture
Clay teaches pupils to respect time. A pinch pot, coiled vessel or slab-built figure may look complete when it leaves the maker's hands, but drying, joining, firing and surface treatment all affect the final result. That delayed feedback makes ceramics a strong project for teaching planning and revision.
Study Lucie Rie's precise forms and glazes alongside Grayson Perry's narrative vessels and personal commentary. Pupils can respond by making a small sculptural vessel or figure connected to an object, memory or story. Start with a clay test tile. It allows students to try texture, slip, underglaze or glaze before committing to the final piece.
Explain the stages clearly: condition the clay, build securely, compress joins, hollow bulky forms, allow even drying and follow the studio's firing rules. Plan for at least two weeks between making and firing, so pupils understand that the schedule must account for drying and kiln availability.
Clay rewards documentation because the final fired surface may not show every important decision.
Photograph the pinch or coil construction, the leather-hard stage, surface decoration, unfired work and final result. Assessors will look for material control, structural decisions, surface experiments and honest evaluation. A cracked piece can still demonstrate strong learning if the pupil identifies why it failed and what they'd alter.
For pupils without studio access, use air-drying clay, modelling material or a digital 3D form as an equivalent design study, while explaining the difference in material behaviour. SEND adaptations might include smaller forms, stabilising supports, pre-portioned clay and extra drying time.
9. Graphic Design Typographic Poster Campaign
Graphic design begins with communication, not decoration. Give pupils a real or imagined brief for a cause, event or product, then define the audience, message, tone and distribution context. A campaign might promote a school reading event, a local clean-up or an imaginary music night. The brief should constrain decisions enough to make editing necessary.
Milton Glaser's I ❤ NY logo offers a clear example of concise communication. Shepard Fairey's Obey Giant campaign allows pupils to examine repetition, recognisable imagery and the way a poster series can spread a message. Students should research how an audience might encounter the work, then test typography, colour and image selection rather than choosing the first attractive font.
Require three typographic concepts before the final design. Pupils can use collage, hand lettering, desktop software or a combination. Show the final poster in context, such as a bus shelter, noticeboard or social media screen. The comparison between graphic design and digital art helps students distinguish communication-led design from image-making without treating them as unrelated fields.
The portfolio link
Assessors want to see the brief, audience research, rejected ideas, layout tests and final rationale. A student applying to university can show that design decisions respond to purpose, not personal taste alone. The history of original movie posters can provide further context for composition, hierarchy and promotional imagery.
Use high-contrast templates, limited type choices and visual checklists for learners who need structure. Offer speech-to-text, screen readers, simplified briefs and printed mock-up frames. Stronger pupils can produce a consistent set of posters for different contexts and explain how the design changes while the campaign identity remains recognisable.
10. Identity and Self-Portrait Series Exploring Who I Am
Self-portraiture can become narrow if it focuses only on facial proportion. A stronger series asks how identity is constructed through pose, clothing, objects, location, colour, family references, culture and the viewer's expectations. Pupils might combine observational drawing, photography, collage, staged images and written fragments.
Frida Kahlo's self-portraits provide a route into symbolism, identity and physical pain. Cindy Sherman's Untitled Film Stills offer a contrasting study of staged identity, character and the visual language of cinema. Ask pupils to research both artists, then decide what they want the viewer to understand about the chosen subject.
Agree boundaries before making begins. Pupils should be able to keep private material private, choose fictional or symbolic identity studies and decline photography if it feels uncomfortable. A series can explore identity through objects, hands, shadows or clothing without requiring a direct face image.
Presenting a sensitive project safely
A final group of images should include a short artist statement of around 150 words, supported by contact sheets, pose tests, colour trials and notes about selection. Assessors will look for a clear relationship between concept and image-making, not forced disclosure. The practical guide on how to draw a self-portrait can support pupils who want a conventional observational starting point.
For SEND learners, offer staged photographs with a trusted adult, avatar construction, object-based portraits, pre-planned prompts and recorded statements. Home educators should agree consent and storage arrangements before taking photographs. Digital submissions need secure handling and clear feedback routines.
A student moving from Level 2 or Level 3 into university will often ask whether a portfolio needs a personal statement. Course requirements vary, but a coherent body of work and a concise explanation of themes are useful preparation. One UCAS course listing requires a portfolio and Creative Positioning Statement before interview, describing a thematic body of work supported by contextual understanding and an approximately 500-word statement in its published course information. That particular requirement is for postgraduate study, so applicants must check each undergraduate course directly.
KS3 Art Projects: 10-Project Comparison
| Project | Implementation Complexity 🔄 | Resource Requirements ⚡ | Expected Outcomes 📊⭐ | Ideal Use Cases 💡 | Key Advantages ⭐ |
|---|---|---|---|---|---|
| Observational Sketchbook Journal: Developing Visual Research Habits | Medium, sustained timetable and tutor checkpoints 🔄 | Low, sketchbook, basic drawing media, scanner/phone ⚡ | Builds observational drawing, annotated process evidence for portfolios, ⭐⭐⭐⭐ 📊 | Long-term portfolio development, remote/home learning, foundational skill-building 💡 | Encourages consistent practice and clear process documentation ⭐ |
| Artist Study and Creative Response: Pop Art Remix | Medium, structured research + guided making 🔄 | Low–Medium, research materials, print/stencil supplies, digital references ⚡ | Demonstrates contextual research linked to practical outcomes, ⭐⭐⭐⭐ 📊 | Teaching art history, contextual studies, briefs requiring stylistic analysis 💡 | Teaches research, referencing and contextual application of style ⭐ |
| Land Art: Sculpture with Natural Materials | Low, simple making but needs site planning and risk checks 🔄 | Very low, found natural materials, camera for documentation ⚡ | Site-responsive, conceptual work documented photographically, ⭐⭐⭐ 📊 | Environmental/conceptual projects, outdoor learning, photography-led portfolios 💡 | Very low cost and strong conceptual discussion points ⭐ |
| Relief Printmaking: Lino and Monoprint Editions | High, tool skills, registration and safety critical 🔄 | Medium–High, lino/polystyrene, cutters, inks, printing tools, ventilation ⚡ | Technical editions showing consistency, registration and process control, ⭐⭐⭐⭐ 📊 | Printmaking pathways, technical skill demonstration, series work for portfolios 💡 | Teaches traditional, repeatable techniques and professional conventions ⭐ |
| Mixed Media Collage: Layered Narratives | Low, concept-led but straightforward making 🔄 | Low, found papers, adhesives, paints, scissors ⚡ | Experimental compositions showing material choices and narrative, ⭐⭐⭐ 📊 | Rapid prototyping, thematic exploration, students reluctant to draw 💡 | Flexible, low-cost, encourages risk-taking and material play ⭐ |
| Cyanotype Photography: Photograms and Botanical Records | Medium, chemistry and exposure control, test logging 🔄 | Low–Medium, cyanotype kit, UV/sunlight, trays, drying space ⚡ | Visually striking process-based series showing historical awareness, ⭐⭐⭐ 📊 | Photography courses, historical/process experimentation, science crossovers 💡 | No camera needed; strong visual impact and process focus ⭐ |
| Textile Stitch and Surface Design: Embroidered Storytelling | Medium–High, skills and time-intensive making 🔄 | Medium, fabrics, threads, needles, workspace; sampler materials ⚡ | Technical stitched samples and panels demonstrating surface design, ⭐⭐⭐⭐ 📊 | Textile/fashion portfolios, craft-focused practice, narrative surface work 💡 | Teaches traditional craft skills and detailed material development ⭐ |
| Hand-Built Ceramics: Coil and Pinch Sculpture | High, drying, firing schedules and material handling 🔄 | High, clay, tools, kiln access or firing service, storage ⚡ | Durable 3D outcomes demonstrating material processes and craft, ⭐⭐⭐⭐ 📊 | 3D/ceramics portfolios, material-led practice, sculpture pathways 💡 | Tactile outcomes that show three-dimensional thinking and technical competence ⭐ |
| Graphic Design: Typographic Poster Campaign | Medium, brief-led process, iteration and mockups 🔄 | Medium, software (free or paid), printing/mockup resources ⚡ | Professional brief response, typographic hierarchy and campaign cohesion, ⭐⭐⭐⭐ 📊 | Design, advertising and communication portfolios; client-simulated briefs 💡 | Highly career-relevant; easy to present mockups and iterations ⭐ |
| Identity and Self-Portrait Series: Exploring Who I Am | Medium, conceptual sensitivity and iterative development 🔄 | Low–Medium, mixed media, camera/studio props, costume materials ⚡ | Personal, concept-led series showing voice and direction, ⭐⭐⭐⭐ 📊 | Fine art and foundation portfolios emphasising authorship and concept 💡 | Strong evidence of personal voice and conceptual maturity ⭐ |
Turning Projects into a Portfolio Habit
Ten projects can produce a great deal of work, but quantity alone won't create a university-ready portfolio. The useful habit is to keep one running portfolio across the year, combining sketchbook evidence, written reflection and dated photographs. Each project should leave behind a clear sequence: starting point, research, experiments, feedback, refinement, final outcome and evaluation.
Use one folder for digital files and one physical or scanned record for sketchbook pages. Name photographs consistently with the project, date and stage. Photograph work before it leaves the learner's control, especially temporary land art, clay pieces and collaborative installations. For remote learners, include the work beside a simple scale reference when size matters, and record short videos where a photograph cannot show process.
The national curriculum expects pupils to record observations in sketchbooks and other media, use varied techniques, improve material handling, analyse their own and others' work and study art, craft, design and architecture across periods and movements. The statutory national curriculum for art and design therefore supports a project sequence that values evidence and evaluation, not only attractive outcomes. A familiar theme can teach more than a novel one if it creates repeated observation, iteration and reasoned judgement.
Assessment should also reflect the whole portfolio. A 2024 pilot of Adaptive Comparative Judgement across six academies used 272 pupil work samples, with each item judged 13 times. The resulting reliability coefficient exceeded expectations at 0.84 with a ±0.02 interval, indicating strong repeatability between judgements in the published case study. The practical lesson is to compare complete bodies of work, including experiments and annotations, rather than awarding isolated marks to disconnected final pieces.
Level 2 and Level 3 students should also check progression details early. The Department for Education explains that new Level 3 Alternative Academic Qualifications are being added to UCAS Tariff tables, but universities set their own requirements and may ask for portfolios, interviews or practical evidence in its guide to post-16 qualifications. Students should identify the awarding body, qualification size, UCAS Tariff status and exact entry requirements for each target course before enrolling. A Level 3 qualification can support progression, but it isn't a universal guarantee of admission.
Funding questions need the same care. GOV.UK explains that undergraduate student finance may support eligible higher-education courses such as a first degree, foundation degree, CertHE, DipHE, HNC, HND, integrated master's degree or an approved Level 4 or 5 course, subject to eligibility rules in its student finance guidance. A Level 2 or Level 3 art course does not automatically qualify for undergraduate student finance. Adult learners in England may instead investigate an Advanced Learner Loan for an eligible Level 3, 4, 5 or 6 course, if they meet the age, provider, course and residency conditions set out by GOV.UK.
For the teacher choosing two projects next term, select one process-led project, such as the observational journal, and one outcome-led project, such as the typographic campaign, then decide in advance which portfolio evidence you'll review. For the home educator, set a weekly target of three sketchbook pages, schedule the first feedback review and start with an ordinary place that the learner can revisit. That small routine creates the evidence from which more ambitious work grows.
The Online College of Art & Design (OCAD) offers a dedicated Key Stage 3 Art online course with tutor guidance, assignments, video tutorials, step-by-step resources and an online portfolio workspace. Visit The Online College of Art & Design (OCAD) to explore flexible tutor-led pathways from entry level through Level 3, including SEND-supported study and portfolio-centred creative courses.