

You've got the paper taped down, a pencil sharpened to a chisel point, and a photo of an iron spiral on your screen. Twenty minutes later the drawing looks like a squashed spring: treads bunched at the bottom, a handrail that wanders off the axis, and nothing about it suggesting a stair a person could climb. You shade harder, hoping detail will fix it. It won't.
The reason isn't your pencil control. A spiral staircase drawing is a measured drawing, and it gets built twice. First as a plan, where the treads are fixed as angles round one centre point. Then as a perspective, which is a projection of that plan rather than a freehand guess. Skip the first drawing and the second has nothing to obey.
What follows is a numbered procedure for both, with every stage checked against real UK stair dimensions and a single fixed light direction. Work in order, because an error in the plan runs downhill into every later stage.
Table of Contents
- Build the Plan View Before Anything Else
- Turn the Plan into a Perspective Drawing
- Check Proportions Against UK Stair Dimensions
- Shade the Treads and Core Shadow Convincingly
- Fix the Mistakes That Make Spirals Look Wrong
- Answers to University Questions for Level 2 and 3 Students
- Study a Historic British Spiral Stair
- Draw Your First Dimensioned Study This Week
Build the Plan View Before Anything Else
Start with the drawing that carries the numbers. A perspective view of a spiral is only as honest as the circle underneath it, because each tread you see in three dimensions is a wedge you already fixed in two. Get the wedges right and the perspective has something to obey. Guess them and no amount of careful shading rescues the drawing.
Work on A3 if you have it. A spiral drawn small forces you to fudge the angles by a degree or two, and fudged angles are the most common reason a finished staircase reads as a coil rather than a building. Sharpen a hard pencil (2H or H) so the construction lines stay light enough to correct.
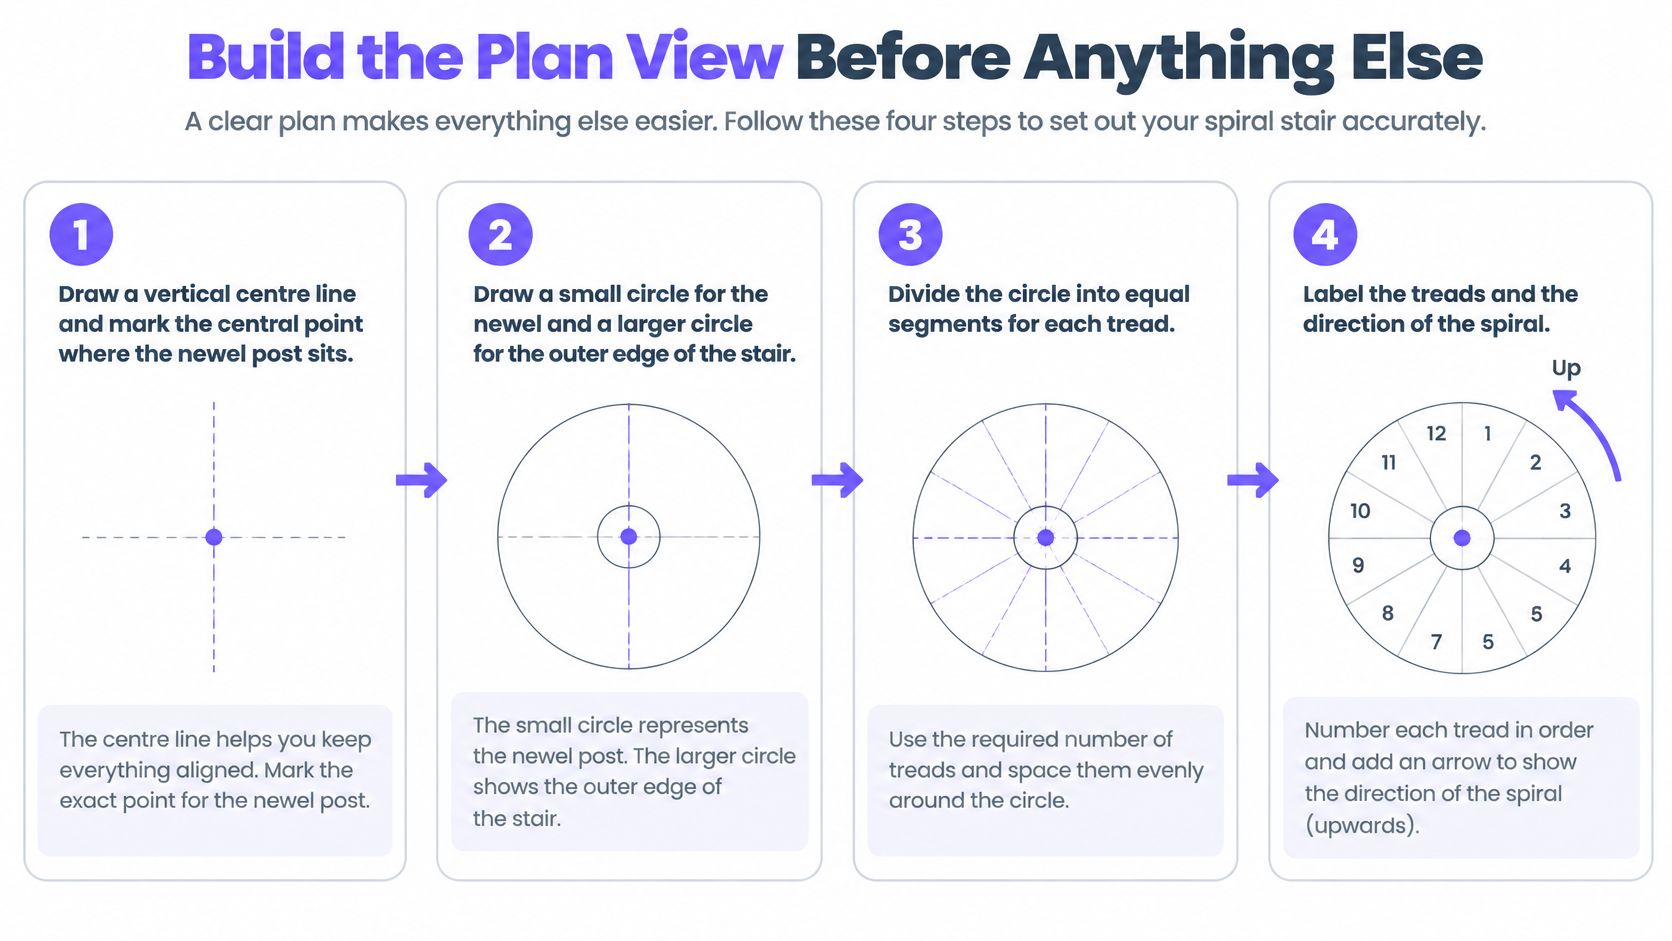
Six steps from one centre point
- Draw a vertical centre line and mark the central point. The newel post sits here, and every radial line you draw afterwards starts from it. A centre that wanders by even a millimetre or two turns into a visibly lopsided stair once the treads are stacked.
- Draw a small circle for the newel and a larger circle for the tread edge. The small circle is the post's thickness; the large circle is the full diameter of the stair. Both are centred on the same point, and that shared centre is the whole geometry of the drawing in one mark.
- Divide the full circle into equal angles from the centre, using a protractor or by folding a paper circle into halves, quarters and eighths before transferring the creases. Twelve treads means 30 degrees each. Equal angles are what make treads equal, so this step does the work that shading can never do.
- Draw each tread as a wedge between the two circles. Keep the outer ends the same depth at the walkline, the path a person's feet follow about a third of the way in from the outer edge. A wedge that narrows to nothing near the post is fine in plan and impossible to climb.
- Mark the rise per step on the centre line as a number. Small figures beside each tread line let you stack the stair later without recalculating anything, and they expose an uneven rise immediately.
- Run the check before moving on. Count the wedges, then confirm the final tread lands level with the floor above. If it doesn't, the fault is in the tread count or the rise, not in your drawing hand.
Here's the four-step summary of what you've just built.
Let the tread count set the angle
The tread count is your first real design decision, and it changes every angle in the drawing.
| Treads per full turn | Angle per tread | Drawing note |
|---|---|---|
| 8 | 45 degrees | Quarters and halves, easy to check by eye |
| 10 | 36 degrees | Clean divisions, good for a compact stair |
| 12 | 30 degrees | Classic division, simple to measure with a protractor |
| 14 | About 25.7 degrees | Needs careful measuring, errors show quickly |
| 16 | 22.5 degrees | Dense spiral, draw the centre lines first |
Fewer treads sweep a wider angle, which lengthens the going at the walkline. More treads tighten the spiral and shorten it. That matters when you compare a compact private stair with a public one, because the going is the dimension UK guidance measures. If your centre going comes out short, widen the diameter rather than adding treads, since extra treads shrink the angle further and make the going worse.
This is measured drawing in the fullest sense, and the habits it builds are the same ones at work in drawing in construction, where the drawing has to agree with the thing being built.
Test before you shade: every wedge must meet the centre at the one marked point, and every angle must match the division you chose. If either fails, redraw the plan rather than adjusting the perspective.
Turn the Plan into a Perspective Drawing
Perspective doesn't invent a spiral. It projects one. Once the plan holds a fixed number of treads at fixed angles, the three-dimensional view becomes a mechanical consequence of where you place the viewer's eye.
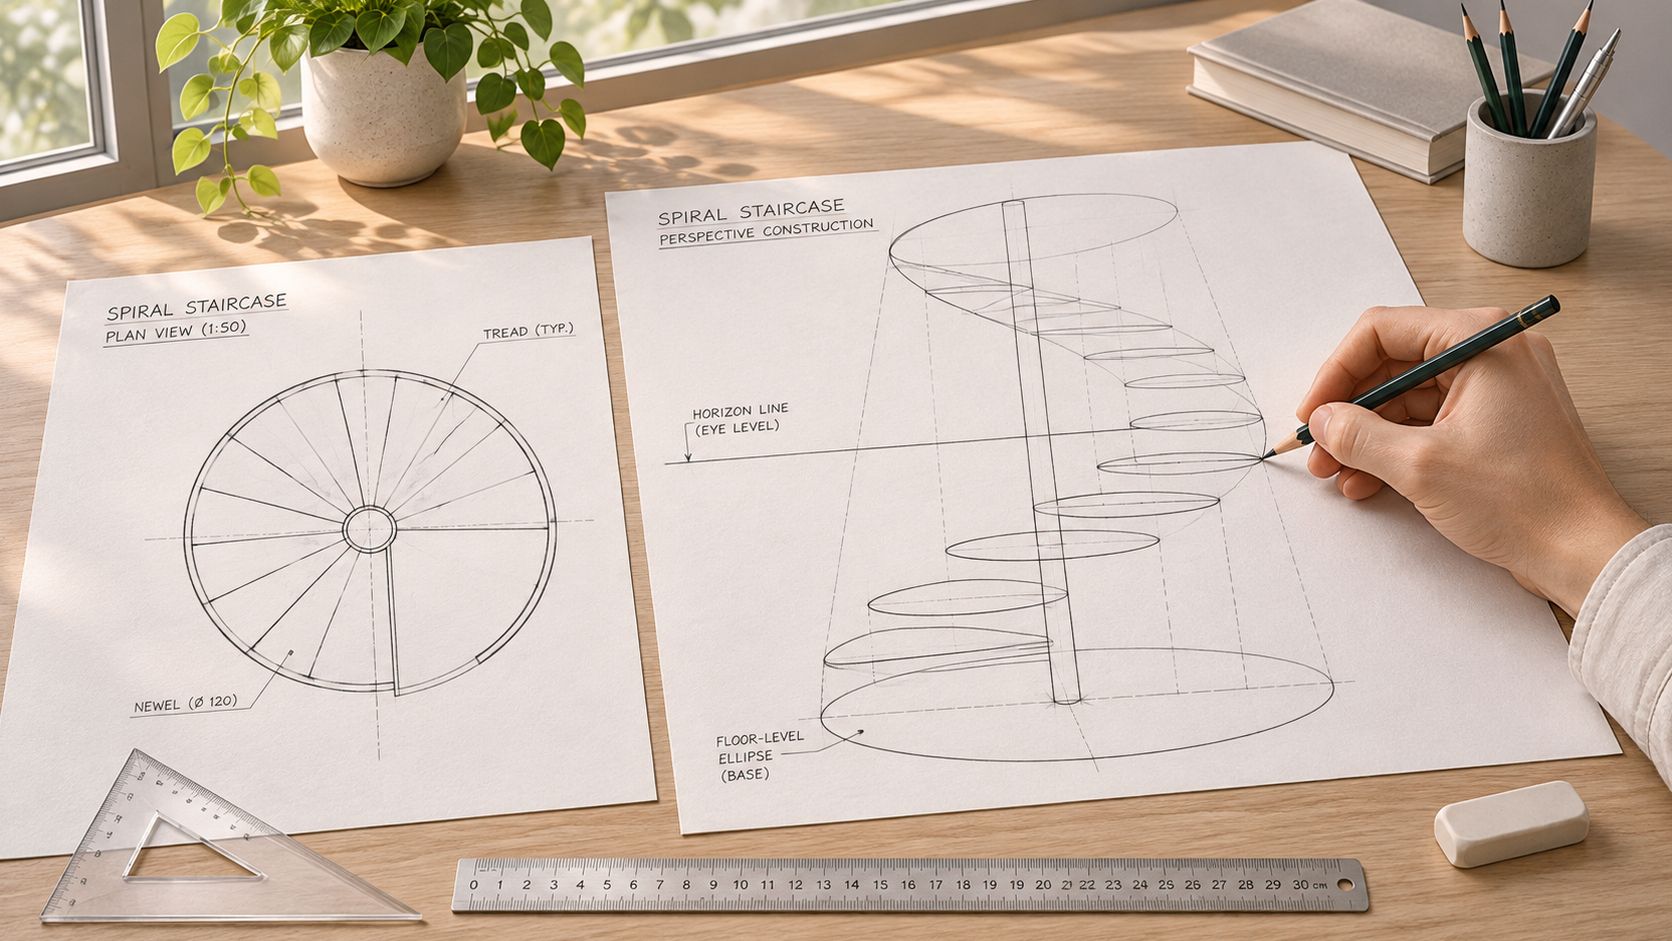
Set the horizon line first, at the height of the viewer's eye. This single line governs everything above. A circle at eye level flattens to a straight line; a circle just above or below it becomes a narrow ellipse; a circle far below your eye opens into a wide, round ellipse. That progression is the entire illusion of a spiral rising away from you.
Six steps from plan to perspective
- Draw the base ellipse at floor level, the plan's outer circle seen at an angle.
- Mark the rise on a vertical line through the centre, using the same spacing you wrote on the plan.
- Draw the matching ellipse at each rise level, keeping the same width but narrowing it as it approaches the horizon.
- Connect the outer edges of the ellipses to form the outer curve of the treads. These connectors are what the eye reads as the stair's edge.
- Draw the newel post as a vertical line through the inner ellipses, and keep it vertical. A leaning post kills the illusion faster than any other error.
- Add the underside of the treads only where the viewpoint exposes them, which is usually the lower half of the stair.
Working from a plan with a horizon line, as described in this guide to two-point perspective, keeps the ellipses honest instead of drawing them to look pretty.
The confusion that flattens the stair
Students draw every ellipse at the same apparent height and the same roundness, and the stair collapses into a flat coil. The fix is to ask, for each ellipse, how far it sits above or below the horizon line, then draw it accordingly. Ellipses also share one minor axis, and that axis stays vertical in a centred view. Tilt one ellipse and the whole helix twists.
Check at the end. The stacked ellipses should line up on one vertical axis, and the top tread should break above the horizon only if the viewer is looking up at the stair.
Check Proportions Against UK Stair Dimensions
A spiral can obey every rule of perspective and still feel wrong, because nothing in the image tells the viewer how big it is. UK guidance separates stairs by use, and the numbers differ sharply.
| Use category | Clear width | Centre going | Minimum headroom |
|---|---|---|---|
| Small private spiral | 600 mm | 145 mm | 2,000 mm |
| Public stair | 1,000 mm | 250 mm | 2,000 mm |
Those reference values come from a UK summary of spiral stair building regulations, which also sets minimum headroom at 2,000 mm and covers the familiar 100 mm sphere rule for dangerous gaps. Read the two rows together and the design problem changes. It isn't only how to draw a spiral, it's how to show scale, use and compliance through the image.
Annotate, don't decorate
Add dimension lines once the perspective is settled. Run a line across the tread at the walkline for centre going, a line across the full diameter, a vertical line for headroom, and a note for user category. These take minutes and convert a pleasant sketch into a credible one.
Handrail height belongs in the same family of checks. The 900mm to 1000mm handrail requirements from Binks Balustrades explain where the rail sits relative to the tread nosing, and a rail drawn at the wrong height is one of the quickest ways to make an otherwise convincing stair look wrong.
Then test yourself properly: draw the same spiral twice, once as a small private stair at 600 mm clear width and 145 mm centre going, once as a public stair at 1,000 mm and 250 mm. The second version forces the diameter wider and the treads longer, and the drawing changes character completely.
These figures are reference points from UK building guidance for learning and portfolio work. For any real project, check the current rules with the relevant authority.
Shade the Treads and Core Shadow Convincingly
Shading a spiral goes wrong for one reason: inconsistent light. A spiral is nothing but repeated surfaces, so the moment two treads disagree about where the light comes from, the stair stops reading as one object.
Make one decision before the pencil touches the paper, and write it down. Pick a direction, say upper left, and draw a small arrow in the margin of the sheet. Every shadow in the drawing answers to that arrow.
- Sketch the light arrow in the margin first. It's your reference for the next hour and it costs three seconds.
- Keep the top surfaces of the treads lightest, since they face the light source most directly.
- Darken the undersides and the edges turning away. Undersides carry the punch in a spiral because you see so many of them.
- Add a cast shadow beneath each tread, falling in the same direction every time. Cast shadows are what separate the treads visually.
- Darken the core shadow along the newel post, where the stair turns away from the light, and keep that band continuous from top to bottom. A broken core shadow makes the post look bent.
- Work to at least four values, from bare white paper to your darkest shadow, and squint at the drawing to check they still separate.
Say a student shades each tread on its own, treating every step as an isolated exercise. The finished stair appears to twist in two directions at once, and the culprit is light, not geometry. Adjusting shading after the arrow is fixed takes a single pass, as this explanation of how an object casts a shadow makes clear.
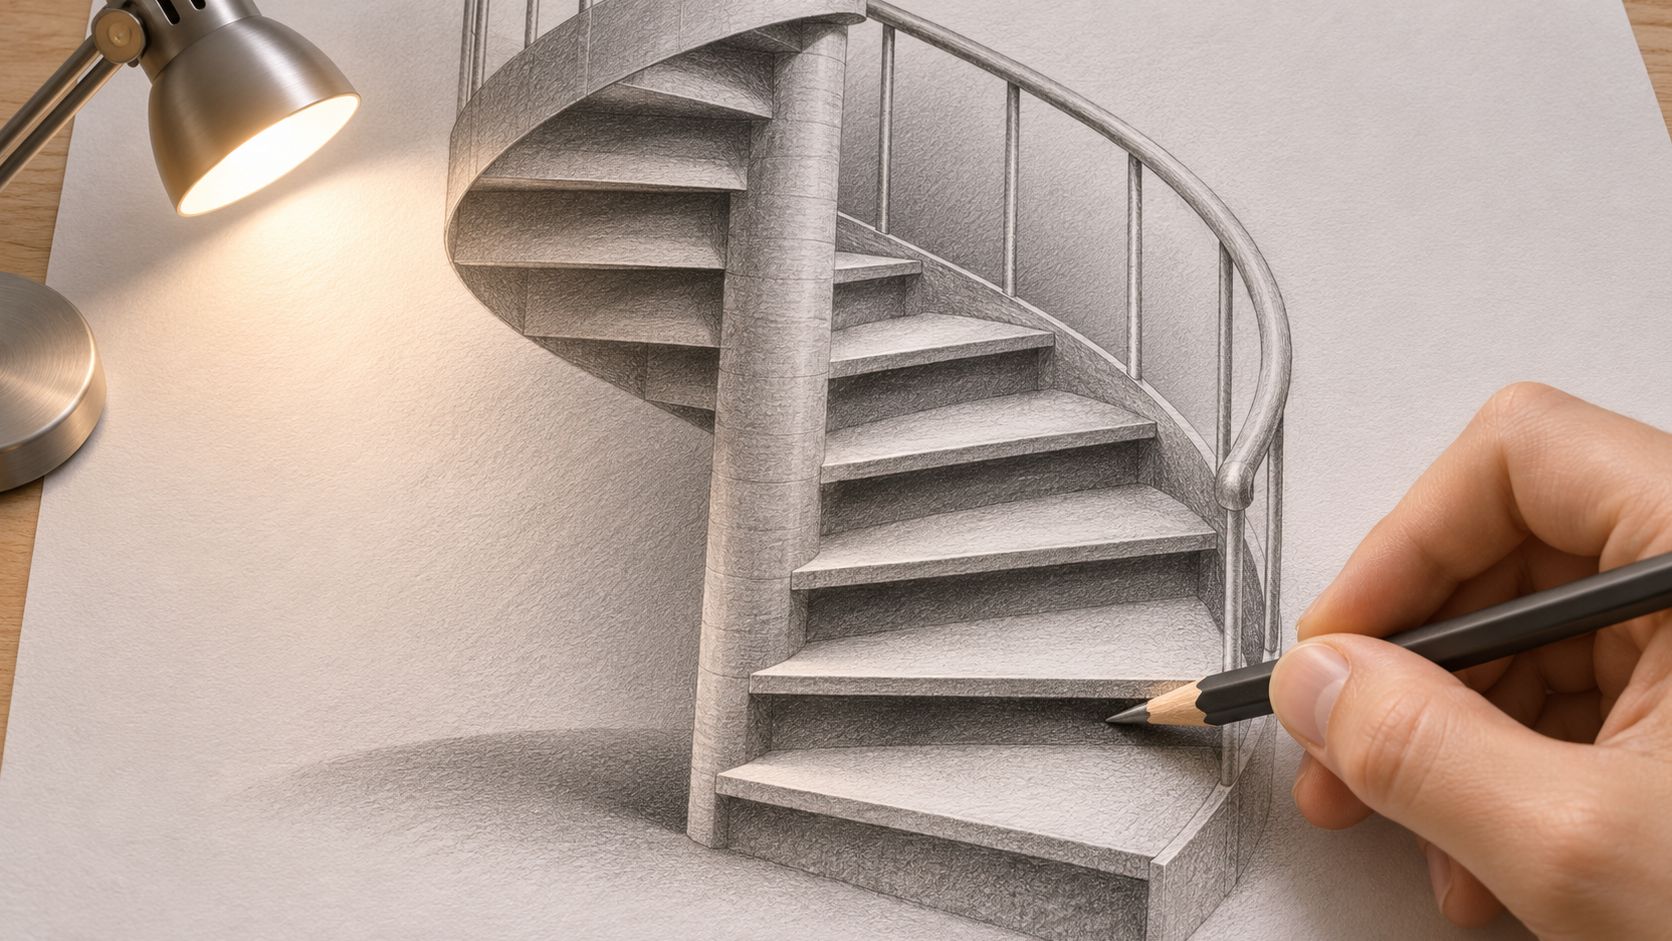
The final check is agreement. Your lightest tread, your darkest core shadow and every cast shadow must all answer to the same arrow.
Fix the Mistakes That Make Spirals Look Wrong
Most faults in a spiral staircase drawing are diagnosable from the symptom alone. Read the row that matches what you're seeing, then go back to the stage that owns that rule rather than redrawing the whole stair.
| Symptom | Likely cause | Fix |
|---|---|---|
| Treads spaced unevenly | Angles guessed rather than divided from the centre | Redraw radial lines from one centre point before adding treads |
| Ellipses look too round | Horizon line never set | Place the horizon line first and flatten ellipses close to it |
| Stair looks too narrow | Clear width not shown | Add dimension lines for clear width and headroom |
| Shadows fall in different directions | Light source changed per tread | Choose one light arrow and check every cast shadow against it |
| Stair appears to float | Newel post and underside edges missing | Draw the newel post and the visible underside edges |
Correcting the plan means redrawing from the centre point, which can take most of a session. Adding dimension lines takes minutes. Shading is one pass once the light arrow is fixed.
Work in a fixed order: plan, then horizon and ellipses, then dimensions, then shading. When a drawing looks wrong, check the wedges against the centre point before touching the shading, because most perspective and shading problems begin in the plan view.
Answers to University Questions for Level 2 and 3 Students
Creative students finishing Level 2 or Level 3 qualifications ask a small set of questions about university entry, and the answers are more specific than the general advice they usually get.
Do Level 2 or Level 3 creative qualifications meet entry requirements? There's no UK-wide rule. Each university and course sets its own, and it may name particular Level 3 qualifications, subjects, grades or UCAS Tariff points. UCAS entry requirements guidance lists A levels, T Levels and Scottish Highers as examples universities may specify directly, and many courses also expect GCSE English and maths or equivalent. Check the exact course page instead of assuming your Level 3 art or photography qualification gives automatic entry, and check whether an interview, admissions test or portfolio is required.
What should the personal statement cover? For art and design it supports the portfolio and the interview rather than reading as a biography. UCAS personal statement advice for art and design asks applicants to discuss independent activity such as books read or exhibitions visited, explain how those experiences changed their own work, and refer to the projects they plan to show, with their methods and influences. That's why development records matter as much as finished pieces.
Can mature students apply and receive finance? Yes. In England there's no age limit for a Tuition Fee Loan for a first undergraduate degree, as UCAS guidance on student finance for mature students confirms, and part-time study can qualify where its intensity is at least 25% of a full-time course each year.
Can I study online and get a Maintenance Loan? Generally only where a part-time distance learner is studying remotely because of a disability, according to UCAS student finance in England. Part-time funding also needs at least 25% intensity and a course that doesn't take more than four times the full-time completion period, up to a maximum of 16 years, and eligibility still depends on nationality, residency, course type and household income.
Practical rule: ask about the course before the qualification. The question is never whether Level 3 "counts" in general, it's whether that specific course page names it.
Study a Historic British Spiral Stair
British spiral stairs are a long-running architectural form, not a modern design trend, which makes them usable as drawing subjects rather than trivia. The Tower of London holds an 11th-century spiral stair, Conwy Castle a 13th-century example and Kirby Muxloe Castle a 15th-century example, each connecting floors on a compact circular plan where a straight stair would have taken more space, as this history of the spiral staircase sets out.
The direction myth is worth correcting. Of 211 British examples whose direction could be established, 149 rose clockwise and 62 anticlockwise, about 70.6% and 29.4%, which challenges the assumption that medieval defensive stairs were overwhelmingly anticlockwise.
For a drawing lesson, the Tulip Staircase at the Queen's House, Greenwich, built between 1629 and 1635, is widely identified as an early self-supporting spiral in England, where interlocking treads make the stair appear to rise without a central column, as noted in this Hever Castle piece on staircases.
Choose one historic stair. Note its direction, its tread repetition and how enclosed it feels, then redraw it as a plan and an elevation before designing your own.
Draw Your First Dimensioned Study This Week
One exercise, finishable in a couple of evenings, pulls every stage together. Pick a use category first, private or public. Draw the plan at a tread count from the angle table, build the stacked perspective on a horizon line, add dimension lines for clear width, centre going, diameter and headroom, then finish with one light arrow and a four-value tonal scale.
- Review against the plan, not the mood. Put the finished perspective beside the plan and confirm the wedges, ellipses and cast shadows all agree with it.
- Keep the two drawings as separate pages. A portfolio that shows the plan, the perspective and the corrections in between demonstrates decision-making, which is exactly what admissions tutors look for in creative applications.
- Time the stages. Most learners spend too long on shading and too little on the circle underneath.
If you want structured feedback, work through this with tutor-led online perspective drawing so the plan and the dimensions get checked before shading begins. At The Online College of Art & Design (OCAD), online art courses cover drawing, oil painting, watercolour, acrylic painting, mixed media, colour theory, composition, perspective drawing, tonal and light studies, observational painting, and art history and visual analysis, so plan, projection and light can be worked through in sequence rather than guessed at.
If you'd like to build a spiral staircase drawing from the plan up, with a tutor checking the angles and dimensions before you commit to shading, The Online College of Art & Design (OCAD) teaches drawing, perspective and tonal studies through tutor-led online courses from entry level to Level 3, with portfolio-focused feedback on every unit. Bring your plan view, your horizon line and your light arrow, and we'll work through where the geometry holds and where it needs rebuilding. Visit The Online College of Art & Design (OCAD) to see the courses and start your first dimensioned study.