

In linear perspective, the horizon line is the viewer's eye level, and receding parallel lines converge at a vanishing point on it. The system was devised around 1415 and documented in 1435, turning eye level into a formal structure for organising space in art.
The most popular beginner advice says the horizon line is where the sky meets the sea or land. That description is convenient, but it can lead you badly astray when you draw a room, a street, a staircase, or a photograph taken from an unusual height. The visible skyline and the geometric horizon line sometimes overlap, but they aren't automatically the same thing.
For a Level 2 or Level 3 student, the useful question isn't only "where does the scene end?" It's "from what height am I seeing this view?" Once you answer that, perspective becomes less mysterious. You can test the idea immediately with a pencil, a ruler, and a sheet of paper.
Table of Contents
- What a Horizon Line Actually Is
- A Short History from Brunelleschi to British Landscapes
- How the Horizon Line Works in One-Point Perspective
- One-Point Versus Two-Point Perspective on the Same Horizon
- Common Mistakes When Placing the Horizon Line
- Three Quick Exercises to Practise Horizon Placement
- Why Horizon Lines Matter for Portfolios and Progression
What a Horizon Line Actually Is
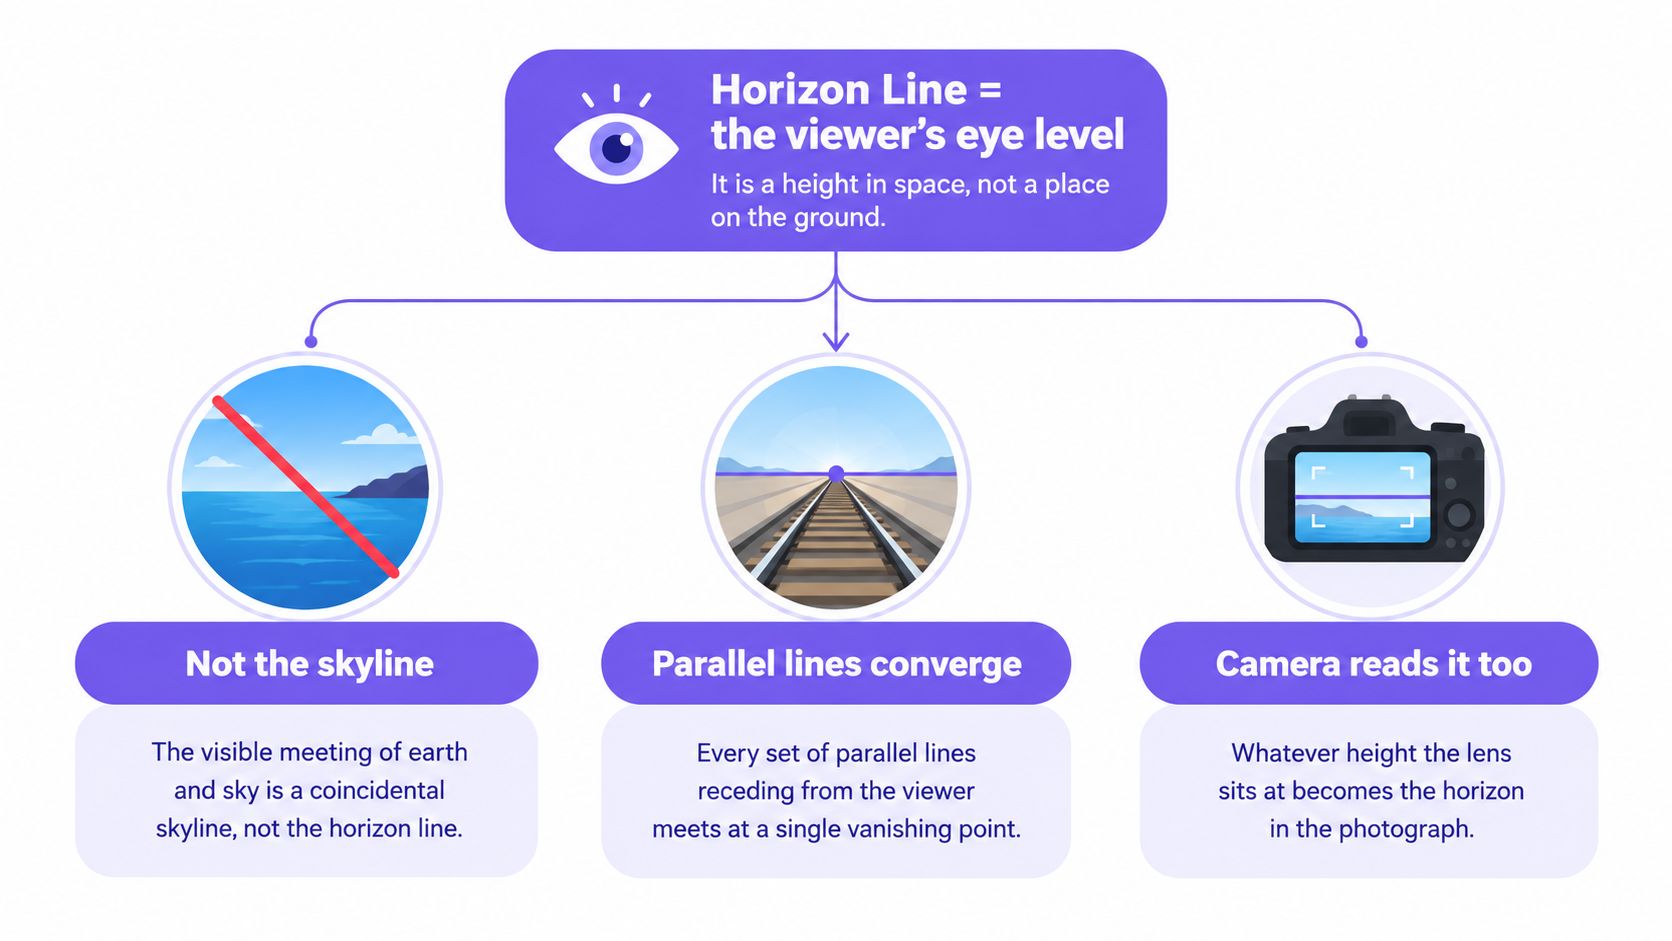
The horizon line is the viewer's eye level in linear perspective. It's an imaginary horizontal line running through the picture space. Receding parallel lines, such as railway tracks, road edges, rows of ceiling beams, or the sides of a corridor, appear to move towards a vanishing point on that line. The lines never physically meet, but the drawing makes them appear to do so, creating the illusion of depth. This is the core mechanism described in the National Gallery's explanation of linear perspective.
Try a simple test. Hold an imaginary sheet of glass upright at arm's length. The horizon line would be the line painted on the glass at exactly the height of your eyes. If you crouch, that line moves lower in the scene. If you stand on a step, it moves higher. The line describes your viewpoint, not a mark that belongs permanently to the surrounding scenery.
Skyline and horizon are different
A literal skyline is the visible meeting of earth and sky, or sea and sky. It only coincides with your eye level in particular circumstances, such as viewing a flat sea from sea level. Stand on a hill above the coast and the physical sea line may sit below your eye level. Draw an interior with no outdoor view and you might not see a skyline at all, yet the perspective horizon still controls the room.
This distinction also helps when you're choosing images for a room or studying contemporary wall art for interiors. A printed skyline may show a beautiful horizon boundary, but that visible boundary isn't automatically the line you'd use to construct every object in the image.
Quick check: The horizon line answers “how tall am I in this picture?” It doesn't answer “where does the land stop?”
For your first sketch, draw a horizontal line across a page. Add two road edges that narrow towards a point on the line. You've just used the horizon line as the organiser of spatial depth, even if the page shows no sky, sea, or distant land.
A Short History from Brunelleschi to British Landscapes
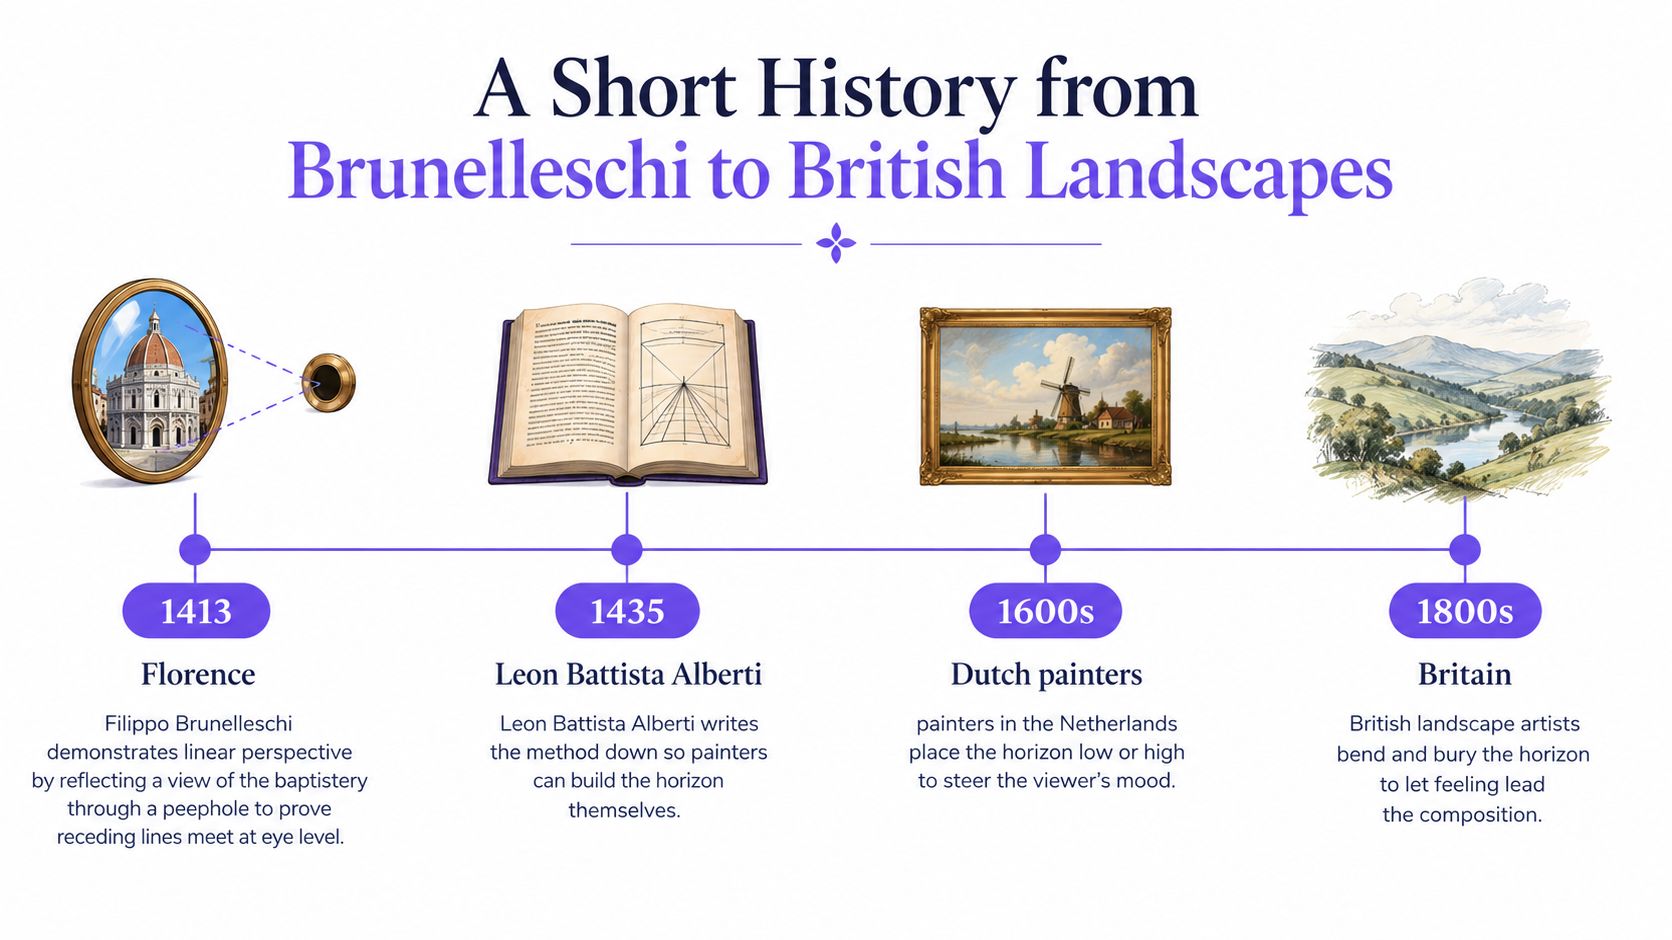
Linear perspective gave artists a formal method for constructing believable space. Britannica's historical account places Filippo Brunelleschi's method around 1415 and Leon Battista Alberti's written documentation in 1435. The horizon line, orthogonals, and vanishing point worked together as parts of the system. You can explore that historical summary in this UK art education resource on perspective and horizon lines.
The important change was practical. Artists could decide where the viewer stood, set the eye level, and guide receding edges towards a consistent point. Instead of judging every line by instinct, they had a repeatable way to build depth. Perspective therefore became both a technical language and a visual effect.
A technical system becomes an expressive choice
Artists soon used horizon placement to shape meaning, not only to organise construction. A low horizon leaves more space for sky and atmosphere. A high horizon gives the ground, foreground, or built environment greater visual authority.
British art repeatedly returns to this decision. Tate's material on Looking at the View describes artists across 300 years of British art through recurring motifs that include the horizon line, from Romantic painting to contemporary photography and film. The choice of height can affect how a viewer senses weather, terrain, distance, and scale.
Try the decision in a small study. Draw the same subject twice, changing only the horizon height. In one version, give most of the page to cloud, haze, or changing light. In the other, allow foreground texture, rocks, roads, or architectural space to dominate. Compare which version communicates your intention more clearly.
You can also follow a practical exercise such as painting vivid scenery in acrylics. That kind of experiment links Renaissance construction methods with later British pictorial arrangement. It also gives you a clear portfolio note: explain how a compositional choice changed the viewer's position and attention.
How the Horizon Line Works in One-Point Perspective
One-point perspective suits a scene that faces the viewer directly. A corridor, a straight road, a tunnel, or a row of lockers can all use the system because the main receding edges travel towards one vanishing point.
Build the drawing in four moves
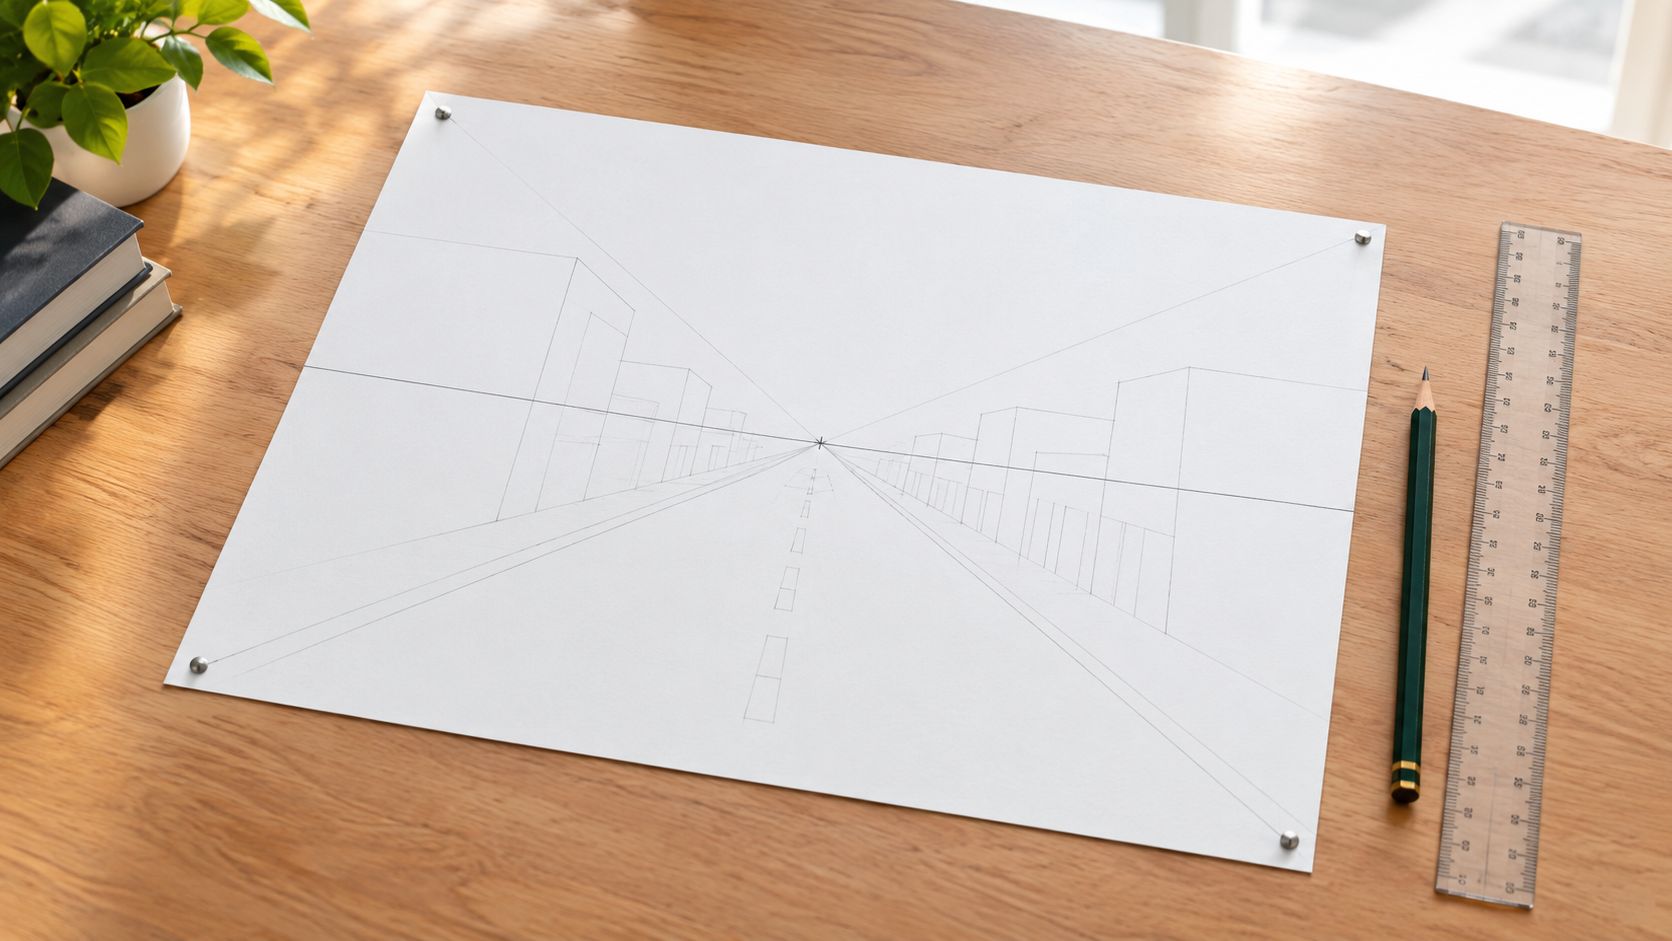
Mark eye level. Draw a light horizontal line across the page. This is the horizon line, whether or not the finished image will show it.
Choose the vanishing point. Place one point on the line. A central point creates a balanced, tunnel-like view. An offset point makes the scene feel less symmetrical and can direct the eye towards one side.
Draw the front plane. Sketch the front of a box, doorway, or building so it faces you. From its corners, draw light lines towards the vanishing point. These are called orthogonals, the receding edges that establish depth.
Add the back edges. Decide where the rear of the form sits, then connect those edges. Near objects should occupy more visual space than distant ones. The vanishing point helps you keep the recession consistent rather than guessing each line separately.
A corridor makes the system easy to see. The floor tiles, ceiling beams, and wall edges all narrow towards the same point. A person whose eyes align with the horizon appears to stand at your eye level. A figure placed above or below that line can read as taller, shorter, higher, or lower in relation to you.
Watch the short demonstration below after trying the first construction. Notice how the horizontal eye-level decision controls the rest of the drawing.
Moving the horizon isn't decoration. It changes whose viewpoint the picture inhabits. A low horizon can make a viewer feel close to the ground or surrounded by sky. A high horizon can reveal more of a floor, road, or tabletop. The same thinking helps when you study professional portrait tips from AiHeadshots, because a camera's height affects how a person and their surroundings are read.
One-Point Versus Two-Point Perspective on the Same Horizon
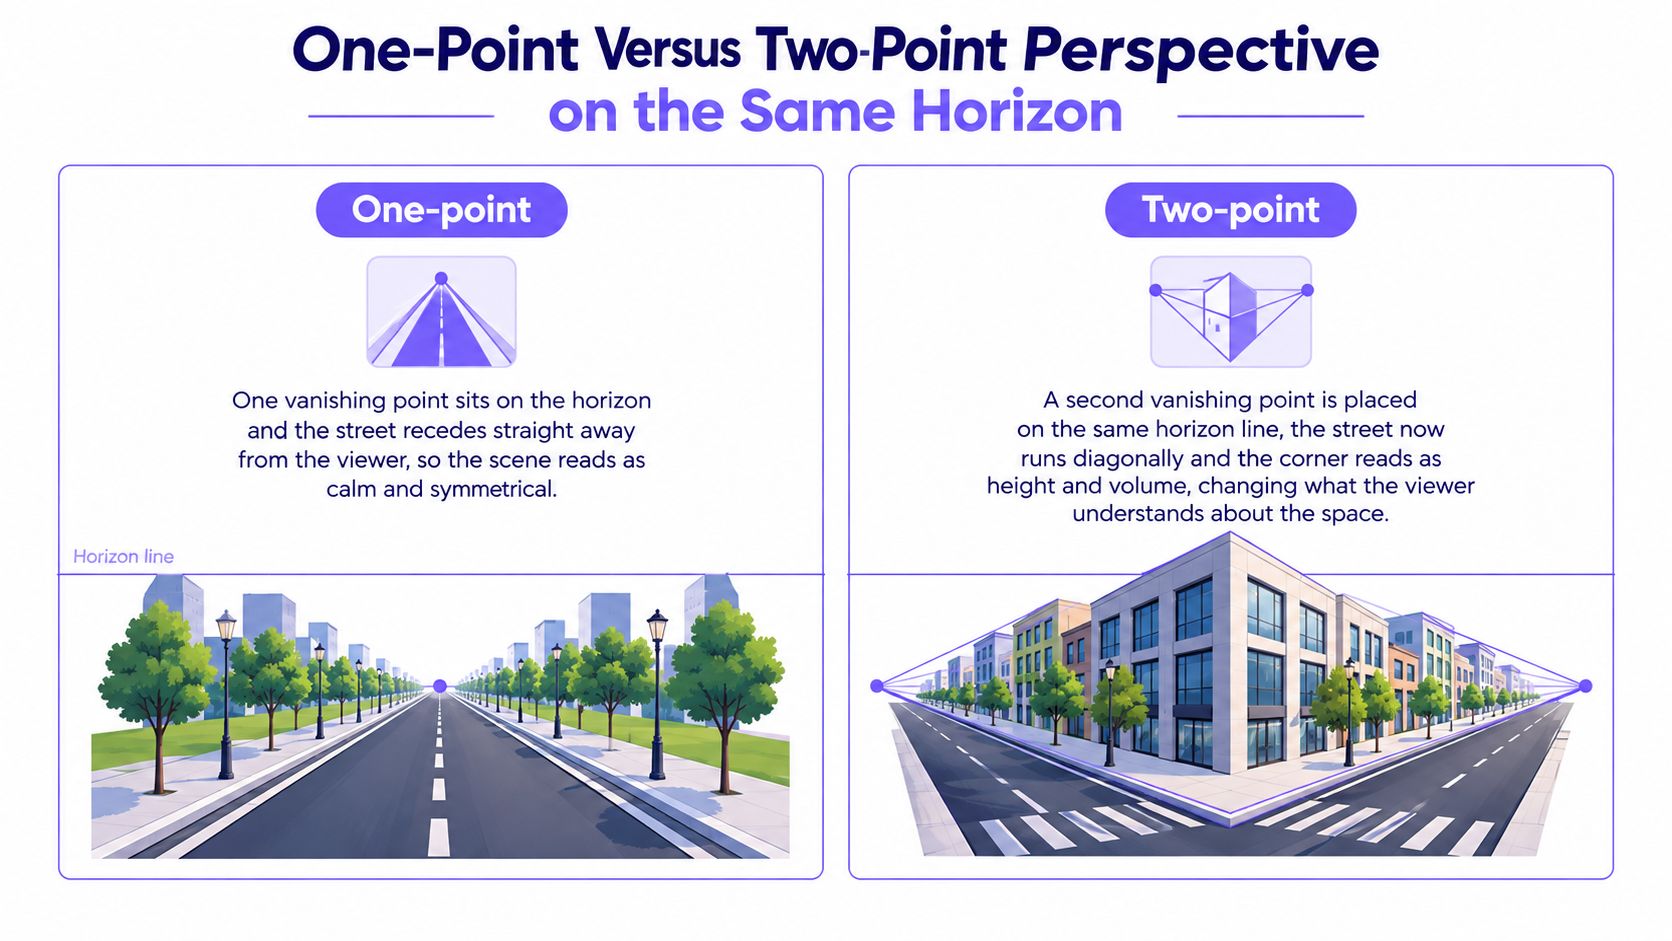
One-point and two-point perspective share the same foundation. In both systems, the horizon line represents the viewer's eye level. The difference is the number and direction of the vanishing points used to describe receding planes.
| Drawing situation | Vanishing-point arrangement | What the viewer reads |
|---|---|---|
| A road viewed straight on | One point on the horizon | Frontal depth and visual symmetry |
| A building corner turned towards you | Two points on the same horizon | Separate side planes and a stronger sense of volume |
| A centred interior | One point, often near the centre | Calm, ordered recession |
| An architectural corner study | Two points, often spread apart | Rotation, width, and three-dimensional structure |
In a one-point scene, the front plane faces you. The vertical edges remain vertical, the horizontal front edges remain horizontal, and the depth edges travel towards one point. This works well for a frontal street view, a corridor, a product shown face-on, or an interior arranged around a central axis.
In two-point perspective, you turn the object or camera so that you see two planes at once. The left-facing set of horizontal edges travels towards one vanishing point, while the right-facing set travels towards another. Both points still sit on the same horizon line. The vertical edges generally remain vertical unless you introduce a different viewpoint or a deliberate distortion.
The useful decision isn't “which system is more advanced?” It's “what is the object doing in relation to me?” Use one point for frontal symmetry. Use two points for rotated volumes, such as a building corner, a box turned on a table, or a street that moves diagonally across the page.
For a quick comparison, draw the same cube twice. In the first version, face one side directly towards you and send its depth edges to one point. In the second, turn the cube so two faces are visible and send each set of receding edges to its own point. Keep the horizon fixed. Only the vanishing-point arrangement changes.
Common Mistakes When Placing the Horizon Line
A realistic drawing can fail before you add detail if the horizon line comes from an unexamined habit. Students often place it at the top of the page, copy the visible skyline, or choose a vanishing point without deciding where the viewer stands.
The page edge is not eye level
Putting the horizon near the top because you want to “leave room for the drawing” confuses the paper with the viewpoint. The visual symptom is a scene that feels oddly viewed from above or below, even when the objects look carefully drawn.
Correct it by deciding the viewing height first. Say to yourself, “The line goes where my eyes are, not where the paper starts.” Then place it lightly before drawing the subject.
The physical skyline can mislead you
A mountain ridge or coastal boundary may look like the horizon, but it's only the visible edge of a landform. If you use it as eye level while drawing nearby buildings or roads, the orthogonals can point from inconsistent heights.
Use this correction: “The skyline describes the view; the horizon organises the perspective.” A skyline may sit above or below the geometric horizon.
A vanishing point can sit outside the page
A wide two-point composition may need a vanishing point beyond the paper edge. Students sometimes force the point into the page and create sides that converge too sharply. The result is a distorted building or street.
Extend a ruler beyond the paper and imagine the point outside the frame. Memorise this line: “The page is a window, not the whole perspective system.”
Viewpoint changes need a reason
If you draw a tabletop from standing height, the visible top plane may be too shallow. If you draw it from a crouch, the ground may dominate unexpectedly. Choose the viewpoint before you choose the subject.
Useful habit: Before adding detail, ask where the viewer's eyes are and whether every receding edge agrees with that height.
These corrections all return to one definition. The horizon line isn't a decorative stripe and it isn't automatically the skyline. It's the drawing's eye-level reference.
Three Quick Exercises to Practise Horizon Placement
Use a soft pencil and one sheet of paper. Give each exercise a few minutes, then spend 30 seconds checking whether the lines agree with the eye level you chose. The aim isn't a polished picture. It's to feel how the same subject changes when the horizon moves.
A low-horizon tabletop
Place the horizon at roughly one quarter of the page height. Draw a tabletop with a mug, a book, and a small box. Let the table's front edge and the sides of the objects recede towards a vanishing point on the horizon.
Keep the upper part of the page open for wall space or a simple background. This arrangement gives the foreground more authority and lets you look slightly across the objects rather than down on a large area of tabletop.
For the self-check, cover the lower part of the page with your hand. Do the objects still feel as though the viewer is close to the table? If the tabletop looks too exposed, your receding edges may be rising too much or your horizon may be too high.
A high-horizon landscape
Place the horizon at roughly three quarters of the page height. Draw a path, field, or road that opens across the lower part of the image. Add fence posts or road edges as repeated forms, making them smaller as they approach a vanishing point.
This gives the ground plane more visual space and reduces the amount of sky. You can use the exercise to test how the land feels when it becomes the dominant subject.
For the thirty-second check, trace the path edges with your finger. They should lead towards a coherent point or perspective direction. If each edge seems to aim somewhere different, redraw the horizon and point before refining the scene.
An off-page horizon
Place the horizon at roughly one half of the page height, then put the vanishing point beyond the right-hand edge of the paper. Draw a street or a long table entering from the left and travelling towards that invisible point. Add several orthogonals, but don't try to squeeze the vanishing point onto the page.
This exercise matters because finished artwork often crops the perspective system. The viewer can still read depth even when the point controlling it remains unseen.
For the final check, extend two receding lines lightly beyond the paper with a ruler or imagine where they would meet. If their direction is consistent, your off-page construction is working. If the subject fans out or narrows too quickly, adjust the angle rather than adding more detail.
Why Horizon Lines Matter for Portfolios and Progression
A horizon line can show more than technical accuracy. It can demonstrate that you made a deliberate decision about mood, power, distance, and viewpoint. A low horizon may give a subject visual height and leave space for atmosphere. A high horizon may make the viewer feel close to the ground, surrounded by objects, or positioned above a broad surface.
That makes horizon studies useful in Level 2, Level 3, A Level, BTEC, and foundation work. A university portfolio shouldn't contain only finished images. UK portfolio guidance commonly asks applicants to show research, development, experimentation, technical competence, presentation, and contextual awareness. One Scottish university's guidance gives named criteria including visual research and enquiry, idea development, selection and resolution, and contextual awareness, with a digital portfolio of up to 20 pages and a maximum file size of 50MB. Read the portfolio preparation and requirements guide before preparing an application.
A practical progression route
Level 2: Make controlled one-point and two-point exercises. Annotate where the eye level sits and explain why you selected it.
Level 3: Use the same perspective knowledge in self-directed compositions, such as a room, street photograph, still life, or personal-response painting.
Interview preparation: Place small horizon experiments beside developed outcomes in your sketchbook. Show what changed when you raised, lowered, or moved the point beyond the frame.
Universities assess more than a technically tidy final piece. Portfolio guidance from UK art and design providers also emphasises drawing techniques, materials, research, analysis, practical processes, and personal response. Your online art portfolio can make that development easier to follow when each study has a clear purpose.
Treat the horizon line as a variable you can test repeatedly, not a diagram you memorise once. For every new project, ask what the viewer should feel, where the viewer should stand, and which horizon height supports that decision.
The Online College of Art & Design (OCAD) offers flexible, tutor-led online courses from entry level through Level 3 in art, design, photography, and related subjects, with assignments, video tutorials, feedback, and portfolio workspace. If you want structured practice with perspective and a route towards a university-ready portfolio, visit The Online College of Art & Design (OCAD) to explore the available courses.