

You're sitting at a kitchen table with a white ball, a single lamp, and a fresh sketchbook. You draw the outline, shade the lower half grey, and step back. It looks like a circle with a dark patch, not a solid object. That frustration is useful because it shows exactly what drawing a sphere is designed to reveal: whether you can observe light, measure form, and control tone rather than copy an outline.
For Level 2 and Level 3 creative students, the sphere is a small but serious study. It gives you a manageable object in which to practise the same decisions you'll later make with faces, fruit, figures, architecture, and still-life arrangements. It can also become useful portfolio evidence when you record the process, annotate your choices, and show how your observation improves.
Table of Contents
- Why the Sphere Is the First Real Drawing Exercise
- The Visual Vocabulary You Need Before You Start
- How to Draw a Sphere from Observation
- Reading the Four Tonal Zones That Create Form
- Common Mistakes That Flatten a Sphere
- Building a University-Ready Portfolio from Tonal Studies
- Practice Plan and Questions Creative Students Ask
Why the Sphere Is the First Real Drawing Exercise
A sphere becomes difficult at the moment you try to make its contour behave like a surface turning through space. A familiar circle can be outlined quickly, yet a convincing ball needs a consistent light direction, gradual value changes, a cast shadow connected to the object, and edges that change according to what the eye sees.
UK curriculum guidance treats drawing as a structured skill involving fine motor control, varied marks, pressure changes that affect tone, and shading that suggests form. It also gives observational drawing priority over drawing from imagination. Measure your sphere against the actual object, then build its tonal structure from the light source through the terminator, core shadow, reflected light, and cast shadow. UK art and design curriculum guidance supports this practical relationship between observation, mark-making, and form.
A small object that exposes large problems
If your ball looks flat, inspect the cause rather than adding darker pencil at random. The outline may be too heavy, the cast shadow may ignore the lamp, or the drawing may jump abruptly from white paper to deep graphite. A sphere removes distracting complexity, so you can test proportion, value, edge quality, and the connection between the object and its shadow.
Use the exercise as a diagnostic study. The terminator shows where the surface turns away from direct light. The core shadow gives that turning area weight, while reflected light prevents the shadow side from becoming a featureless hole. The cast shadow anchors the sphere to its surface. Together, these four ideas form a reusable system for every rounded form you draw.
Practical rule: Keep the light direction consistent from the first mark to the final adjustment. If it changes halfway through, the sphere loses its solid appearance, even when the pencil work is neat.
The same test applies to a cheek, an apple, or a forearm. Each form depends on the relationship between its surface and the light. A sphere study is therefore a controlled way to check whether your marks describe volume rather than merely decorate an outline.
For students preparing school or college work, organised presentation matters too. Resources for school and academic book solutions can support the production and presentation of coursework, sketchbooks, and project documentation. Your drawing must carry the artistic evidence, while clear process records help viewers understand how you observed, tested, and refined each tonal decision.
The Visual Vocabulary You Need Before You Start
Before you touch the paper, name what you're looking at. Without a working vocabulary, beginners often see “light” and “dark” as two blocks. With the right terms, you can identify smaller changes and decide what kind of mark each area needs.
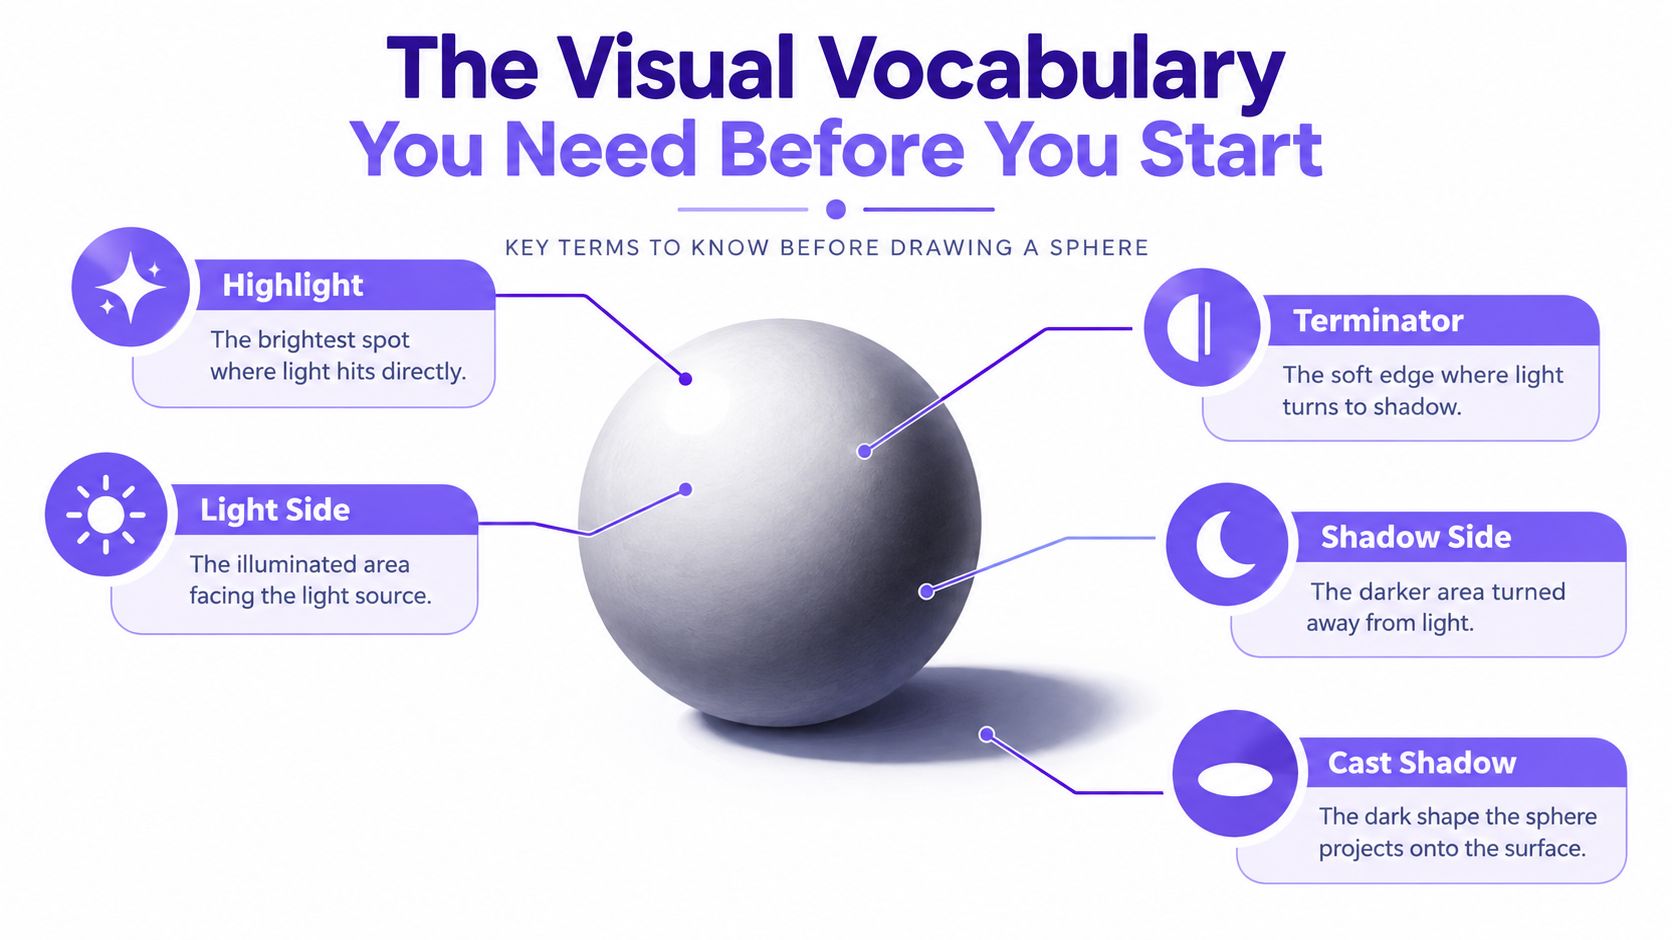
Locate each area on the object
- Highlight: The brightest visible spot where direct light strikes the surface. It may be small, soft, or slightly broken rather than a perfectly white circle.
- Light side: The broad area facing the lamp. It includes the highlight and the quieter tones around it.
- Halftone: The middle range between the strongest light and the beginning of shadow. It helps the surface turn gradually.
- Terminator: The transition where the surface turns away from the direct light. On a sphere lit from above, it usually curves across the lower or side portion, depending on the lamp's position.
- Form shadow: The darkness created because the sphere's own surface turns away from the light. It belongs to the sphere and follows its curvature.
- Core shadow: The deeper band within the form shadow, usually close to the terminator but not necessarily sitting directly on its edge.
- Reflected light: A restrained lift inside the shadow side caused by light bouncing from the table or nearby surroundings. It isn't a second lamp, so it should remain weaker than the light side.
- Cast shadow: The shape the sphere projects onto the table. It sits outside the object and tells the viewer where the sphere touches or hovers above the surface.
The distinction between core shadow and cast shadow matters. The core shadow wraps around the sphere. The cast shadow spreads across the table. If you merge them into one dark shape, the object can look glued down.
Squint at the ball and let small details disappear. You should still be able to identify the broad light side, the shadow side, the terminator, and the cast shadow. Those large relationships matter before texture or polished blending.
How to Draw a Sphere from Observation
Use a real sphere if possible, such as a white ball, an orange, or a plaster form. Place it on a simple surface and use one lamp, because several competing light sources make the tonal structure harder to read. Keep your pencil, putty eraser, ruler or measuring pencil, and paper ready, but let observation lead the process.
Establish the shape before shading
Begin by measuring the outer height and width with your eye. Hold your pencil at arm's length and compare the vertical and horizontal dimensions. Check the widest points, the top and bottom, and the places where the sphere meets the table. Don't assume a perfect circle. Your drawing must respond to what is in front of you.
Mark the base contact and the ellipse suggested by the table relationship. Even if only part of that ellipse is visible, it helps you understand how the sphere sits in space. Keep the first contour light so you can correct proportion without fighting a heavy border.
Next, indicate the largest light and dark masses. Don't start by polishing the highlight or filling the deepest shadow. Lightly map where the light side ends, where the terminator bends, and where the cast shadow travels across the surface. The UK guidance emphasises establishing the light source first, then building tone through a controlled sequence, which prevents random shading from taking over.
Build tone gradually
Lay a light halftone across the turning surface. Use hatching, cross-hatching, stippling, or blending, but make the marks follow the form rather than filling an area. A curved arrangement of strokes can support roundness, while a careless patch of horizontal graphite may make the surface appear painted on.
Develop the shadow side in layers. The core shadow should be dark enough to describe the turn, but it shouldn't become a black outline. Leave a subtle reflected-light area near the lower shadow side if the table is bouncing light upwards. Compare it with the light side constantly. Reflected light is usually quieter, so don't allow it to compete with the highlight.
The cast shadow needs a firm contact point beneath the sphere, then a softer edge as it moves away. That change tells the viewer how the object meets the table and how the light travels. If you want to compare drawing with digital spatial thinking, how Nim turns drawings to 3D offers useful context for seeing a flat image as a description of volume. Related observational practice is also explored through life-class drawing.
Finish by adjusting edges
Inspect the contour. Some sections should be clearer against the background, while others can soften where the value of the sphere approaches the value behind it. A uniformly hard outline makes the sphere look cut out. A completely lost edge can make it disappear, so vary it according to observation.
Step away and squint again. Ask whether the sphere reads as round before you inspect individual pencil marks. If it doesn't, correct the large value relationships first. More blending won't solve a misplaced terminator or a cast shadow that points in the wrong direction.
Reading the Four Tonal Zones That Create Form
A circle becomes a volume when the tonal zones explain how light behaves across a curved surface. Consider a matte plaster sphere lit from the upper left. The upper-left area receives direct light, the surface gradually turns through halftone, and the lower-right area enters shadow. The exact placement depends on the lamp and the object, so observe rather than memorise a fixed diagram.
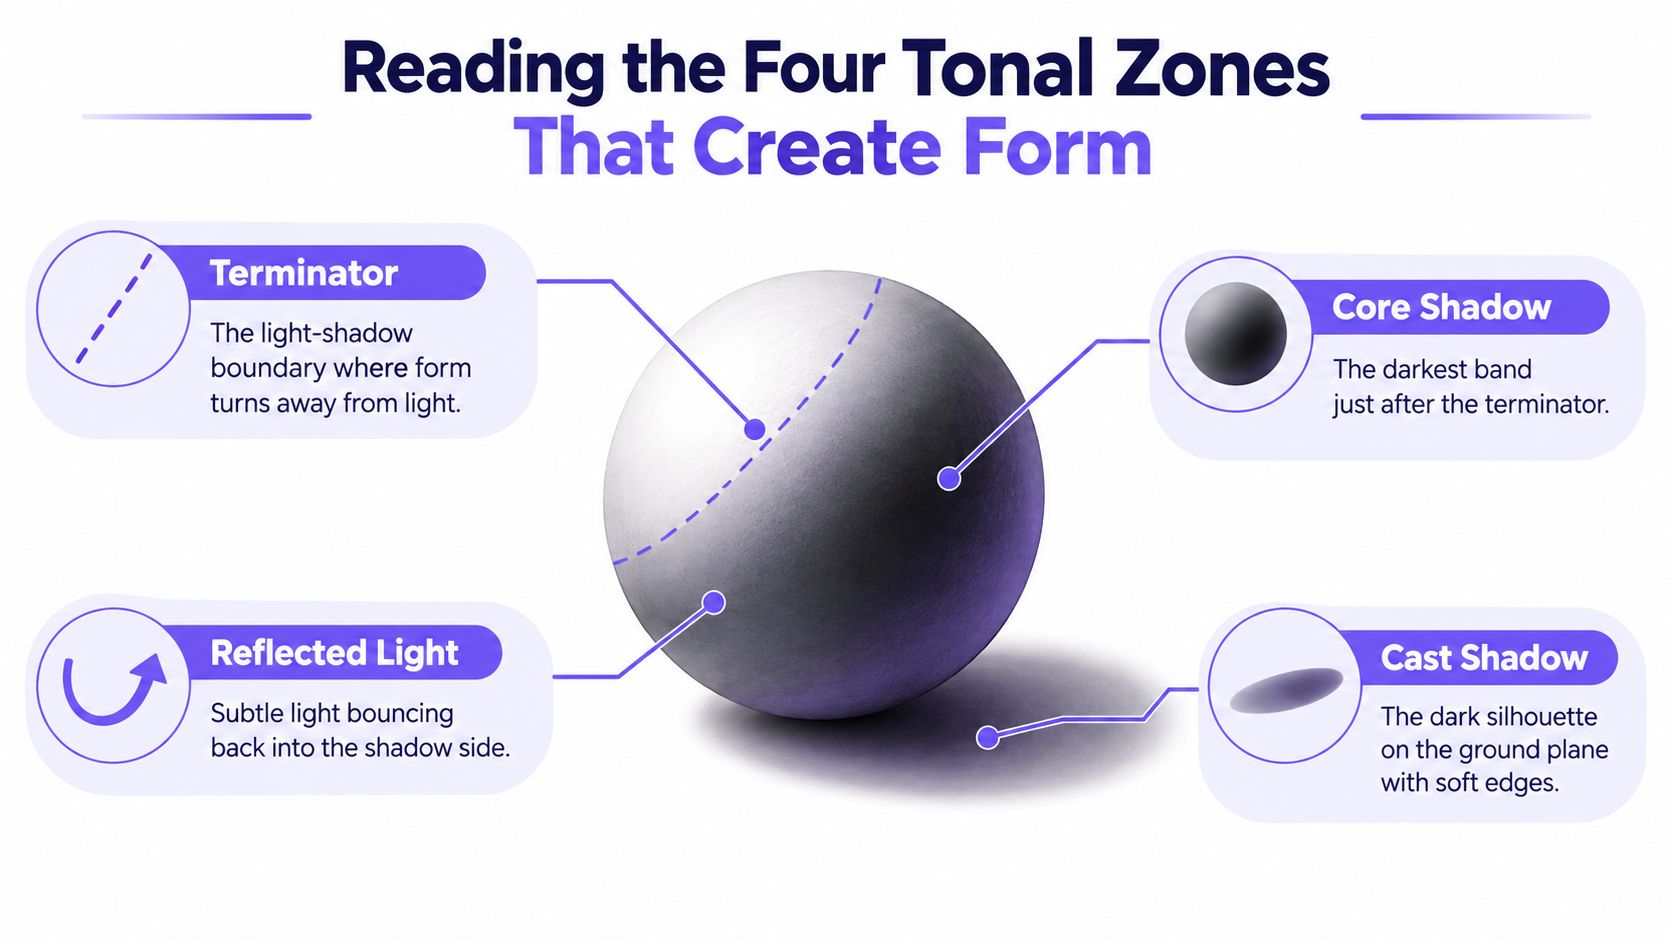
The terminator organises the turn
The terminator is where direct light stops reaching the surface. It isn't always a sharp drawn line. On a matte sphere, it may appear as a soft transition, but it still has a clear structural role. Follow its curve around the object and ask whether it supports the sphere's roundness.
The core shadow usually sits just inside the shadow side, near the terminator. It can be darker than the areas farther into shadow because of the way direct and bounced light reach the surface. Don't automatically place your darkest mark on the outer contour. The deepest area should be located by looking at the object, not by applying a symbol for “shadow”.
Reflected light keeps the shadow alive
The table can bounce a little light back into the shadow side. That reflected light often appears as a subdued lift along the lower or outer part of the sphere. It should remain connected to the shadow family. If you make it as bright as the highlight, you'll suggest a second direct light source.
The cast shadow is separate. It falls from the sphere onto the table, often stretching away from the lamp. It may be strongest near the contact point and softer farther out. Its shape isn't a repeated outline of the sphere. It is an observation of light being blocked across a horizontal plane.
Watch the short video below after you've made your first tonal map. Use it to compare the relationships between the object, its surface, and its shadow.
Test the relationships, not isolated marks
UK art-and-design teaching research describes drawing and shading as explicit areas of teaching and assessment in post-16 settings, with emphasis on technical vocabulary and repeatable methods. For a sphere, the practical benchmark is whether your tonal transitions convincingly model curvature. You can extend the same observation through a study of how an object casts a shadow, then explore more complex surfaces through a lifelike turkey illustration tutorial.
Squint and identify four values: the light side, the terminator transition, the core shadow, and the cast shadow. Can you explain why each is lighter or darker than its neighbour? If you can, you're practising transferable form analysis, not just copying a shaded ball.
Common Mistakes That Flatten a Sphere
The most common errors aren't failures of talent. They're signs that one visual relationship has been misunderstood. Correct the observation first, then change the mark.
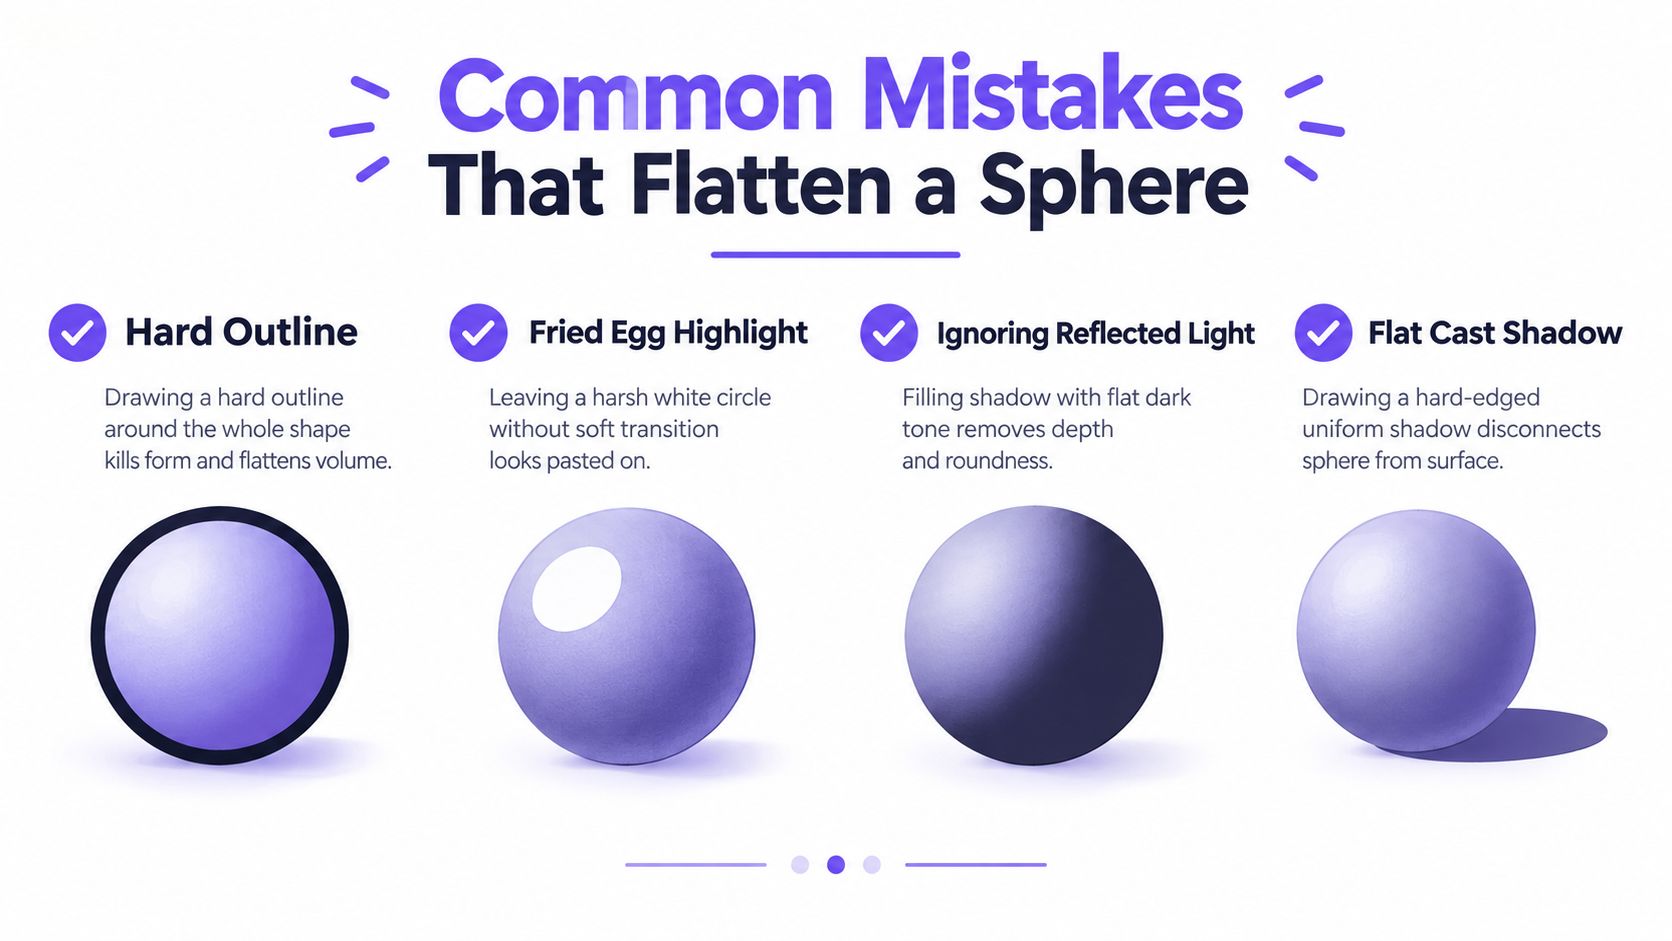
When the contour does too much work
A heavy line around the entire sphere announces a cut-out shape. The eye reads the outline before it reads the surface, so the tonal modelling struggles to overcome it. Lighten the contour and strengthen only the edges that observation makes clear.
Ask yourself: Does the outline describe the object, or am I using it to compensate for weak shading?
A second problem appears when the darkest tone sits exactly on the outer edge. That creates a ring rather than a turning surface. Look just inside the terminator and compare the core shadow with the contour. The edge may be lighter, softer, or partly lost against the background.
When the middle values disappear
Some learners jump from white paper to a dark shadow because halftone feels less dramatic. The result resembles a fried egg, with an abrupt boundary and no gradual turn. Build the middle values patiently. A soft transition between highlight and shadow often does more for volume than another layer of dark graphite.
An oversized, pure-white highlight causes a similar problem. It looks pasted onto the surface rather than observed as reflected light. Squint at your object and ask: Is the highlight a real area of direct light, or have I drawn a symbol for shine?
When the sphere loses contact
If the form shadow and cast shadow become one continuous dark mass, the sphere can appear stuck to the table. Keep the two areas distinct. The form shadow wraps around the object, while the cast shadow belongs to the surface beneath it.
Finally, inspect the cast-shadow edge. A hard, evenly dark oval makes the shadow look like a second object. Ask whether the edge becomes softer as it moves away from the contact point. These corrections are small, but together they restore the visual logic of the drawing.
Building a University-Ready Portfolio from Tonal Studies
A sphere study becomes useful portfolio evidence when it records decisions, not only a finished grey object. It can show observation from life, material testing, revision, and an understanding of how marks describe form. Annotate the choices you made: where pressure changed, how the mark range developed, and why the shading turns gradually. This gives a reviewer access to your thinking instead of leaving the image to speak alone.
Turn one exercise into a developing enquiry
Keep the first attempt beside a revised version. Add a small tonal scale, record the lamp position, and write a short reflection on the terminator, reflected light, and cast shadow. Then place the sphere beside an egg, cylinder, or cube. The comparison tests whether you can transfer the same tonal reasoning to other forms, rather than repeat one successful image.
A sequence often shows more development than one polished page. Include material tests in graphite, charcoal, or soft pastel drawing when they support the project's direction. Photograph each study evenly, keep the background quiet, and check that annotations remain readable.
Portfolio language: “I used measured observation of a matte sphere to investigate how gradual tonal transitions describe curvature. Comparing the first and revised studies helped me separate form shadow from cast shadow and control edge softness.”
Connect study to progression
Post-16 creative study places value on technical vocabulary, repeatable methods, evaluation, and control of formal elements. A sphere can therefore support Level 3 work when you show sustained practice around it. Record what changed between attempts, which material produced the clearest result, and how the four tonal concepts guided your revisions.
University applications need careful preparation as well. The University of Edinburgh's portfolio guidance asks applicants for one PDF of up to 20 pages, with a maximum of 5 pages for each of 4 assessment criteria, a 50MB file-size limit, and a submission period from 1 December 2025 to 28 January 2026. It requests initial research, investigative work, idea development, finished work, and short reflective text. A documented sphere study contributes most effectively when it appears as part of that process, supported by experiments and evaluation. University of Edinburgh portfolio requirements provides the exact model.
A UAL Level 3 Diploma and Extended Diploma in Creative Practice is described as an in-depth introduction to creative industries. It develops knowledge and skills that can support entry-level roles, apprenticeships, or progression to related higher education courses. UAL's qualification information identifies higher education, employment, and further training as typical progression routes.
A tonal study cannot guarantee admission. It can, however, make your working habits visible: careful observation, deliberate testing, written reflection, and refinement. That evidence gives the sphere a wider purpose. It becomes a small diagnostic project for the tonal decisions you will reuse across a university-ready portfolio.
Practice Plan and Questions Creative Students Ask
Use the sphere as a short project rather than a single sitting. During the first week, make timed observational studies from life under one lamp, then move the lamp higher, lower, and to the side. During the second week, refine one study, compare it with the earlier attempts, and write a brief evaluation using the terms terminator, core shadow, reflected light, and cast shadow.
Questions with practical answers
- Should I draw from life or photographs? Start from life when you can. A real object lets you change the lamp and inspect subtle reflected light.
- How long should a tonal study take? Work in timed sessions, but let the purpose decide the length. A quick map tests proportion; a longer study tests sustained tonal control.
- What should Level 2 students prioritise? Proportion, a clear light source, a readable light-shadow division, and controlled pencil pressure.
- What should Level 3 students add? Refined halftones, varied edges, accurate cast-shadow structure, material testing, and written evaluation.
- Will one sphere be enough for a university portfolio? No single exercise is enough. Use it as process evidence within a broader project showing investigation and development.
- Can this help with SEND learning needs? Structured demonstrations, flexible pacing, and specific feedback can make the exercise more accessible. UK progression data shows higher-education participation by age 19 at 8.9% for pupils with an EHC plan or Statement of SEN, 24.2% for pupils receiving SEN support, and 51.2% for pupils with no identified SEND. Official widening-participation statistics show why supportive routes and clear preparation matter.
- Is university still a realistic route for creative students? It remains one route, alongside employment and training. Total UK higher-education student numbers fell by 1.1% in 2023/24, the first fall in almost a decade, according to the House of Commons Library briefing. Prepare a focused portfolio and investigate each course's requirements carefully.
The Online College of Art & Design (OCAD) offers flexible, tutor-led courses from entry level through Level 3, including art and design qualifications, foundation diplomas, portfolio workspace, and dedicated SEND pathways. If you want structured feedback while developing tonal studies such as drawing a sphere and building a university-ready portfolio, visit The Online College of Art & Design (OCAD) to explore the available courses.