

You've set up your paper, found a useful reference, and begun drawing the figure. Then the torso feels too long, the hips seem detached, and the arms no longer belong to the same body. This is a common first serious experience with female anatomy drawing, especially when you're preparing Level 2 or Level 3 work for a future university application.
The problem usually isn't a lack of talent. You're trying to describe a three-dimensional structure with a vocabulary that may still be developing. Once you learn to locate bones, organise large forms, and observe how muscles change the surface, the figure becomes less mysterious and much easier to correct.
Table of Contents
- Why Female Anatomy Drawing Feels Hard and How to Start
- Skeletal Landmarks That Shape the Female Figure
- Muscle Groups That Matter and Ones You Can Ignore
- Proportion Systems That Actually Work
- A Step-by-Step Workflow for Drawing the Female Form
- Drawing Real Bodies Beyond the Idealised Default
- Building Anatomy Studies Into a University-Ready Portfolio
Why Female Anatomy Drawing Feels Hard and How to Start
The female figure can feel difficult because soft transitions often conceal the structure beneath them. A shoulder may flow gently into the upper arm, the waist may narrow without a sharp edge, and the pelvis may be covered by varied soft tissue. If you copy only the outer contour, you can lose the ribcage, pelvis, and joint positions that keep the body coherent.
Treat the study as a construction problem, not a test of artistic worth. Begin with the skeleton, build the major masses, and add surface information only after the large relationships are working.
Start with two different kinds of observation
A short gesture sketch trains movement, weight, and rhythm. Use a single line of action to record the way the spine travels through the pose. Don't pause to draw breasts, fingers, or abdominal lines. Your aim is to understand whether the figure is standing, leaning, twisting, or resting its weight on one leg.
A longer structural study asks a different question: how are the parts connected in space? Mark the head, ribcage, pelvis, knees, and feet. Check the tilt of each form before you refine the contour. A quick gesture can be expressive but anatomically vague, while a longer study can be accurate but stiff if it lacks movement.
Practical rule: If the pose doesn't work as a simple arrangement of lines and volumes, detail won't rescue it.
UK figure-drawing instruction commonly recommends establishing the pose with a line of action, blocking in the largest structural masses, and adding contours afterwards. The same approach is described in Jake Spicer's guide to life drawing, which emphasises simple forms, anatomical landmarks, proportion, and rhythm.
Make your first correction before rendering. Ask whether the head sits over the ribcage, whether the ribcage sits over the pelvis, and whether the joints form a believable chain. This guide develops that construction vocabulary step by step, beginning with the landmarks you can use to anchor the skeleton.
Skeletal Landmarks That Shape the Female Figure
Before you draw a smooth silhouette, identify the points that explain it. These landmarks act like pins holding the figure together. They're particularly useful in Level 2 and Level 3 figure units because they help you show observation and construction rather than just tracing an outline.
Find the upper body anchors
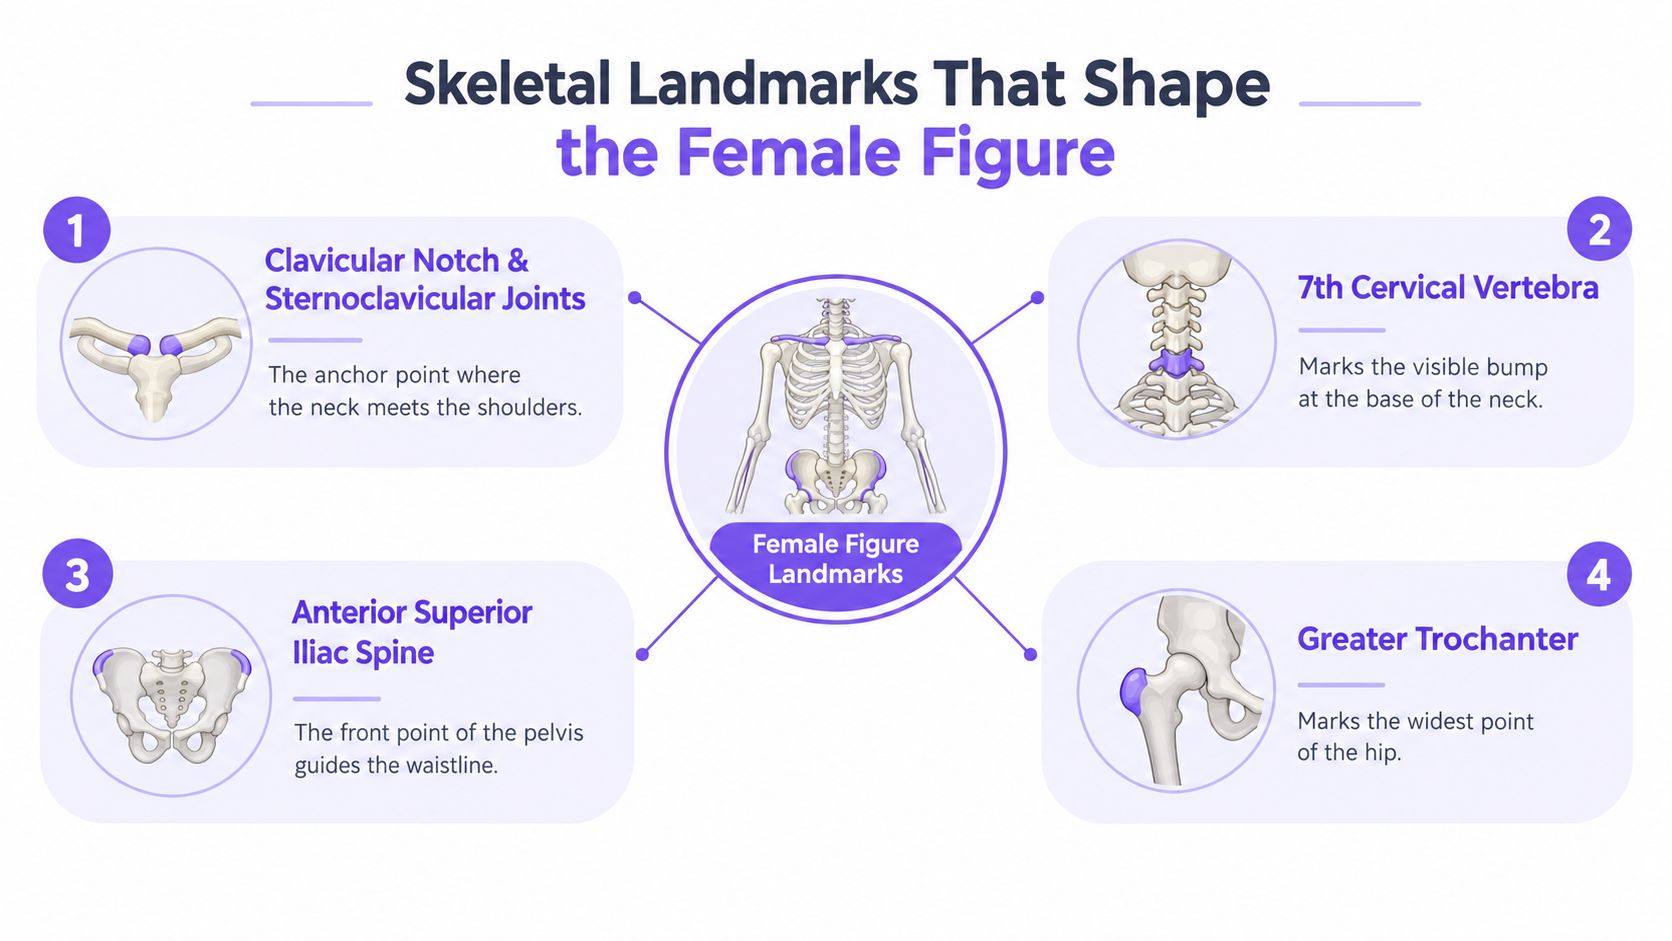
The clavicular notch sits at the top of the sternum, where the neck meets the chest. The sternoclavicular joints extend this anchor towards the shoulders, helping you place the collarbones and understand the angle of the upper chest. If these points are too high or too level, the neck and shoulder slope can look disconnected.
The seventh cervical vertebra, often called C7, is the noticeable bump at the base of the neck. In a back view it gives you a reliable centre point for the shoulder line and spine. The acromion is the bony tip of the shoulder. Place it incorrectly and the upper arm will appear to begin too far forward or too far back.
At the elbow, locate the olecranon, the point of the ulna that forms the back of the joint. It helps you turn the arm from a flat tube into a connected structure. The medial and lateral epicondyles of the femur perform a similar job at the knee, defining the width and rotation of the joint. The patellae then sit over the front of the knees, giving the knee plane its direction.
Use the pelvis to control the whole pose
The anterior superior iliac spines, or ASIS, are the front points of the pelvis. They're often visible on a lean or twist and provide a useful comparison for the ribcage. If you place the ASIS too low, the waist becomes too long and the pelvis loses its tilt.
The greater trochanters are the bony outer points of the upper femur. They help establish the widest part of the hip and the direction of the thighs. Drawing them too narrowly makes the pelvis look compressed, while placing them too far apart can create an artificial shelf.
The pubic symphysis is a central pelvic landmark. You don't need to outline it heavily, but its position helps you understand the relationship between the lower abdomen, groin, and upper thighs. The tibial tuberosity below the knee helps you track the shin and prevents the lower leg from becoming a featureless taper.
Draw planes, not a list of dots
Once you've marked the points, connect them through planes. The clavicles describe a sloping chest plane. The ASIS and greater trochanters describe the pelvis in space. The epicondyles and patellae explain the turn of the knee.
A drawing mannequin for study can help you practise these rotations without the pressure of a live session. Use it to tilt the ribcage, rotate the pelvis, and compare the joint positions. The aim isn't to memorise isolated anatomy. It's to make every landmark support a believable plane.
Muscle Groups That Matter and Ones You Can Ignore
Beginners often draw too many muscles because anatomy books present the body as a catalogue of named parts. In a figure study, you need a smaller working selection. Prioritise the muscles that change the silhouette, create a clear plane, or explain a strong stretch.
The deltoid controls the rounded shoulder cap and helps you place the upper arm. The trapezius influences the slope from the neck towards the shoulder, while the pectoralis major shapes the upper chest. Its lower attachment matters because the chest isn't a pair of floating symbols. It belongs to the ribcage and changes with posture, gravity, and rotation.
Across the torso, the rectus abdominis can be treated as a central plane rather than a row of individually outlined segments. The external obliques help explain the side plane from ribs to pelvis. On the back and hip, the gluteus maximus gives the buttock its main mass, while the gluteus medius helps describe the upper side of the hip and pelvic tilt.
The sartorius can create a diagonal tension across the thigh, and the quadriceps organise the front of the thigh as a broad, turning mass. At the lower leg, the gastrocnemius gives the calf its characteristic split and taper. You can indicate these groups with changes in plane and tone instead of drawing every boundary.
Use a layered priority
Work from the outside in:
- Silhouette muscles: deltoid, gluteus maximus, quadriceps, and gastrocnemius.
- Surface planes: trapezius, pectoralis major, external obliques, and gluteus medius.
- Skin-level detail: subtle tendon changes, folds, creases, and small anatomical accents.
Some muscles are useful only when the pose makes them prominent. The brachioradialis, individual finger extensors, and the sternocleidomastoid are commonly overemphasised by beginners. The sternocleidomastoid may create a soft plane change from the ear towards the sternum, but outlining it aggressively can make the neck look corded and rigid.
| Muscle Group | Impact on Silhouette | Drawing Priority |
|---|---|---|
| Deltoid and trapezius | Strong effect on shoulder width and slope | High |
| Pectoralis major | Shapes the chest plane and upper torso | High |
| Rectus abdominis and external obliques | Organise front and side torso planes | Medium to high |
| Gluteus maximus and medius | Define the hip mass and pelvic turn | High |
| Sartorius and quadriceps | Clarify thigh direction and knee tension | High |
| Gastrocnemius | Shapes the calf and lower-leg taper | Medium |
| Brachioradialis and finger extensors | Usually limited effect on the main silhouette | Low |
| Sternocleidomastoid | Often a subtle neck plane | Low unless strongly activated |
Gesture and landmarks should remain visible in your thinking even when you add muscles. If a muscle description contradicts the underlying ribcage, pelvis, or joint alignment, simplify it and return to the structure.
Proportion Systems That Actually Work
A proportion system gives you a measuring framework before your eye has developed reliable judgement. The head-height method is the simplest place to begin. Treat the head as one unit, then compare the lengths of the torso, arms, and legs against it.
The commonly taught seven-and-a-half head canon provides a useful academic starting point for the standing figure. It isn't a rule that every body must obey. It's a checking device that helps you identify whether your figure has drifted during construction.
Measure before committing to line
Hold your pencil at arm's length, close one eye, and measure the model's head height with your thumb and pencil tip. Keep your arm still as you compare that measurement down the body. Lightly tick the repeated intervals on your paper before you commit to the contour.
For a traditional guide, the navel may sit around the third head-height, the crotch around the fourth, and the knees between the fifth and sixth. The exact placement varies with the individual model, pose, age, and viewpoint. Use these points to diagnose proportion, not to force a real body into an artificial template.
The heroic eight-head canon stretches the figure and creates a more stylised effect. It can be useful for fashion illustration or character design, but it changes the relationship between torso and legs. Naturalistic figure studies generally benefit from measuring what you see first, then using a canon to understand the difference.
Compare intervals, not isolated features
Check the distance from the chin to the bust line, from the bust line to the navel, and from the pelvis to the knees. Compare the left and right sides of the pose as well. A foreshortened thigh may look short because it points towards you, not because the anatomy is wrong.
The proportions of the body become easier to judge when you use several measurements together. Keep your guide lines light, and erase them only after the head, ribcage, pelvis, and major joints agree with one another.
A Step-by-Step Workflow for Drawing the Female Form
A dependable workflow stops you from polishing an unstable drawing. UK figure-drawing methodology commonly starts with the line of action, then moves through structural masses, landmarks, and contour. That order preserves movement while giving you opportunities to correct proportion early.
Build from movement to structure
Step one is the line of action. Use one sweeping stroke to describe the pose and the direction of the spine. Add a second line if you need to indicate the supporting leg or the counter-thrust of the body, but don't begin with small contours.
Step two is the basic block-in. Draw the head, ribcage, and pelvis as simplified ovoid or box-like forms. Check their tilt and counter-rotation. The ribcage and pelvis rarely sit as identical, parallel shapes in a relaxed pose, and their relationship creates much of the figure's balance.
Step three connects the masses. Draw the spine as a directional link, then use cylinders or tapered blocks for the limbs. Place the shoulders, elbows, wrists, hips, knees, and ankles against your head-height marks. At this stage, you're checking whether the joints form a believable chain.
Step four refines the contour. Let the silhouette respond to the major muscles and planes, but don't outline every anatomical term you know. A small change at the deltoid, hip, knee, or calf often communicates more than a page of internal lines.
Correct the lean before adding detail
Suppose your student figure leans to one side even though the reference stands with balanced weight. Look at the central axis first. You may have tilted the ribcage and pelvis in the same direction, making the whole body slide sideways.
Split the figure with a light spine and weight-bearing axis. Angle the hips opposite to the shoulders, then reconnect the ribcage, pelvis, and supporting leg. You can often restore balance without changing the contour at all. Only after the structure works should you redraw the waist, chest, and surface anatomy.
A finished surface cannot repair a broken centre of gravity.
Finish with selective rendering. Use darker accents where forms overlap, softer transitions across rounded masses, and sharper edges where a plane turns decisively. Keep the construction sheet alongside the final drawing so you can identify whether a problem began with gesture, proportion, landmarks, or tone.
Drawing Real Bodies Beyond the Idealised Default
A symmetrical, front-facing figure with a narrow waist is easy to recognise as a symbol, but it offers limited observational training. Real bodies vary in width, length, posture, age, muscular development, and the distribution of soft tissue. Drawing that variation makes your anatomy studies more useful for university portfolio work because it demonstrates attention rather than reliance on a formula.
Research in UK art education describes life drawing as a site where students reflect on different cultural conceptions of the body, while historical accounts show that women were excluded from full nude study for much of the development of institutional art education. The Royal Academy Schools opened in January 1769 as the first art school in England to use a structured system that included anatomical models, yet female students weren't enrolled until 1860, when Laura Herford gained admission after applying with only her first initial and surname. Women were initially restricted to drawing casts and weren't permitted to draw from the male model until 1893, with the model partially covered, as documented in the history of drawing at the Royal Academy Schools.
The Slade School of Art, founded in 1871, was the first UK art school to allow male and female students equal access to life drawing. The Royal Academy's eventual admission of women to life drawing in 1893 marked a shift towards shared anatomical study, after a long period in which the life room remained restricted, as explained in this history of women drawing nudes.
Practise respectful observation
Use references that show real bodies across ages, sizes, and abilities. Credit life models appropriately, and ask permission before drawing people you know. Avoid turning distinctive features into caricature. Accuracy should describe the person in front of you, not replace them with a cultural ideal.
Try these exercises:
- Angle changes: Draw the same model from the front, side, back, and a three-quarter view.
- Consent-based observation: Sketch a family member only with clear permission, focusing on posture and clothing structure if nude study isn't appropriate.
- Athlete and dancer studies: Observe how developed muscles make landmarks easier to find, while remembering that muscularity varies between individuals.
- Interior research: Study diagrams of reproductive anatomy separately, then consider how biological structures relate to the visible body without forcing invisible anatomy onto the surface.
Guidance on using references without copying can help you transform observation into your own decisions. A respectful female anatomy drawing practice is inclusive because it treats variation as evidence, not as an error.
Building Anatomy Studies Into a University-Ready Portfolio
Anatomy studies become valuable portfolio material when they show how you think. Admissions tutors don't need a sequence of identical polished figures. They need evidence that you can observe, test, revise, and develop a visual idea.
Select a small group of finished studies alongside supporting pages. Include two or three fully rendered figure drawings, gesture sketches, skeletal landmark sheets, muscle studies, and proportional construction. The contrast matters. A finished figure shows control of media, while a rough page can show that you understand how the image was built.
Make the learning visible
Annotate each study briefly. Record the measurement method, the problem you noticed, the correction you attempted, and the next question you want to investigate. For example, you might write that the pelvis was too narrow, that the greater trochanters were repositioned, and that the next study will test the same pose from a lower viewpoint.
This supports common Level 2 and Level 3 assessment aims, including technical skill, critical reflection, and personal investigation. It also gives you useful material for an interview because you can discuss decisions rather than claiming that a drawing “worked” or “failed”.
The UAL Level 2 Award in Art and Design provides 2 units, 60 GLH, and 90 TQT hours, with a typical duration of 6 to 8 weeks, according to the UAL qualification information. Its stated progression includes further education, employment, entry-level creative roles, and apprenticeships, so structured anatomy work can sit within a broader creative pathway.
For students planning towards degree-level study, the UAL Level 3 Diploma and Extended Diploma in Art and Design are designed to support progression to higher education or employment, with further education and other training also listed as progression routes on the Doncaster College art and design qualification page.
Sequence the evidence
Arrange pages from observation to development to resolution. Show a gesture beside the structural block-in that grew from it, then place the refined drawing nearby. Mix pencil, charcoal, and digital work only when each medium helps answer a different visual question.
The Online College of Art & Design (OCAD) offers flexible, tutor-led creative courses from entry level through Level 3, including art and design pathways, online studio materials, portfolio workspace, and guidance towards degree applications. Visit The Online College of Art & Design (OCAD) to explore how structured study and tutor feedback could support your female anatomy drawing practice and university-ready portfolio.