

You're halfway through a portfolio study, your lines are becoming less confident, and your fingers have started to clamp around the pen. Perhaps a tutor has told you to use a tripod grip, but the advice feels more like a finger puzzle than a solution. You're left wondering whether your unusual hold will affect your drawing, handwriting, or chances of progressing to university.
Learning how to hold a pen correctly for art and design isn't about copying a perfect hand shape. It's about finding a comfortable setup that gives you stable marks, controlled movement, and enough endurance for annotation, technical drawing, sketchbook work, and portfolio development.
Table of Contents
- Redefining What a Correct Grip Actually Means
- Mastering the Dynamic and Lateral Tripod Grips
- Setting Up Your Workspace for Ergonomic Control
- Adapting for Left-Handed Writers and Tool Variations
- Troubleshooting Common Grip Mistakes and Fatigue
- Exercises to Retrain Grip and Build Control
- FAQs for Creative Students Transitioning to University
Redefining What a Correct Grip Actually Means
The myth of one perfect grip creates unnecessary tension. A pen hold can look different from a textbook example and still produce clear, controlled work. The National Handwriting Association states that many competent writers use unconventional grips, and there's no evidence directly linking an unusual grasp with poor handwriting. The National Handwriting Association's guidance on handwriting difficulties supports a more useful definition of correctness.
A functional grip is comfortable, controls the pen, avoids pain or excessive fatigue, and supports consistent output.
That definition matters to Level 2 and Level 3 creative students because portfolio work rarely involves one quick page. You might move from pencil thumbnails to fine-liner outlines, written evaluations, colour notes, and presentation captions in the same study session. Your grip needs to support the work, not distract you from it.
The dynamic tripod grip remains a valuable starting model. You hold the pen between the thumb and index finger, rest it on the middle finger, and allow the remaining fingers to fold comfortably. This arrangement usually gives the fingers enough freedom to guide small movements. It can be especially useful when you're developing controlled hatching, delicate contours, or the precise edges needed for line definition in art.
However, a lateral tripod, quadrupod, or adapted grip may also work well. UK evidence found that mature grips develop gradually, and the dynamic tripod was common but not universal among older children. The practical question isn't “Does my hand look correct?” It's “Can I make the marks I intend without pain, cramping, or premature fatigue?”
Mastering the Dynamic and Lateral Tripod Grips
Start with the dynamic tripod as a calm reference point rather than a rule you must force. Place the pen so it rests on the side of your middle finger. Your thumb and index finger should stabilise the barrel from above, while your ring finger and little finger remain comfortably folded towards the palm.
Keep your fingers approximately 1–3 cm from the writing tip, as recommended in UK NHS occupational-therapy guidance. This distance gives you a useful balance. If you move too close, your fingers can crowd the nib and block your view. If you move too far away, the pen may feel less precise.
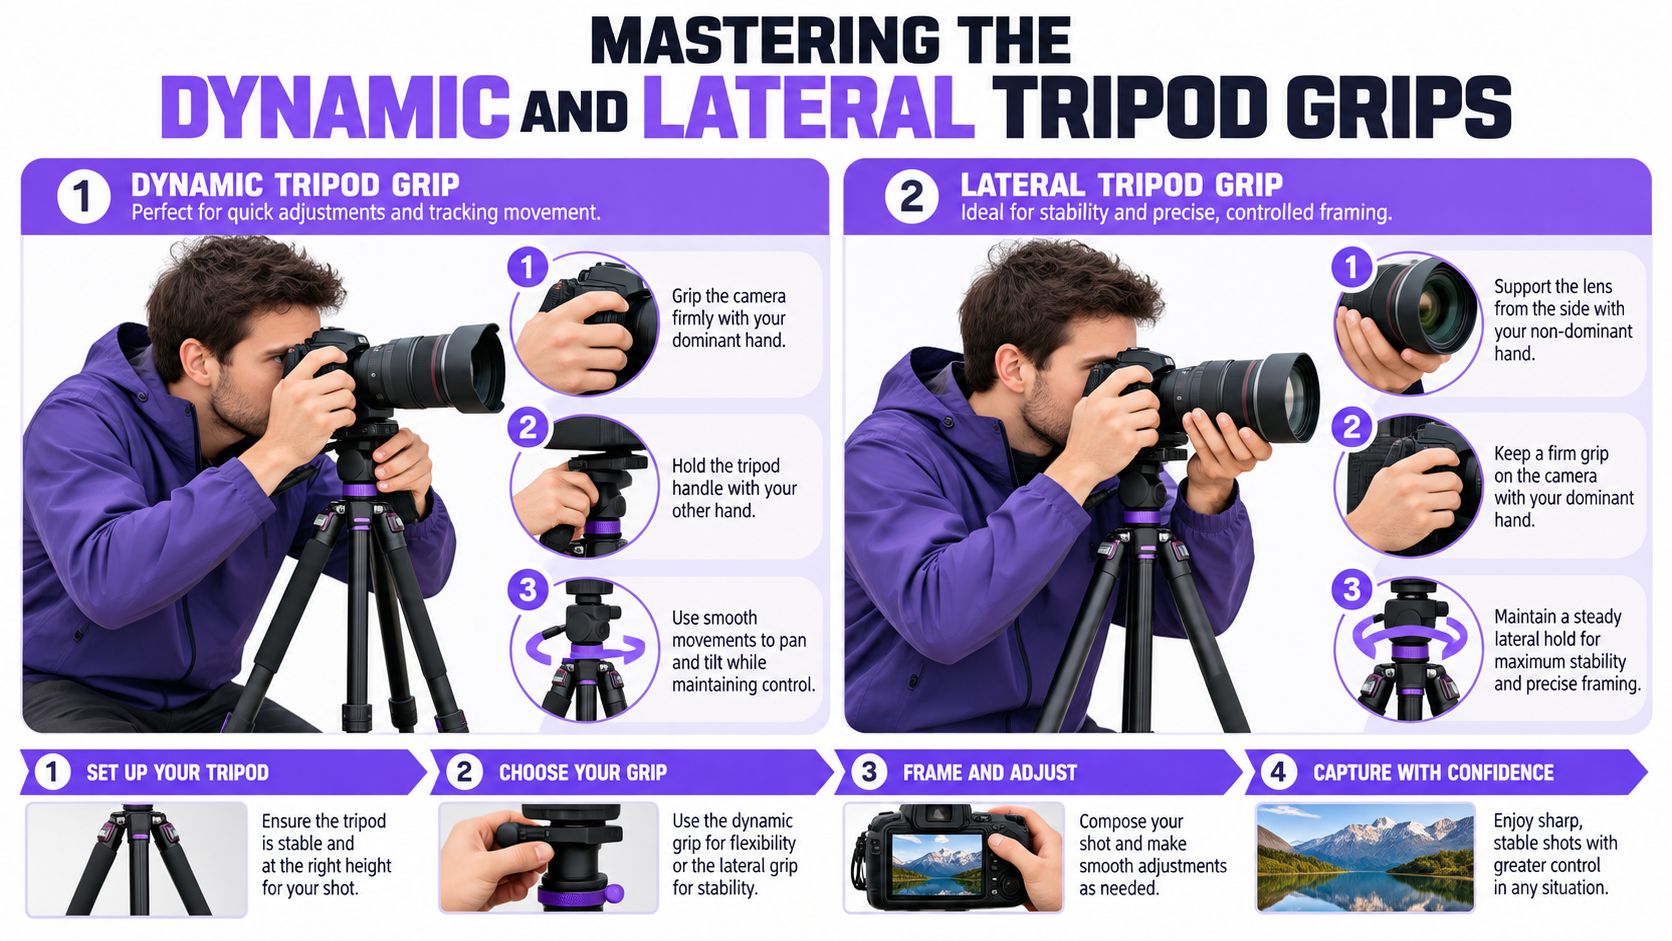
Build the contact points gradually
First, place the paper securely with your non-writing hand. Next, form the three-point contact between the thumb, index finger, and middle finger. Don't squeeze to create stability. The pen should feel supported, not trapped.
Then make small marks using gentle finger and thumb movements while keeping the wrist relatively steady. This is useful for short contours, lettering, and controlled tonal marks. For broad gestural drawing, you can allow more movement from the forearm and elbow, but keep checking that tension isn't travelling into your fingers.
The lateral tripod uses a similar three-finger arrangement, but the thumb crosses over the pen and may rest against the index finger. It can feel more secure for some students, particularly when the thumb naturally presses across the barrel. It isn't automatically a poor grip just because it looks different.
Use this checklist during a study:
- Relaxed contact: Can you loosen your fingers without the pen falling immediately?
- Visible nib: Can you see enough of the tip to guide your line?
- Controlled movement: Can you draw curves and short straight lines without dragging your whole hand?
- Sustained comfort: Does your hand remain comfortable during a complete piece of work?
If the answer is yes, your grip is doing its job.
Setting Up Your Workspace for Ergonomic Control
Your fingers are only one part of the writing system. The paper, desk height, chair, wrist, forearm, and shoulder all influence how much effort your hand must use. A cramped setup often makes students squeeze the pen harder without realising why.
Begin with your feet supported on the floor, your knees comfortably bent, and your desk close to elbow height. Keep your shoulders relaxed rather than lifted towards your ears. If your chair leaves you twisting or leaning forward, review best writing desk chairs as part of a broader workspace adjustment, not as a substitute for good drawing technique.
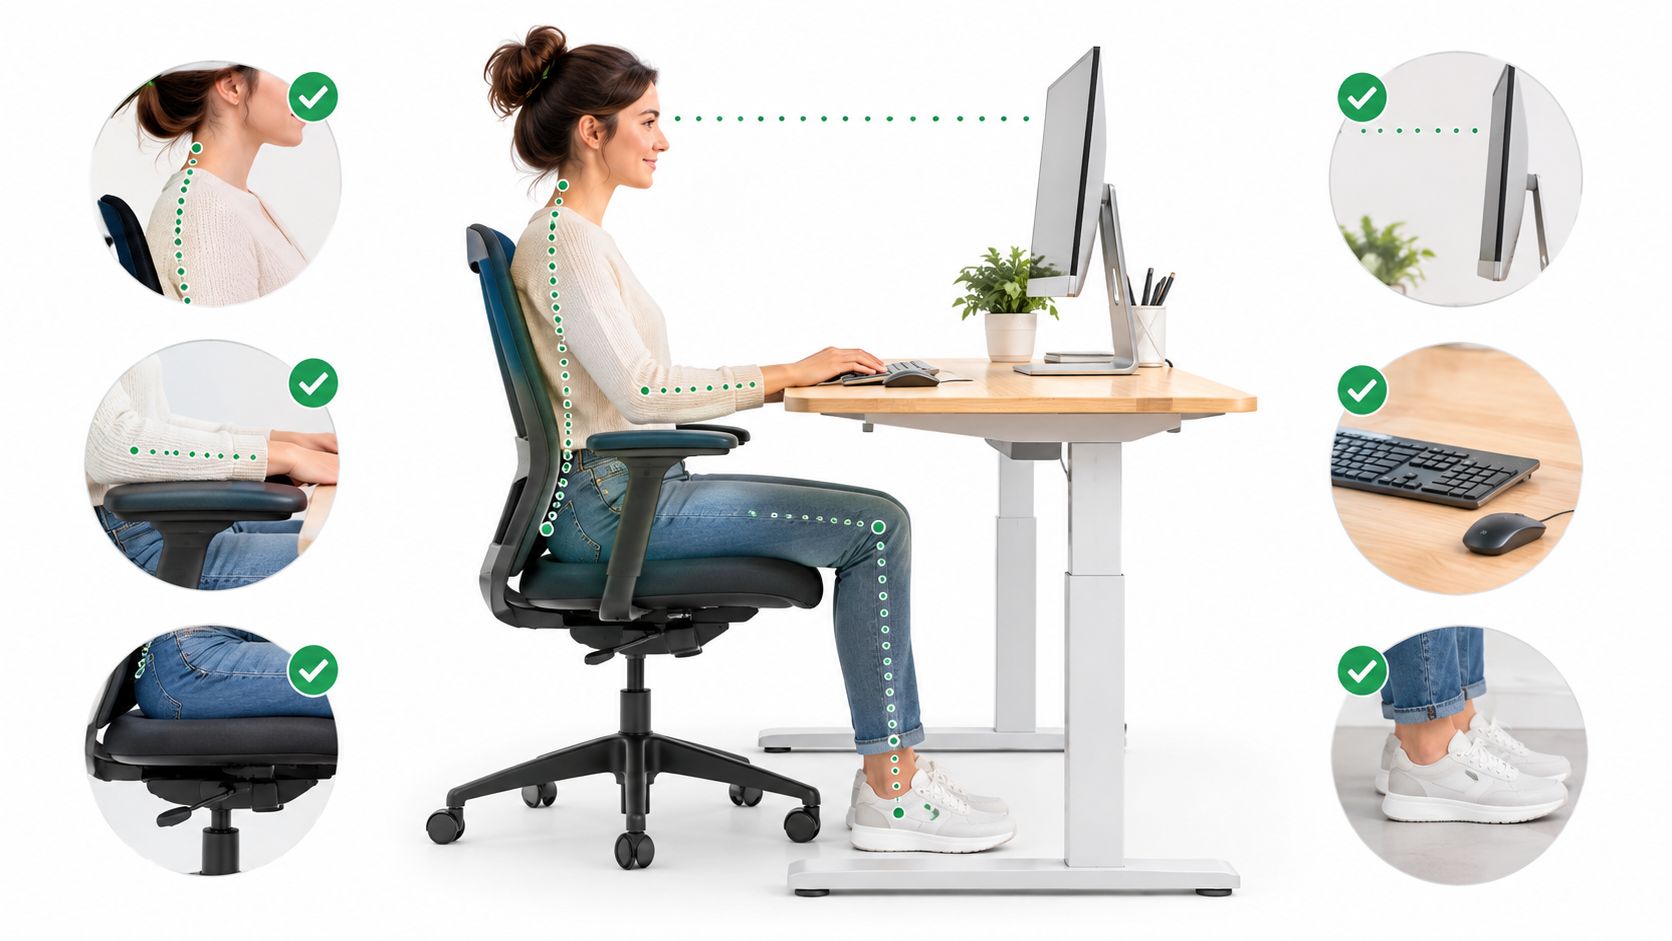
Angle the page to support movement
Tilt the paper to the right for a right-handed writer and to the left for a left-handed writer. This helps your hand travel along straighter lines instead of forcing the wrist into an awkward sideways position. On a drawing board, use the same principle. Rotate the board until your usual stroke direction feels natural.
A writing slope can also help when your wrist doesn't rest comfortably on the page. West Suffolk NHS guidance recommends a slope of approximately 35 degrees in this situation, because raising the surface can support wrist and forearm alignment. The handwriting advice from West Suffolk NHS Foundation Trust also emphasises a stable seated position and an appropriately placed desk.
Test your arrangement with a page of lines, ellipses, and written notes. If your shoulder tightens, the paper keeps slipping, or your wrist bends sharply, change the surface before changing your fingers. Good ergonomics reduces the demand placed on the grip.
Adapting for Left-Handed Writers and Tool Variations
A left-handed setup shouldn't be treated as a reversed version of right-handed advice. Your hand moves across the page differently, and wet ink or graphite can pass directly beneath your palm. The right combination of page angle, hand position, paper surface, and tool can make a noticeable difference to comfort.
One UK NHS resource recommends positioning the paper at approximately 45 degrees for left-handed writers, compared with approximately 20 degrees for right-handed writers. Leeds Community Healthcare's occupational-therapy school resources also address the hooked wrist, which occurs when the hand curls above the writing line. Try keeping your writing hand below the line where possible, and rotate the page rather than bending the wrist sharply.
Compare the whole tool setup
| Variable | What to test | Why it matters |
|---|---|---|
| Barrel diameter | Try a wider pen or pencil | A larger barrel can feel more stable and may reduce gripping effort |
| Weight | Compare a light tool with a slightly heavier one | A heavier pen may feel less likely to wobble, while an overly heavy tool can increase fatigue |
| Texture | Test a smooth barrel against a textured or moulded grip | Texture may help your fingers stay positioned without extra pressure |
| Ink flow | Compare tools that require different levels of pressure | Smoother flow can reduce the urge to press down during long studies |
| Paper surface | Try smoother paper for fine-liner or technical-pen work | Less drag can make controlled movement feel easier |
These adjustments are particularly useful when you switch between pencils, brushes, fine liners, and technical pens. A comfortable pencil hold may not transfer perfectly to a broad marker or brush. For example, a portrait study in portrait sketching in pencil may benefit from a loose, mobile hold, while small technical annotations may need closer visual control.
Make one change at a time. If you alter the pen, paper, angle, and grip together, you won't know which adjustment helped.
Troubleshooting Common Grip Mistakes and Fatigue
Many grip problems begin as sensible attempts to gain control. You move closer to the nib because the line feels uncertain, then your fingers become cramped. You press harder because the pen feels unstable, then your hand tires and your lines become slower.
Holding too close to the nib reduces visual access and fine-motor freedom. Holding too far away can reduce precision. Move the barrel gradually until you can see the mark developing without bending your wrist or locking your fingers.
Use performance as your diagnostic tool
UK evidence involving children with developmental coordination disorder found no meaningful relationship between grip strength, pen pressure, and handwriting performance. The same evidence found that the children with developmental coordination disorder applied less pressure to the writing surface, which reinforces an important point: more force isn't automatically more control. The Brunel University study provides the research background for this functional approach.
Assess your work using practical signs:
- Line quality: Do contours remain steady, or do they become jagged as you continue?
- Endurance: Can you complete the intended study without your hand becoming painful or unusually tired?
- Legibility: Can you read your notes and annotations later?
- Movement: Can you change direction without the whole wrist locking?
- Output: Can you produce the expected amount of coursework at a reasonable pace?
An unusual grip may be perfectly functional if it meets these criteria. If you experience persistent pain, cramping, unusually slow writing, or difficulty controlling marks, try changing the tool, pressure, page angle, or writing surface. Specialist occupational-therapy advice may be more useful than repeatedly copying a prescribed finger arrangement.
Exercises to Retrain Grip and Build Control
Changing a long-established habit takes patience. Don't try to hold the new position through an entire portfolio session immediately. Practise briefly, then return to your normal movement before tension builds.
Begin by stabilising the paper with your non-writing hand. Form the three-point contact gently, keeping the fingers soft. Draw small vertical lines, horizontal lines, curves, and circles with the fingers and thumb while the wrist stays relatively quiet.
Turn practice into creative work
Use a page of controlled marks rather than empty repetition:
- Line studies: Draw parallel lines, changing direction slowly and observing whether pressure stays light.
- Contour exercises: Trace the outer edge of a simple object without lifting the pen.
- Shading drills: Build tone with repeated marks, keeping the barrel supported rather than clenched.
- Annotation practice: Write short labels beside a sketch, checking whether your letters remain legible.
- Observation drawing: Apply the same relaxed setup to life class drawing so the technique serves a real portfolio activity.
Pause when your fingers tighten. Shake out the hand, lower your shoulders, and adjust the pen before continuing. The aim is progressive control, not immediate perfection. Over time, these small movements can make your line work feel more deliberate and less effortful.
FAQs for Creative Students Transitioning to University
Will an unusual grip affect my portfolio assessment?
Usually, assessors care about the evidence in the portfolio, such as observation, experimentation, development, communication, and control. They aren't looking for a particular finger arrangement in photographs of your hand. If your grip allows accurate lines, readable annotations, and sustained creative work, it can be functional even when it doesn't resemble a textbook tripod.
How long does it take to retrain a grip?
There isn't one timetable that suits every learner. A grip develops through repeated, comfortable practice, and forcing a new hold for too long can create tension. Use short drawing and writing exercises, review the quality of your marks, and increase practice only when your hand remains relaxed.
What if I have dyspraxia, developmental coordination disorder, or another SEND need?
Don't assume that a different grip means you should just try harder to copy a standard one. UK evidence found that grip strength and pen pressure weren't reliable indicators of handwriting performance, so support should focus on comfort, control, movement, and the amount of work you can complete.
Speak with a tutor, occupational therapist, or learning-support professional about adapted tools, altered pacing, writing slopes, page positioning, and alternative ways to record ideas. Students with learning difficulties may benefit from specialist support and adapted pathways, especially when preparing university applications and portfolio work. Your creative thinking remains central, and the right adjustment should help you show it more clearly.
The Online College of Art & Design (OCAD) offers flexible, tutor-led Level 2 and Level 3 art and design courses with portfolio-focused feedback, online studio resources, and SEND-specific pathways. If you want supportive guidance while developing confident drawing, annotation, and presentation skills, visit The Online College of Art & Design (OCAD) to explore the available courses.