

You've spent time drawing a figure, but something still feels wrong. The head may look convincing, yet the arms seem too short, the torso feels stretched, or the knees sit at different heights. Erasing and redrawing individual details rarely solves the problem because the error often began with the overall structure.
Human proportion drawing gives you a way to investigate that problem instead of guessing. You compare landmarks, heights, widths, and angles against a repeatable system, then adjust your drawing before adding tone, clothing, or expressive detail. The system isn't a rigid formula that every body must obey. It's a practical starting point for observation.
For Level 2 and Level 3 students, that distinction matters. GCSE and equivalent work often introduces proportion as a clear technical rule. A university-ready portfolio expects you to show how you test, question, refine, and apply those rules in different situations. Your sketchbook should demonstrate not only that you can draw a figure, but that you understand why a figure works on the page.
Table of Contents
- Introduction to Human Proportion Drawing
- The Standard Head-Count Proportion System
- Historical Foundations of Figure Measurement
- Practical Measurement Techniques for Observational Drawing
- Inclusive Approaches to Proportion and Studio Setup
- Progression from Level 2 to Level 3 Portfolios
- University Entry and Foundation Diploma Requirements
- Quick Reference Guide for Figure Landmarks
- Frequently Asked Questions by Art Students
- How much technical proportion drawing should appear in a final portfolio?
- Can I use exaggerated or stylised proportions?
- Do assessors need to see every measurement?
- What should I do if a pose doesn't fit the standard system?
- How can SEND learners prepare a strong portfolio?
- What should I practise before applying to university?
Introduction to Human Proportion Drawing
A student might begin with the face, carefully placing the eyes and nose, then draw downwards without checking the relationship between the head and the rest of the body. The finished figure can contain beautifully observed features and still feel unconvincing because the main landmarks were never compared. This is a common transition point between casual sketching and assessed observational drawing.
Proportion is the relationship between parts. In figure work, you might compare the height of the head with the length of the torso, the width of the shoulders with the pelvis, or the position of the elbow with the waist. These comparisons turn a vague judgement, “something looks off”, into a useful question, “which measurement or alignment needs checking?”
Why the first drawing should stay simple
Start with a light construction drawing. Use a simple oval or block for the head, a central line for balance, and loose shapes for the ribcage, pelvis, arms, and legs. Avoid committing to fingers, hair, facial features, or fabric folds until the large relationships are credible.
This method supports the observational approach described in BBC Bitesize's GCSE guidance on observational drawing and proportion, where students compare height, width, and landmark positions before refining detail. The value of the method is practical. You can identify a structural error while it's still easy to correct.
Practical rule: If the figure doesn't read clearly as a whole, don't spend longer polishing one small feature.
A proportion system also builds confidence. You won't need to rely entirely on instinct when a pose changes, a model sits down, or a reference photograph uses an unusual viewpoint. You can begin with a known unit, compare the visible landmarks, and then allow observation to challenge the initial estimate.
Accuracy and expression can work together
Some students worry that measuring will make their drawings stiff. That usually happens when the construction lines are treated as the finished image rather than as temporary scaffolding. Once the placement is secure, you can alter the line, exaggerate a gesture, simplify anatomy, or develop a personal visual language.
The strongest portfolio pages often show both sides of the process. A measured study demonstrates control, while a later interpretation demonstrates decision-making. That progression helps an assessor see how technical understanding supports, rather than limits, creative expression.
The Standard Head-Count Proportion System
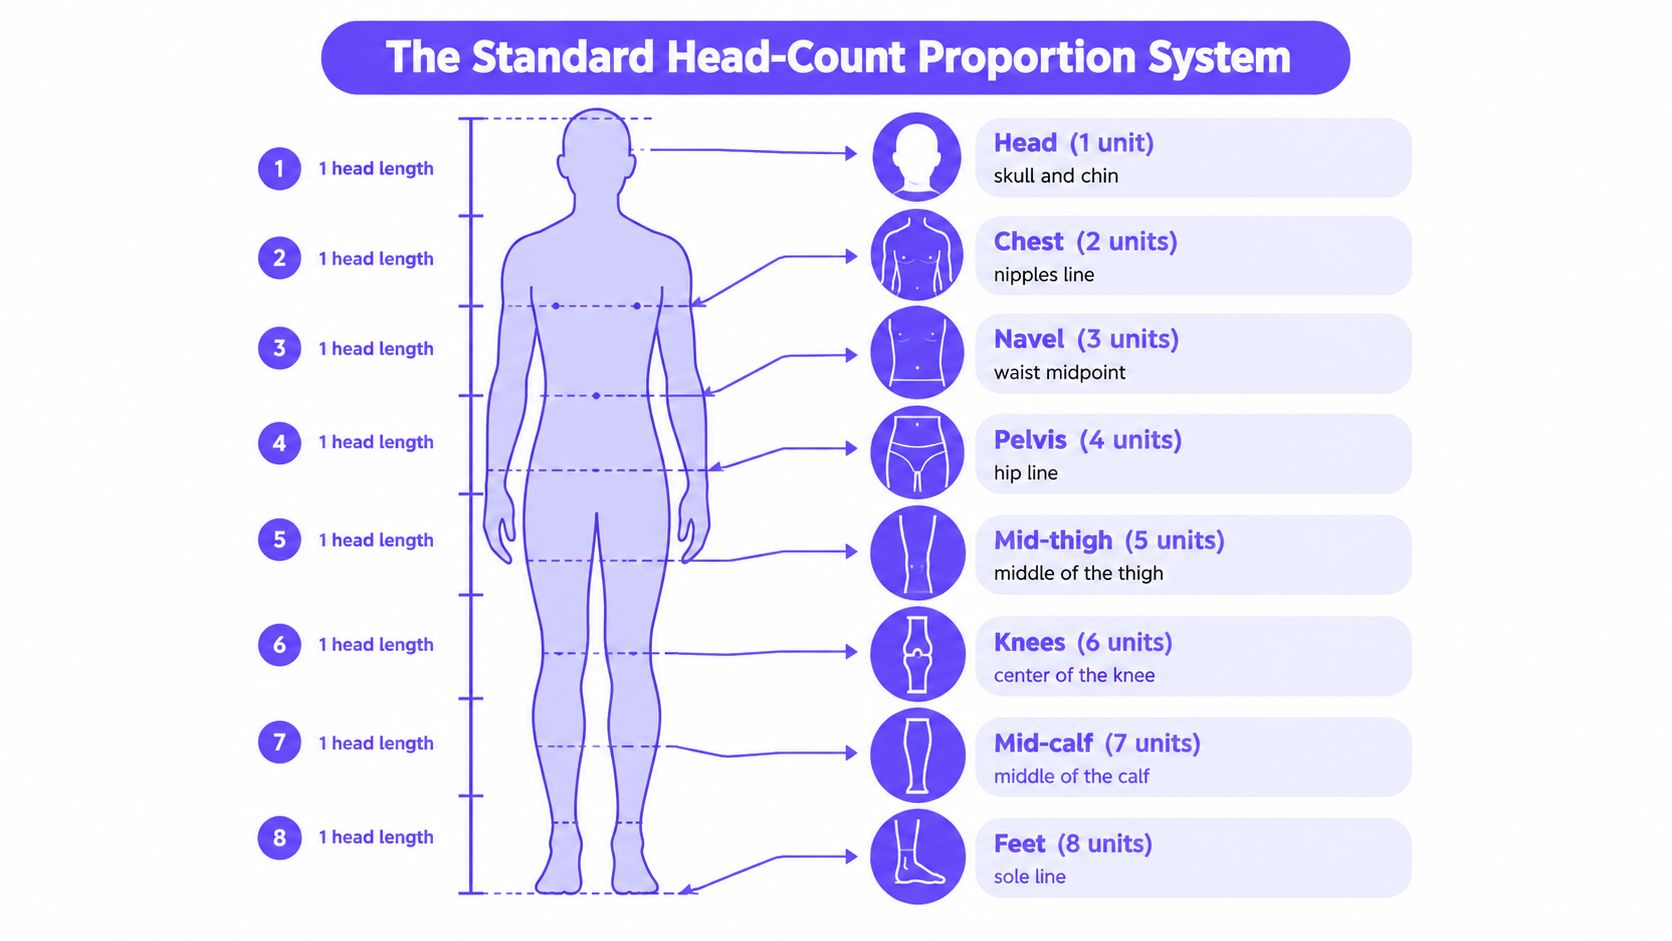
A standing figure on your page may look convincing at first, yet small errors in the head, torso, or leg lengths can make the whole drawing feel unstable. The head-length unit gives you a practical checking system. Measure from the crown to the chin, then compare that unit with the figure's larger divisions. UK GCSE art and design guidance commonly presents an adult figure as seven to eight heads high, with the navel around three head-lengths down, the elbows aligned with the navel, and the wrists near the top of the legs, as shown in BBC Bitesize's figure-drawing revision guidance.
Building the measurement from the head
Use the head as a repeatable module, like a ruler that can be moved around the page. Choose a scale that fits the paper, then extend a light vertical guide by repeating the measured head length. Keep this construction loose enough to adjust when observation disagrees with the initial estimate.
- Place the head. Mark the crown and chin, and record the head's angle. A tilted head still has a measurable height, but that height follows the head's orientation rather than the page edge.
- Locate the chest. The chest or nipple line gives an early check on the upper torso. The shoulders, ribcage, and chest do not automatically share one level, so observe their separate angles and widths.
- Check the navel. In the standard standing framework, the navel sits around three heads down. The elbows often approach this level. Compare the two landmarks together instead of positioning them as unrelated marks.
- Find the pelvis. The hip or pelvis region falls around the fourth unit in an eight-head construction. Draw it as a tilted solid form, with a front plane and direction, rather than as a flat band.
- Track the legs. The knees sit around the sixth unit, while the lower legs continue towards the seventh and the feet complete the standing figure. These are reference points, not a grid that every pose must obey.
Checking width and pose
Height alone cannot describe a figure. Compare shoulder width, ribcage width, the gap between ribcage and pelvis, and the space created by the feet. A seated or foreshortened body may show very different vertical relationships from a standing figure. A wheelchair user's pose also changes the visible position of the pelvis, knees, and feet, so measure the observed body and mobility setup rather than forcing it into a standing template.
Use the head unit to test whether a limb relates plausibly to the torso. Follow each arm from shoulder to elbow to wrist, and check the negative spaces around it. A bent arm will not match a straight vertical measurement. For SEND learners, a lower drawing board, adjustable easel, clear sightline, or shorter observation interval can make the same measurement process accessible without changing its purpose.
The head count is a scaffold for proportion checking, not a rigid canon. This practical guide to drawing body proportions presents head counts and landmark alignments as checks that support observation. A strong GCSE study shows control of the system, while a Level 3 portfolio should also show where you tested, adjusted, and adapted it for real bodies, viewpoints, and inclusive drawing setups.
Historical Foundations of Figure Measurement
Human proportion drawing has a long history of combining measurement with observation. Leonardo da Vinci's study of human proportion, associated with the period from c.1490 to 1492, remains a major reference in UK art education because it presents the body as a set of related measurements rather than a collection of isolated features. BBC Bitesize's GCSE material on proportion and balance uses the Vitruvian Man as a canonical example for this reason.
Leonardo's work is particularly valuable because it reveals a tension that still affects students today. The artist sought an ideal body form in which each part related to the whole through simple fractions. When he measured an actual model, however, he had to use more complex divisions, including twelfths and seventeenths, rather than relying only on the idealised scheme described by the theory in the Royal Collection Trust's account of Leonardo's proportion studies.
Ideal systems meet real bodies
The lesson isn't that one historical system is correct and another is wrong. The lesson is that bodies vary, poses change, and observation can expose the limits of a neat diagram. A measured framework helps you organise what you see, but it can't replace looking carefully at the model.
That idea gives your portfolio commentary more depth. Instead of writing that you followed a rule, you can explain how a head-based construction helped you locate landmarks, where the observed pose differed from the initial framework, and how you revised the drawing. You're showing an understanding of proportion as an active process.
A proportion rule becomes useful when it helps you notice the individual figure in front of you.
Historical examples can also prevent a common mistake. Students sometimes treat the seven or eight-head model as an ideal body that every person must match. In observational work, the model's posture, viewpoint, body structure, clothing, and movement all affect the visible relationships. The historical evidence supports flexibility, not mechanical copying.
For UK students, this connection links Renaissance study with current classroom practice. Leonardo provides the historical foundation for comparing landmarks such as the eyes, ears, nose, navel, and outstretched arm span. Your job is to use those comparisons thoughtfully, then let direct observation lead the final decision.
Practical Measurement Techniques for Observational Drawing
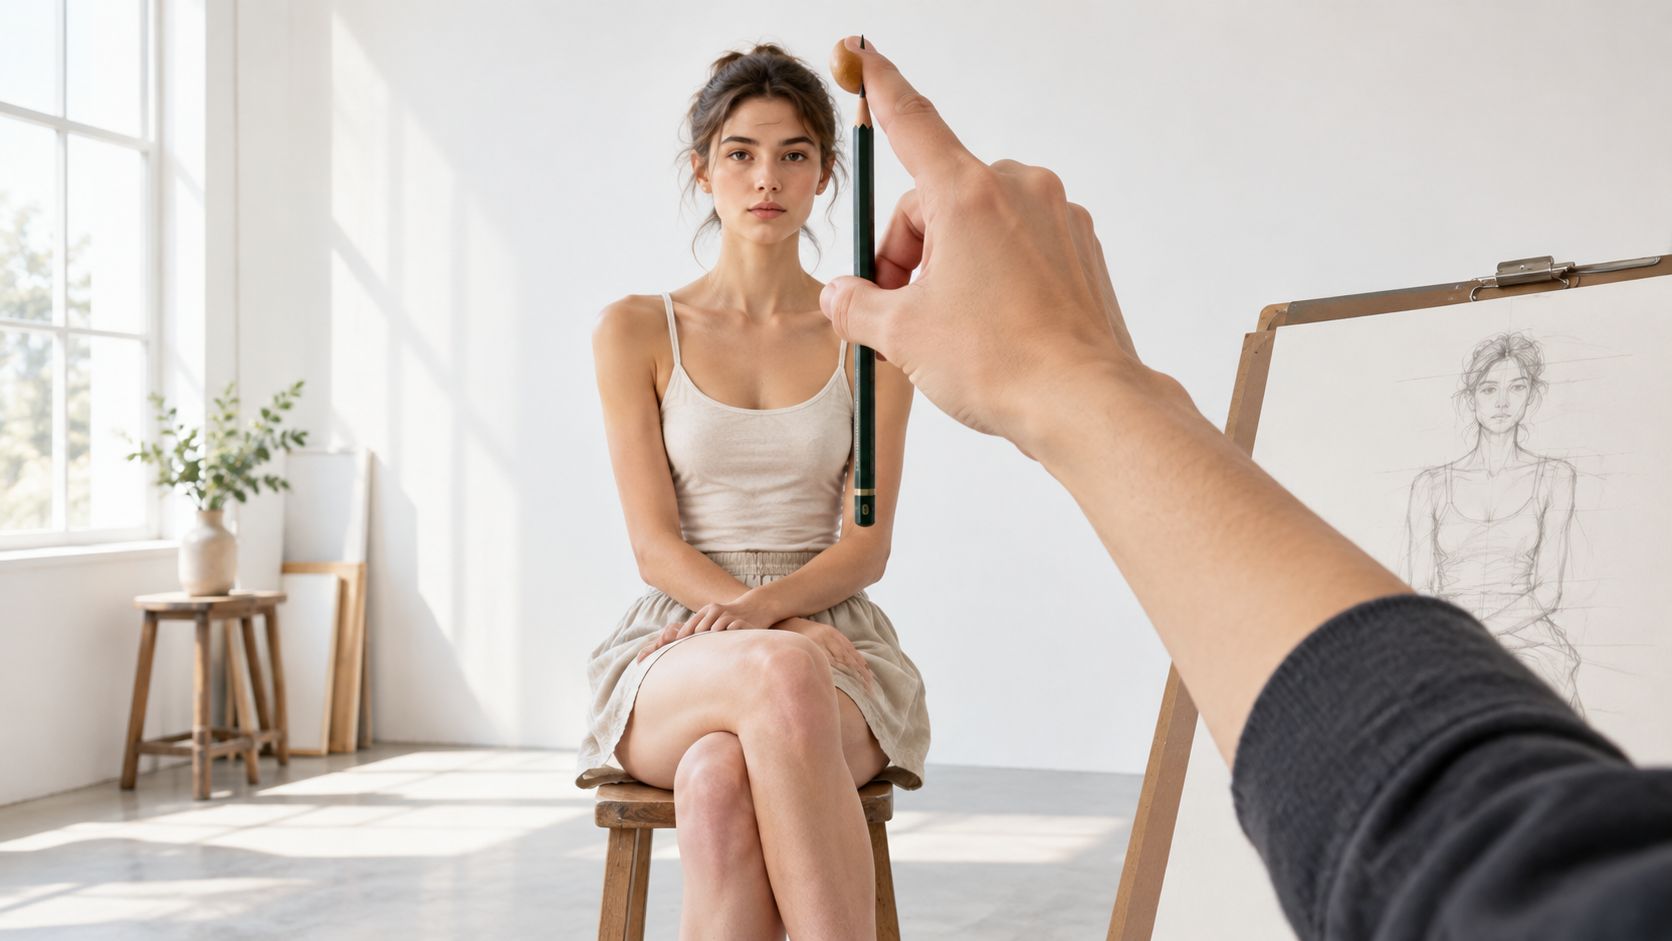
A pencil can become a measuring tool. Hold it at arm's length with your elbow comfortably extended, close one eye, and use your thumb to mark the apparent height or width of a feature. The pencil doesn't need to touch the model. It gives you a consistent visual comparison that you can transfer to the page.
A reliable studio sequence
Begin by deciding how much of the figure is visible. For a standing pose, mark the top of the head and the lowest visible point, such as the sole of a foot. For a seated figure, use the head, shoulder, seat, knees, or feet as separate landmarks instead of pretending the pose has a single vertical height.
Then make a few comparisons:
- Overall height: Compare the head with the visible body length. Keep your pencil position consistent while you check.
- Relative width: Measure the shoulder width against the head or the ribcage against the pelvis.
- Joint alignment: Look for relationships between elbows, navel, wrists, knees, and the supporting surface.
- Angle and direction: Use the pencil to compare the slant of the shoulders, the pelvis, and the main gesture line.
- Negative space: Check the shapes between the arms and torso, between the legs, and around the body. These shapes often reveal errors faster than anatomy does.
Transfer the results lightly. Don't draw every measurement as a dark line. Use a central axis, a few horizontal guides, and simple structural forms. The doll for drawing practice can help you rehearse these relationships when a live model isn't available, provided you still return to varied references and real observation.
Foreshortening changes the visible measurement
A limb pointing towards you may look shorter than its full anatomical length because perspective compresses the visible form. You shouldn't lengthen it automatically to satisfy the head-count diagram. Instead, compare the apparent length, the overlapping forms, and the direction of the limb in space.
Keep your viewpoint in mind. If the model is above or below your eye level, horizontal landmarks may tilt. A seated figure can also create a different relationship between the torso and legs because the pelvis folds the body into a compact arrangement. Use perspective lines and overlapping shapes to explain what you see.
The following video can support a demonstration of proportion measurement, but pause it often and draw alongside the explanation rather than watching passively.
If holding a pencil at arm's length isn't comfortable or practical, use a ruler, a transparent overlay, a digital stylus, or a photograph with a simple grid. The tool matters less than consistency. Record what you measured, what changed, and why you accepted or rejected the first estimate.
Inclusive Approaches to Proportion and Studio Setup
A standard standing life-drawing setup doesn't suit every learner or every model. UK government guidance for art and design notes that teachers may use a vertical easel for pupils in wheelchairs, allowing them to access artwork more easily, while inclusive art resources emphasise adapting activities and materials to individual SEND needs in the government's art and design research review.
Accessibility should affect the workflow, not just the furniture. A learner may need a seated reference, a different viewing angle, longer pauses, adapted grips, speech-to-text reflection, or a digital canvas with stabilisation. Those adjustments don't remove the technical challenge. They make it possible to engage with the same underlying questions about structure, proportion, and observation.
Measuring a seated or adapted pose
For a seated model, don't force the body into a standing eight-unit diagram. Identify the head, shoulder line, ribcage, pelvis, seat, knees, ankles, and feet as connected landmarks. A vertical axis may run from the head towards the supporting surface, while a second directional line follows the spine or the weight-bearing leg.
A wheelchair user drawing from a wheelchair may need a lower or altered viewpoint. Place the paper or screen where the learner can work without strain, then use a camera, mirror, or digital reference if the live angle is difficult to maintain. The drawing can still show careful comparison of visible lengths, angles, overlaps, and negative spaces.
Adapt tools and assessment thoughtfully
Useful adaptations may include:
- Vertical working surfaces: A vertical easel or mounted board can reduce awkward reaching and make the page easier to view.
- Alternative measuring tools: Try a shortened pencil, ruler, viewfinder, transparent grid, or digital line tool if a long sighting position is inaccessible.
- Adjusted pacing: Allow time for observation, rest, repositioning, and verbal or written reflection. Speed isn't the only evidence of understanding.
- Different evidence formats: A student might explain measurements through annotations, audio, typed notes, or a sequence of photographs showing the process.
- Clear reference choices: Seated, standing, cropped, and adapted-posture references can all support proportion study when the task is defined clearly.
The life class drawing resource can be used as a starting point, but an inclusive lesson must respond to the learner and model rather than applying identical instructions to everyone. Proportion remains rigorous when the criteria focus on observation and reasoning, not on whether every student uses the same physical setup.
Progression from Level 2 to Level 3 Portfolios
At Level 2, a proportion study often demonstrates that you can observe a figure, use a head-based guide, place major landmarks, and correct obvious errors. The page may include construction lines, a finished study, and a short note about what you found difficult. That evidence shows developing control.
At Level 3, the expectation becomes more analytical. You're likely to compare references, investigate gesture and structure, test media, revisit unsuccessful drawings, and connect figure studies to a wider project. Proportion becomes one part of a visual investigation rather than an isolated exercise.
| Qualification Level | Proportion Focus | Portfolio Application |
|---|---|---|
| Level 2 | Establish major landmarks and use a repeatable measurement system | Show observational studies, construction lines, corrections, and clear technical notes |
| Level 3 | Analyse proportion across poses, viewpoints, materials, and intentions | Connect figure research to composition, experimentation, personal direction, and resolved work |
| Foundation or university preparation | Use proportion knowledge selectively and critically | Present a coherent body of work that demonstrates process, reflection, and independent decisions |
Make development visible
A strong sketchbook page doesn't need to hide every mistake. Place an early structural drawing beside a revised version. Add arrows to show where the elbow moved, how the pelvis angle changed, or why the feet were repositioned. Keep the note specific, such as “the forearm was shortened because I measured from the elbow rather than the shoulder”, rather than “I improved the proportions”.
Clothing provides another useful test because fabric can conceal landmarks while still revealing the body's underlying structure. Use clothing and figure drawing studies to investigate how seams, folds, hems, and tension points describe the form beneath them. Don't draw garments as flat outlines. First establish the body's direction, then place the fabric over it.
Move from exercise to intention
Level 2 work might ask whether the figure is accurate. Level 3 work can ask what accuracy achieves. A distorted figure may communicate movement, vulnerability, tension, or character, but the distortion should look chosen rather than accidental.
Your portfolio can include measured studies, gestural drawings, seated poses, clothed figures, and stylised outcomes. Arrange them so the viewer can follow your thinking. Technical practice earns its place when it informs a later visual decision.
University Entry and Foundation Diploma Requirements
Technical figure work becomes more useful when you understand what it needs to prove in an application. A university admissions tutor isn't only looking for a page of accurate anatomy. They want evidence that you can observe, develop ideas, respond to feedback, select work, and explain your decisions.
A Foundation Diploma can provide a structured bridge between school-level study and undergraduate applications. UAL's Foundation Diploma information states that undergraduate applicants must apply through UCAS, pass the Foundation Diploma, and meet course-specific entry criteria. UAL also gives typical expectations of accepted Level 3 qualifications, together with three GCSE passes including Maths and English at grade 4 or above, subject to the relevant course requirements.
What a portfolio needs to communicate
University Centre Somerset says its Art and Design Foundation Diploma supports portfolio development for undergraduate applications, carries UCAS points, and expects 10 to 15 pieces of recent work plus two sketchbooks, as set out in its Foundation Diploma course information. That benchmark isn't a reason to fill a portfolio with similar anatomy sheets. It's a reminder that selection, recency, and process all matter.
A useful portfolio sequence might include:
- Observation: A carefully measured figure study that establishes your technical starting point.
- Investigation: Variations using different poses, viewpoints, materials, or reference types.
- Reflection: Notes, corrections, comparisons, and tutor feedback that show how your decisions developed.
- Application: A composition, textile design, character project, interior scene, or photographic outcome informed by figure structure.
- Resolution: Selected work that shows control without losing your individual interests.
In Scotland and elsewhere in the UK, the UAL Level 3 Foundation Diploma is treated as a university-preparatory route. Edinburgh College explains that it carries 80 UCAS points for Pass, 96 for Merit, and 112 for Distinction, and is widely recognised for second-year entry to four-year Art and Design degrees in Scotland and first-year entry to three-year degrees elsewhere in the UK, depending on institutional requirements.
Check the route before you apply
Entry rules differ by institution and course. South Staffordshire College requires at least four GCSEs at grade 4 or above, including Maths and/or English and at least one creative arts subject or an equivalent Level 2 qualification, alongside an art and design portfolio, according to its Level 3 Art and Design course information.
Use course pages to check the current requirements for your intended route. Keep your proportion studies because they support the wider portfolio story, not because every degree demands identical figure work.
Quick Reference Guide for Figure Landmarks
Keep this checklist beside your sketchbook when you're working quickly. Use it to identify relationships before you commit to detail, then compare the marks with the reference again. The head unit gives you a starting scale, while the pose determines how those relationships appear on the page.
The fast construction check
- Head: Use the distance from crown to chin as one unit. Mark the head angle before extending the body.
- Chest: Check the chest or nipple line in relation to the head and shoulder slope.
- Navel: In the standard standing guide, place it around three heads from the top of the figure.
- Elbows: Compare the elbow level with the navel, then follow the actual bend of each arm.
- Wrists: Check whether the wrists approach the top of the legs in the standing framework.
- Knees: Use the knee position as a major leg landmark, then compare the visible lower-leg length.
- Feet: Mark the direction and contact of each foot. A foot can point away, turn out, or overlap another shape.
- Pelvis: Treat the pelvis as a solid, tilted form. Its angle affects the spine, ribcage, and legs.
Correct the common errors first
If the head looks too large, don't reduce it in isolation. Compare its height with the entire visible figure and check whether the body was drawn too short. If the arms look too short, trace the complete route from shoulder to elbow to wrist rather than measuring only the forearm.
A knee placed too high may indicate that the pelvis was positioned incorrectly. A flat-looking torso may need a clearer ribcage and pelvis angle. When the pose is foreshortened, check overlaps and depth before applying a standing proportion chart.
Studio check: Turn the page upside down or view it in a mirror. Large proportion errors often become easier to see when your familiar reading of the figure is interrupted.
For an accessible workflow, use the same checklist with a seated or adapted pose, but change the landmarks you compare. The principle stays consistent: identify visible relationships, record them clearly, and allow the observed pose to take priority over an idealised diagram.
Frequently Asked Questions by Art Students
How much technical proportion drawing should appear in a final portfolio?
Include enough to show that you understand the process, then select the studies that support your wider direction. A portfolio filled only with repeated head-count diagrams may show diligence without showing development. A smaller group of well-chosen studies can demonstrate observation, correction, material control, and application more effectively.
Keep earlier attempts when they explain a later decision. For example, an initial figure may reveal that you placed the pelvis too high, while a later composition may show how that correction helped you organise the pose. Annotate the relationship briefly and clearly.
Can I use exaggerated or stylised proportions?
Yes, but make the intention visible. A stylised figure can have an elongated torso, enlarged head, compressed limbs, or altered anatomy. The viewer should still be able to distinguish between a deliberate choice and a drawing that lost control during construction.
Begin with an observed study or measured reference, then record the changes you make. You might extend the legs to create elegance, compress the torso to increase tension, or enlarge the hands to focus attention on gesture. Your notes should explain what the alteration communicates.
Do assessors need to see every measurement?
They need to see enough evidence to understand how you work. You don't have to cover every finished page with construction lines, but a sketchbook should include selected guides, comparisons, corrections, and reflections. A clean final drawing can sit beside a process page that reveals how you tested the structure.
Use arrows, small diagrams, and short annotations. Explain a decision in your own words. “I changed the shoulder angle after comparing it with the pelvis” gives more useful evidence than a long paragraph about practising proportion.
What should I do if a pose doesn't fit the standard system?
Treat the standard system as a reference point, not a target that overrides observation. Seated poses, cropped figures, foreshortened limbs, unusual camera angles, and wheelchair-based viewpoints all require you to select different visible landmarks.
Start with the parts you can measure confidently. Establish the head, main axis, supporting surface, ribcage, pelvis, and joints. Then compare the negative spaces and overlaps. If the model's full height isn't visible, don't invent the missing proportions. Record the limits of the reference and focus on the relationships that are present.
How can SEND learners prepare a strong portfolio?
Use an accessible setup that allows sustained observation and comfortable mark-making. A vertical easel, adapted tool, digital reference, alternative pacing, and audio or typed annotations can all help a learner document technical thinking. The final portfolio should show the student's decisions and development, not compliance with a single studio routine.
Ask tutors or course providers how they support adapted assessment before enrolment. A portfolio can communicate rigorous proportion work through drawings, photographs of stages, written reflections, or other agreed evidence.
What should I practise before applying to university?
Practise observation across different conditions rather than repeating one comfortable standing pose. Draw from live references where possible, photographs, clothed models, seated arrangements, and your own staged viewpoints. Review each page by asking which landmark was reliable, which assumption failed, and what you changed.
Then curate. Choose work that demonstrates a clear progression from measured construction to purposeful visual decisions. The Online College of Art & Design (OCAD) offers flexible, tutor-led art and design study, Level 2 and Level 3 pathways, foundation diplomas, portfolio workspace, and SEND-specific routes. Visit The Online College of Art & Design (OCAD) to explore courses and discuss how your human proportion drawing can support a university-ready portfolio.
Build your next sketchbook spread around one observed figure, one measured construction, and one developed response. Give yourself time to compare the landmarks, annotate the changes, and select the evidence that best represents your progress.